
 Nederlands
 Deutsch
 Français
First time using PancakeSwap? We’ve got you covered! Whether you’re on your desktop or mobile device, our comprehensive step-by-step tutorial will guide you through the entire process. Learn how to confidently purchase and securely store your $SHA tokens using the MetaMask app. From setting up your wallet to navigating the trading platform, this guide will help you every step of the way.
🔗 Community Links
$SHA Contract Address – verify SHA address via bscscan
MetaMask – install MetaMask (browser extension or mobile app)
PancakeSwap – Decentralized Exchange (DEX)
How to Purchase $SHA via PancakeSwap Using MetaMask (Desktop Edition)
Prior to using PancakeSwap, please keep in mind you:
- must install the MetaMask browser extension
- must hold a small amount of $BNB token to pay the fees (trade & network transaction fees)
- can use popular tokens such as $BNB, $BUSD or $USDT to swap for $SHA.
Quick links
Step 6. Connect to PancakeSwap
Step 9. Display $SHA in your wallet
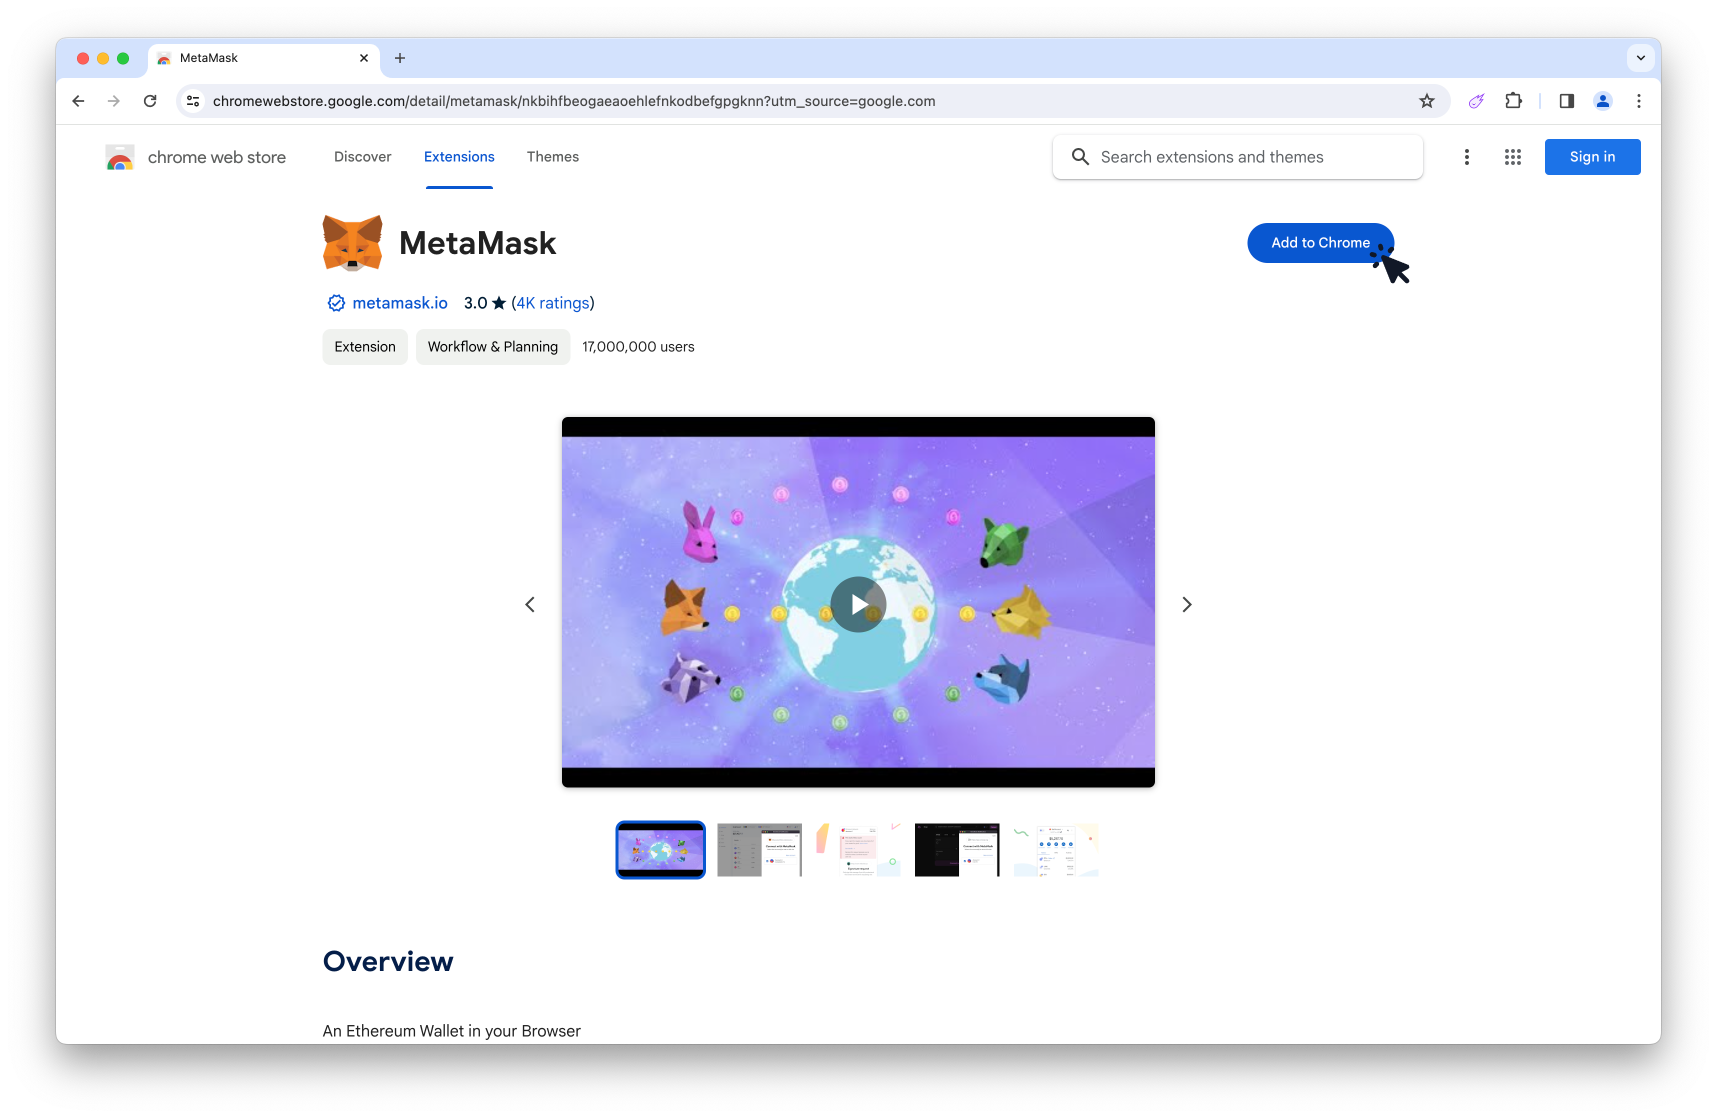
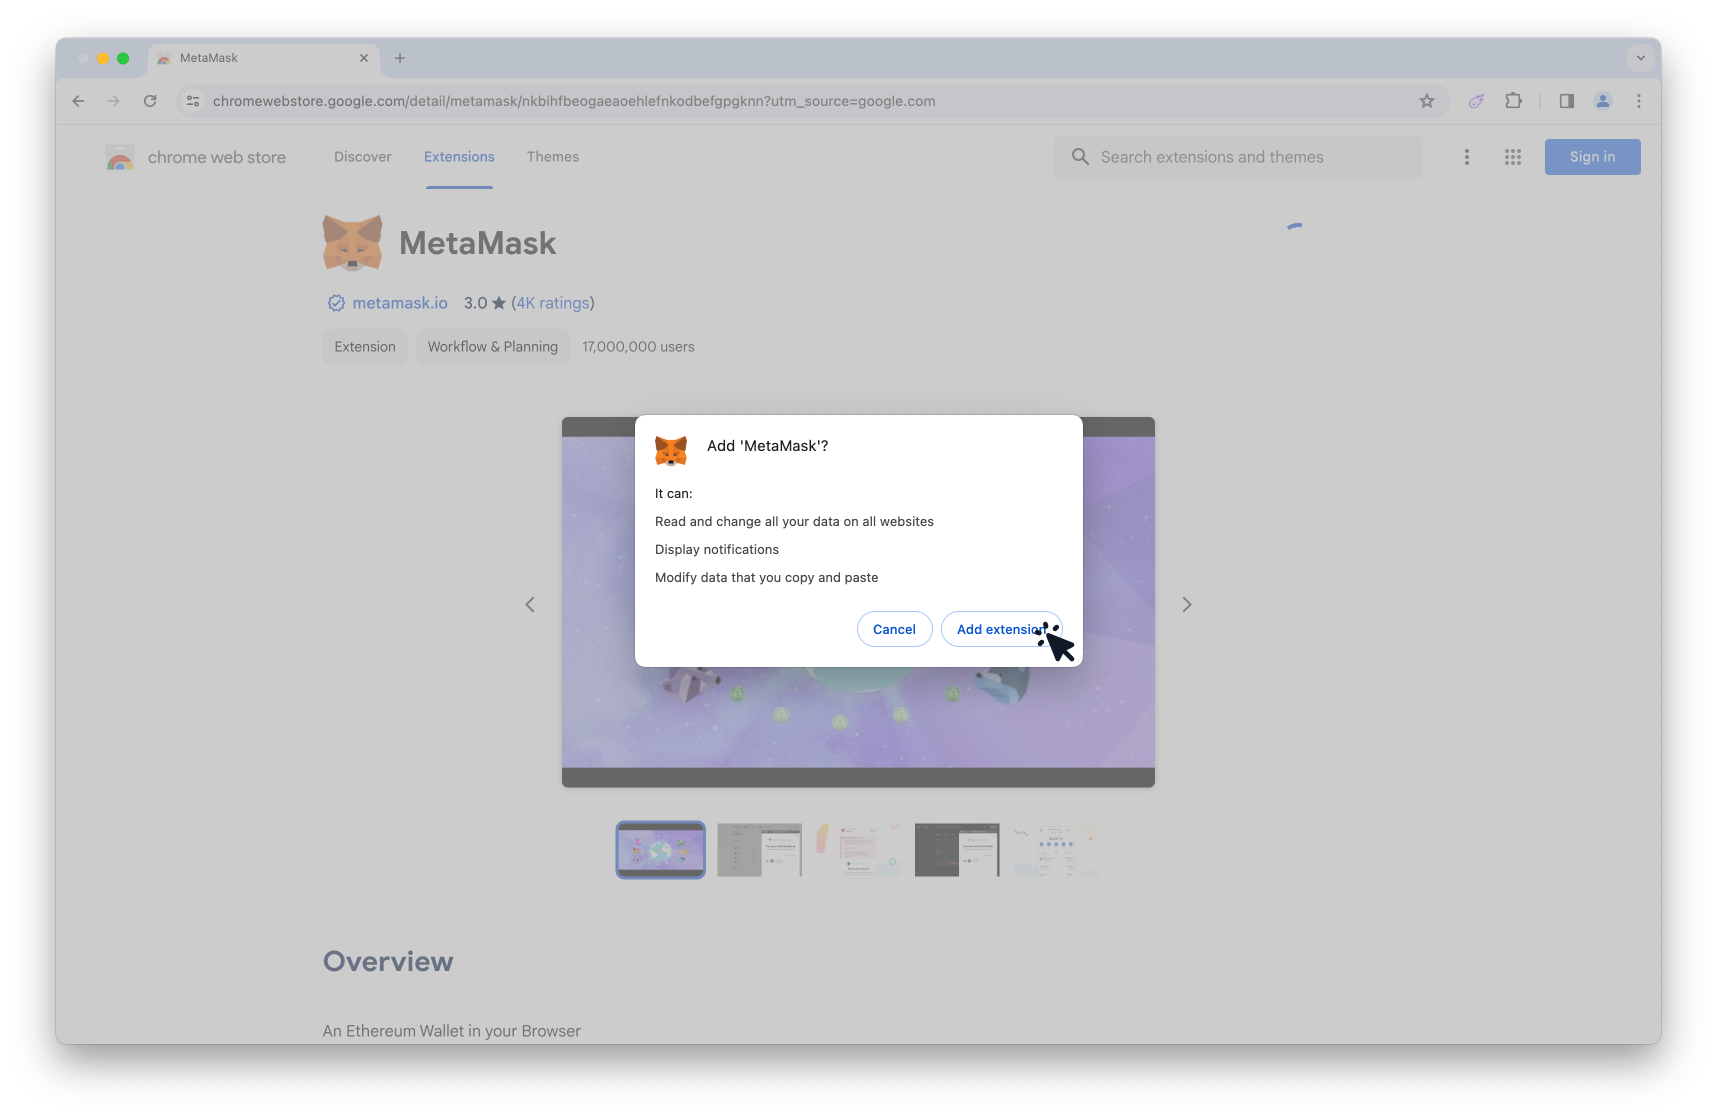
Step 1. Install MetaMask browser extension
- 1. Visit the MetaMask website and scroll down view the available supported browsers.

- 2. Click the browser icon that matches the browser you are currently using.

- 3. Click the Add to button.
- 4. When the popup appears, click Add extension.
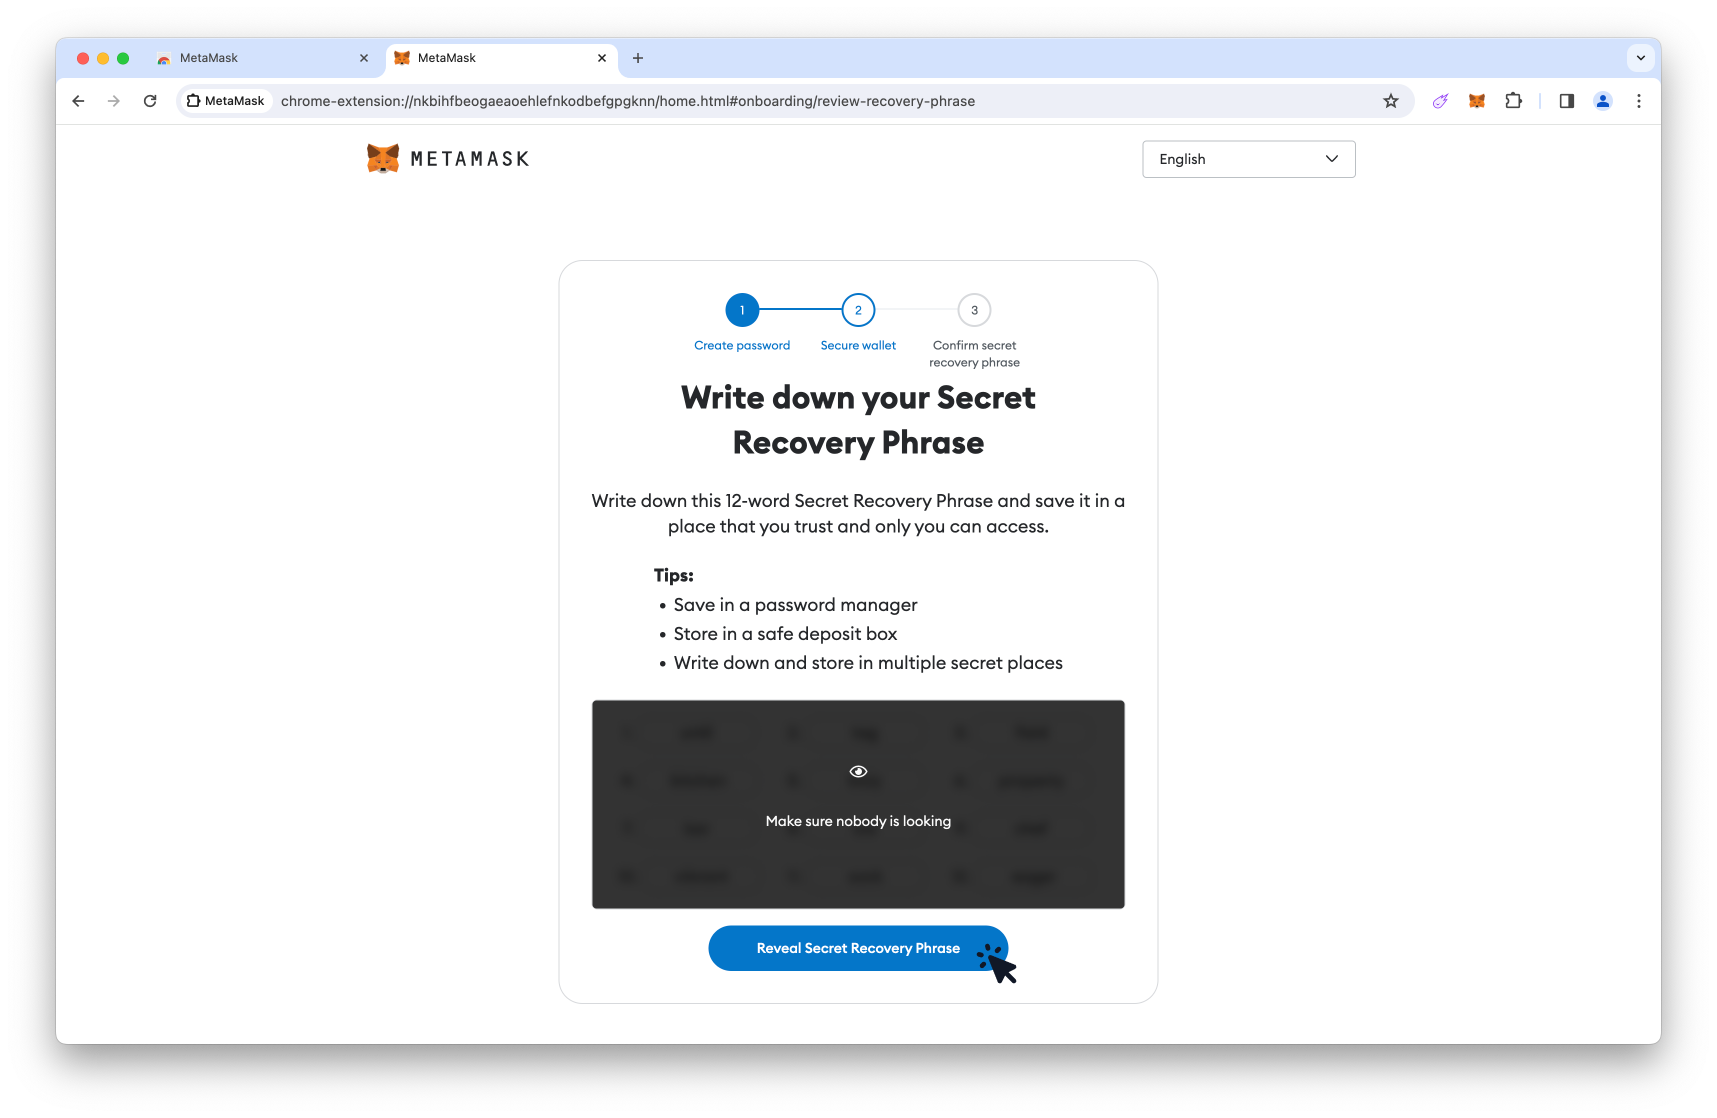
Step 2. Create your wallet
- 1. Select the checkbox to confirm that you agree to MetaMask’s Terms of use.

- 2. Click the Create a new wallet button
TIP: You can also choose to import a wallet if you have an existing seed phrase.

- 3. If you would like to share usage data with MetaMask click I agree, otherwise click No thanks.

- 4. Create and confirm a secure password
TIP: A secure password contains a mixture of upper/lowercase letters, numbers, symbols and is at least 16 characters long.

- 5. Once you have created and confirmed your password, select the checkbox to confirm acknowledgment that MetaMask can not recover your password.

- 6. Click the Create a new wallet button.

- 7. Click the Secure my wallet button.
TIP: This step is highly recommended as your Secret Recovery Phrase is required to import your wallet on another device/browser or if you forget your password.

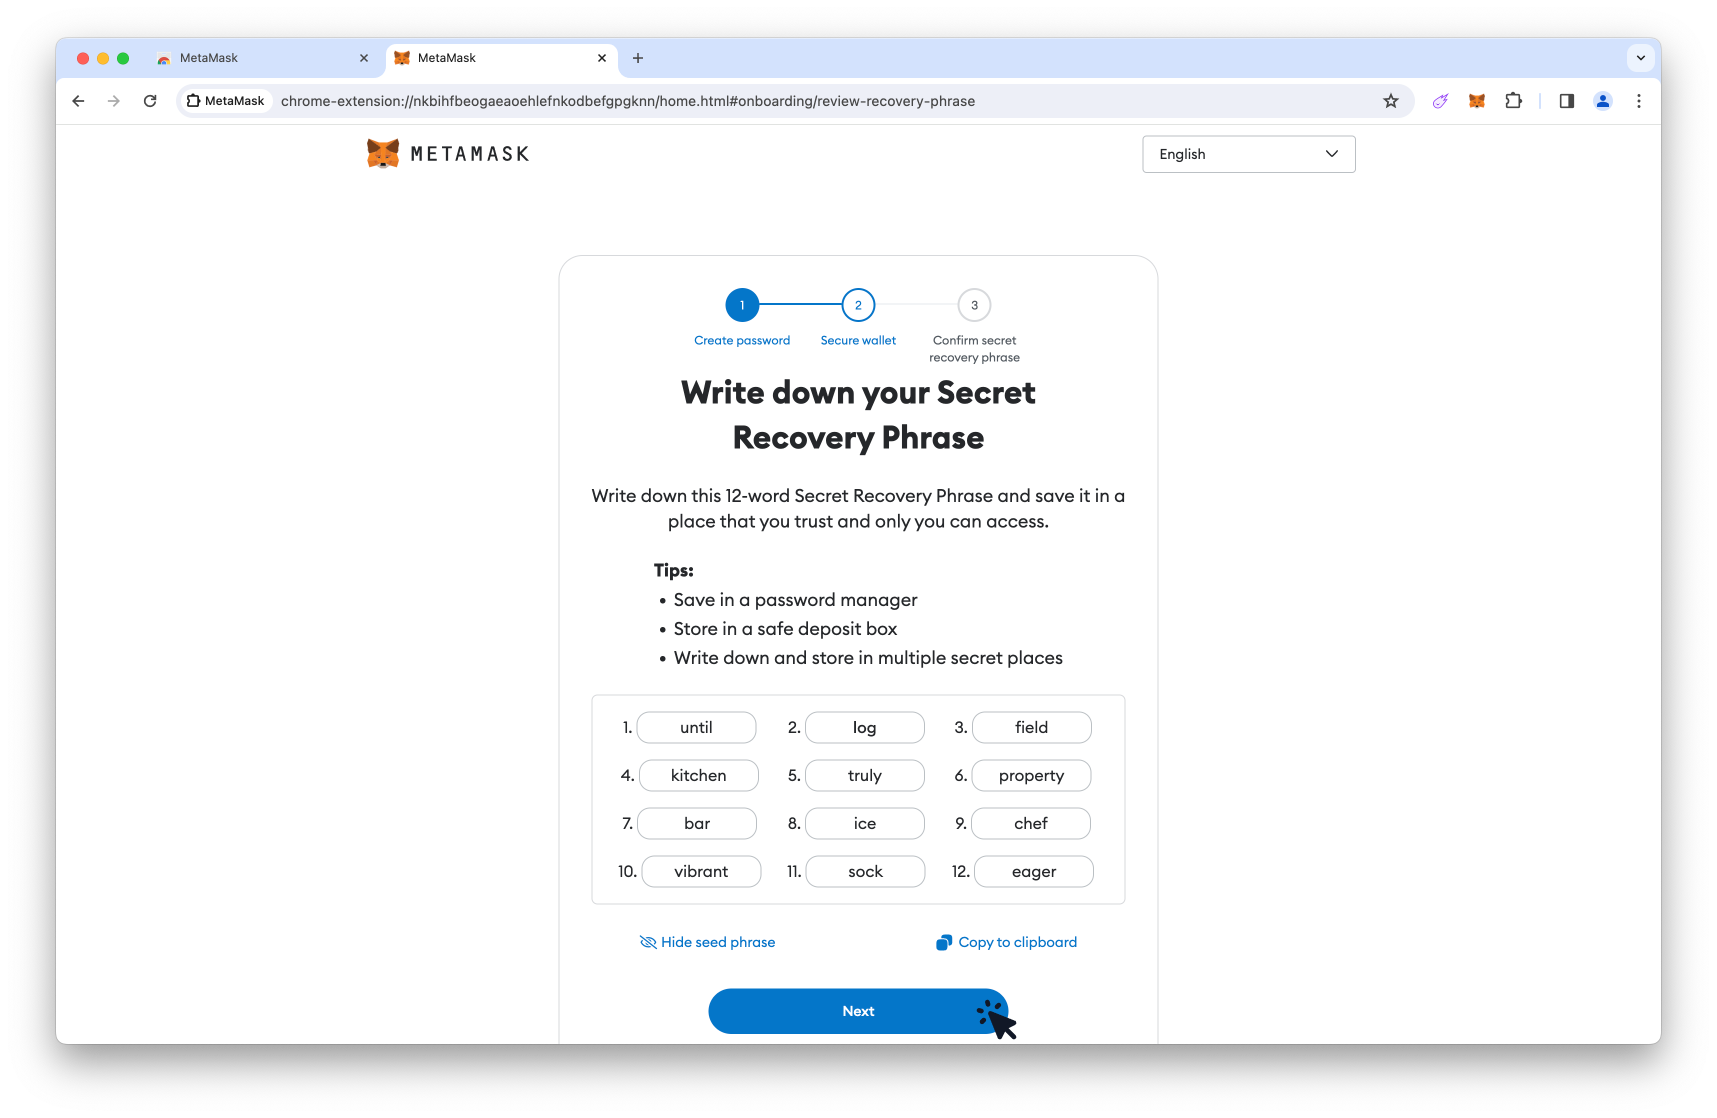
- 8. Click the Reveal Secret Recovery Phrase button.
TIP: Never share this Secret Recovery Phrase with anyone. If someone asks you to share your Secret Recovery Phrase they are attempting to scam you.
- 9. Securely store your Secret Recovery Phrase.
TIP: Remember to carefully check the spelling and order of the words in your recovery phrase.
🔒 Get the ultimate peace of mind by creating a protection plan with Inheriti® to securely store your sensitive data.
- 10. Click the Next button.
- 11. Fill in the missing words of your recovery phrase.
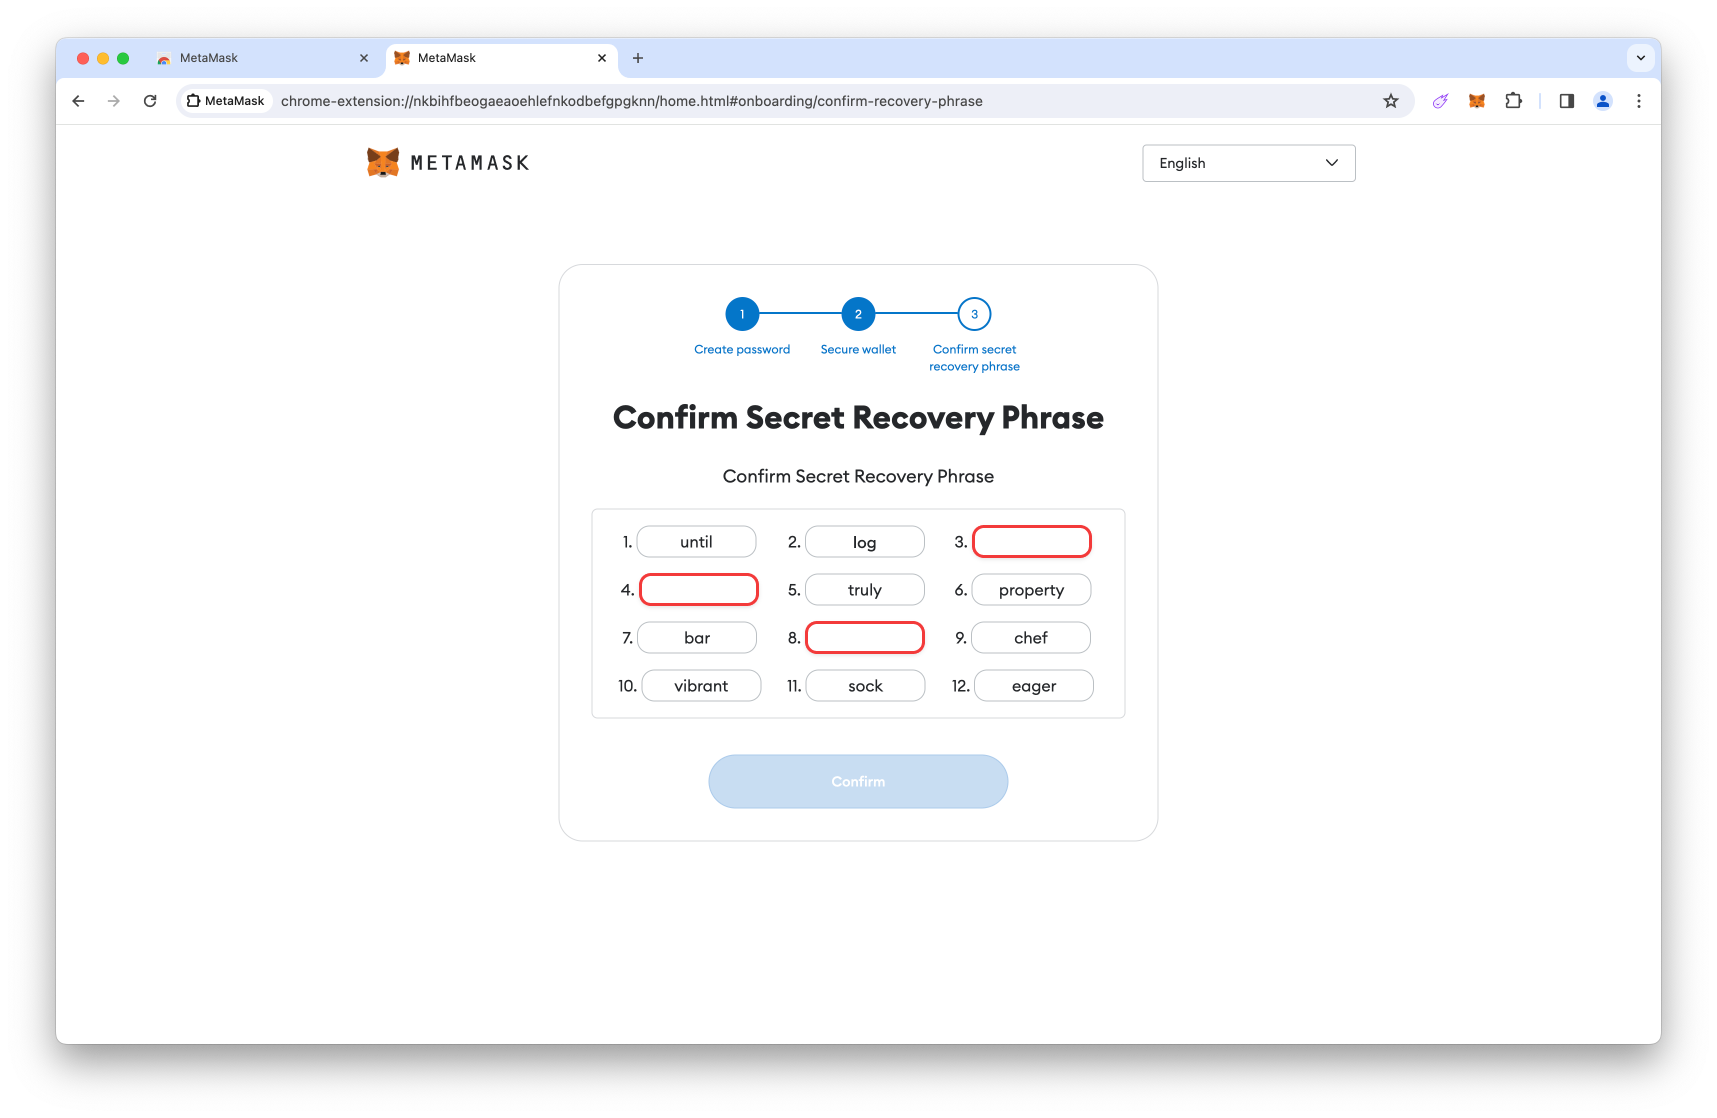
- 12. After carefully checking your words, click the Confirm button.

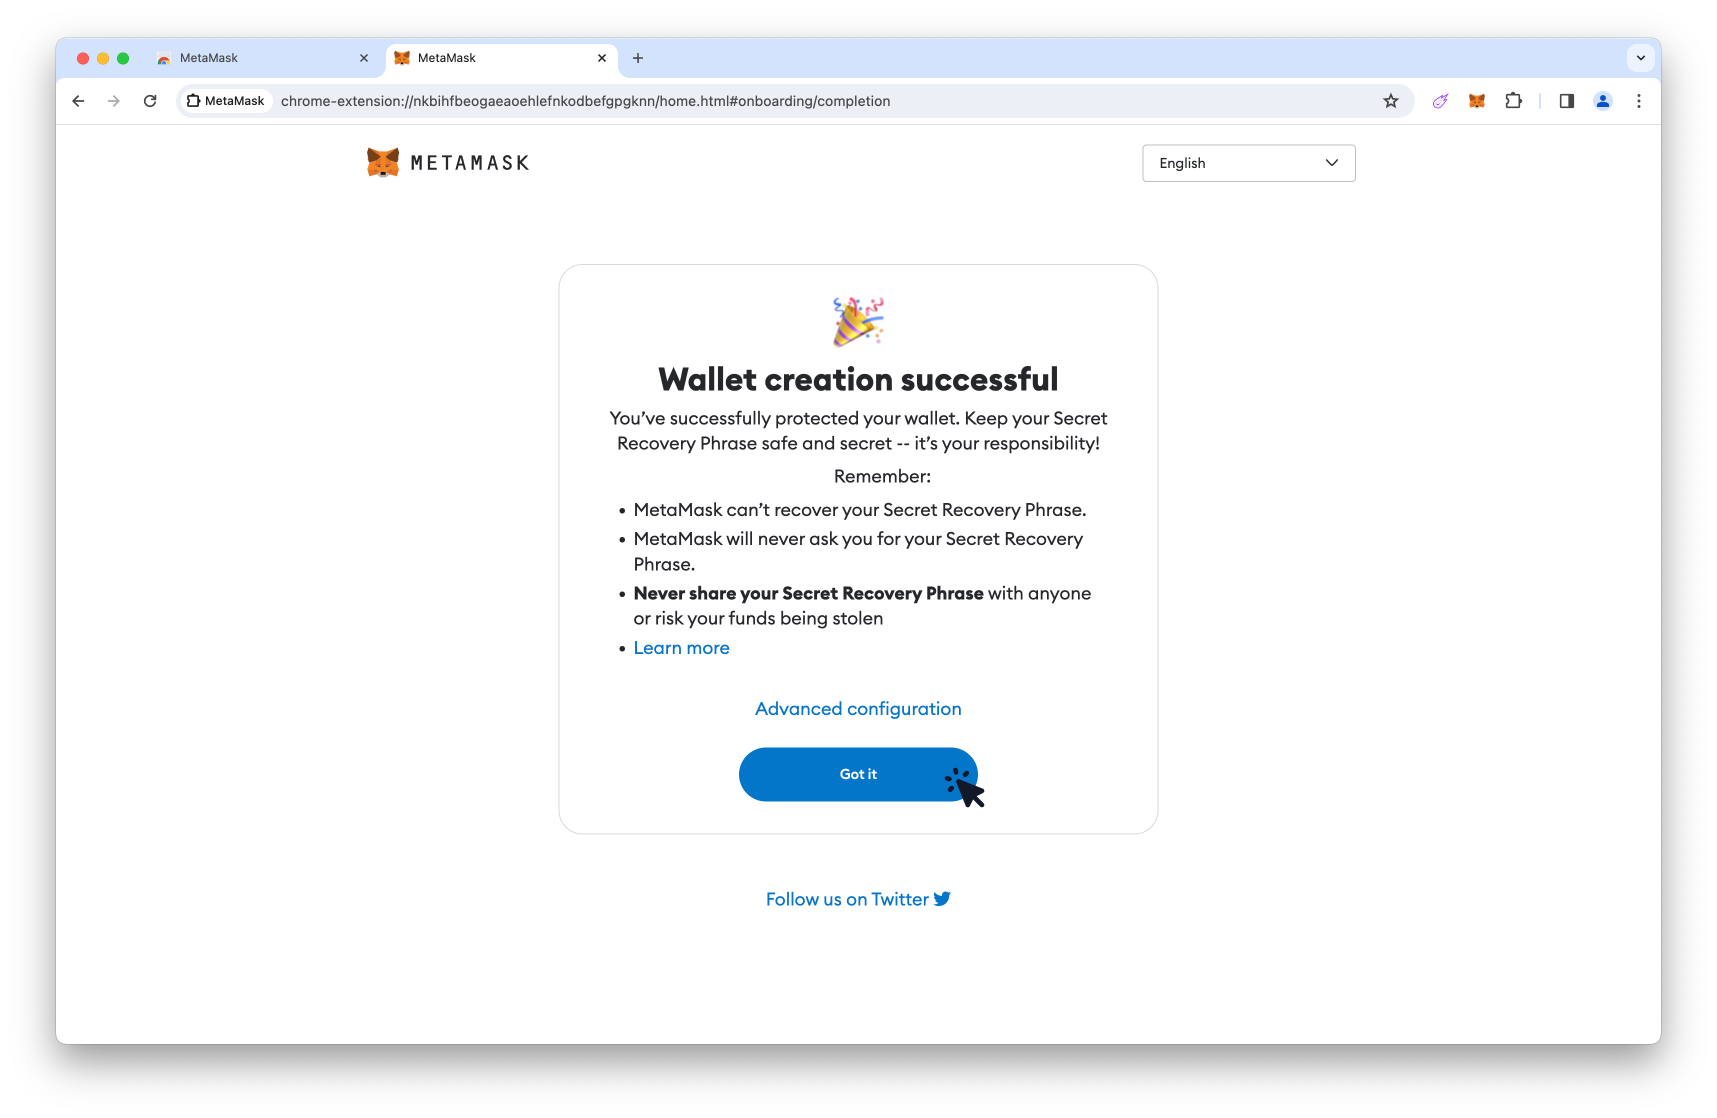
- 13. After reading MetaMask’s safety tips, click the Got it button.

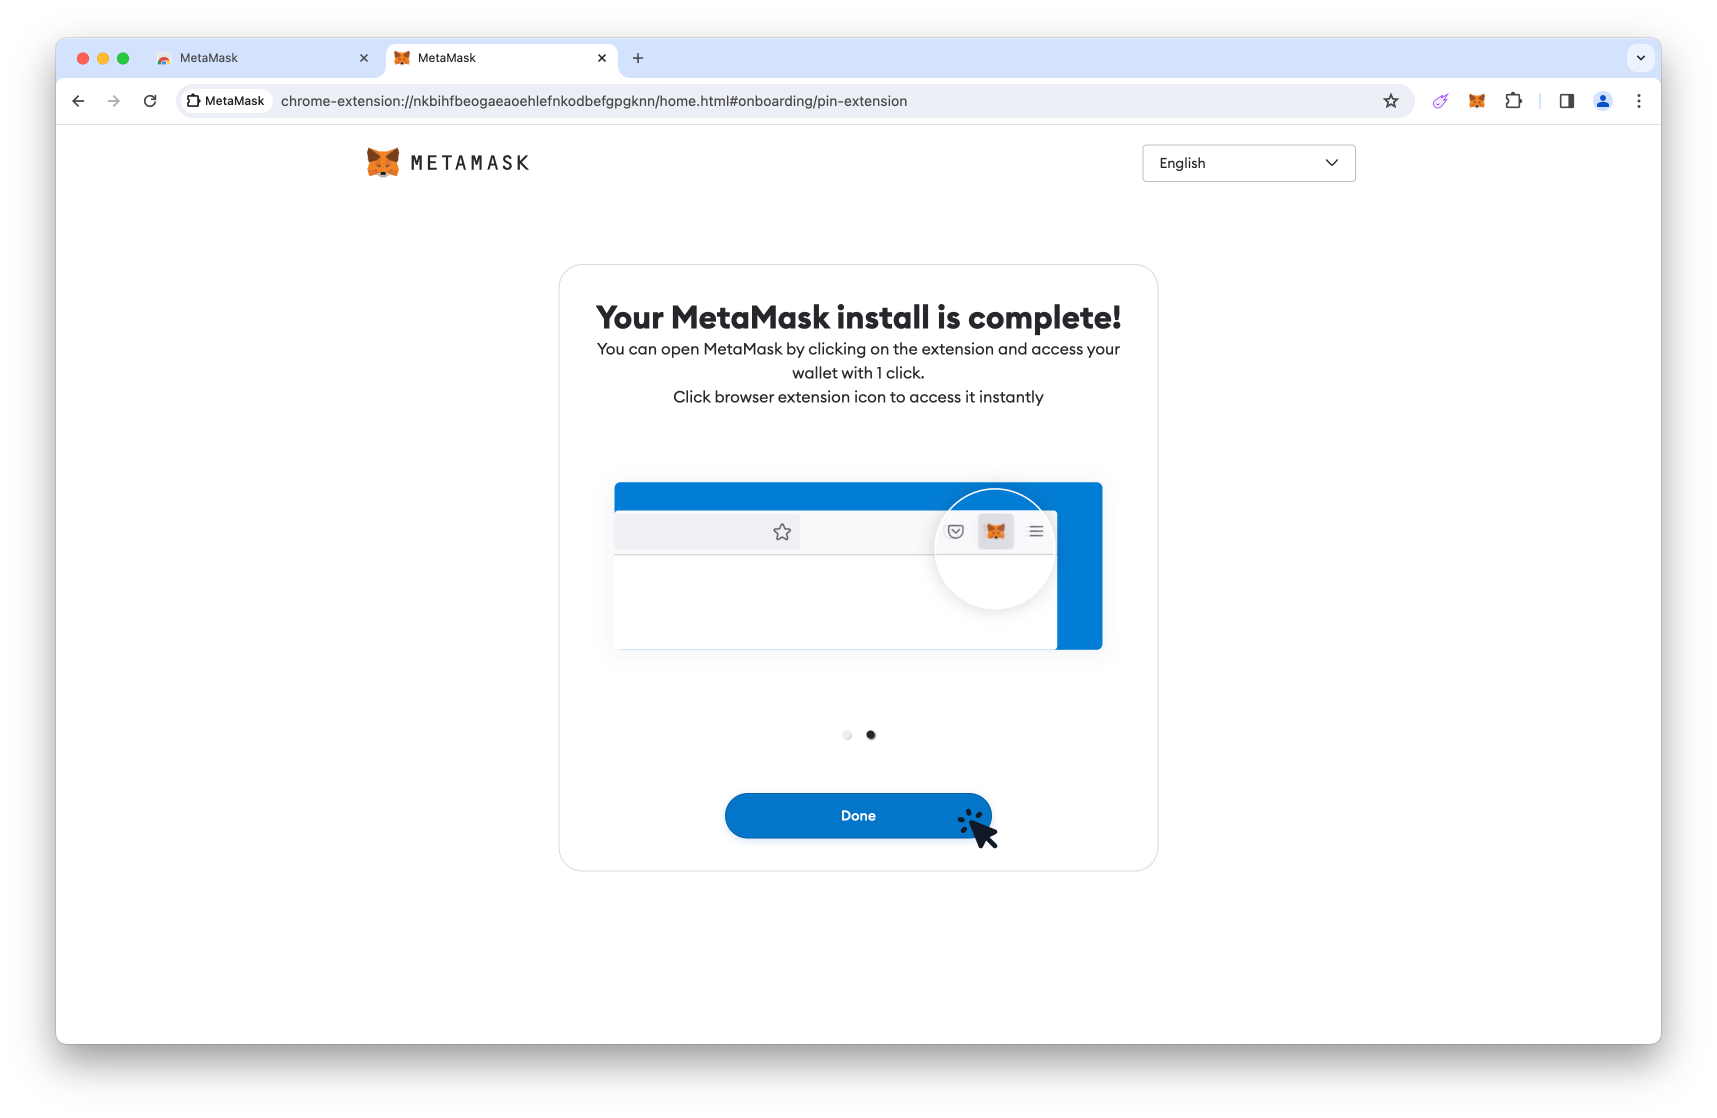
- 14. (Optional) Follow the on screen steps to Pin MetaMask on your browser so it’s easily accessible.

- 15. Click the Next button.
- 16. Click the Done button.
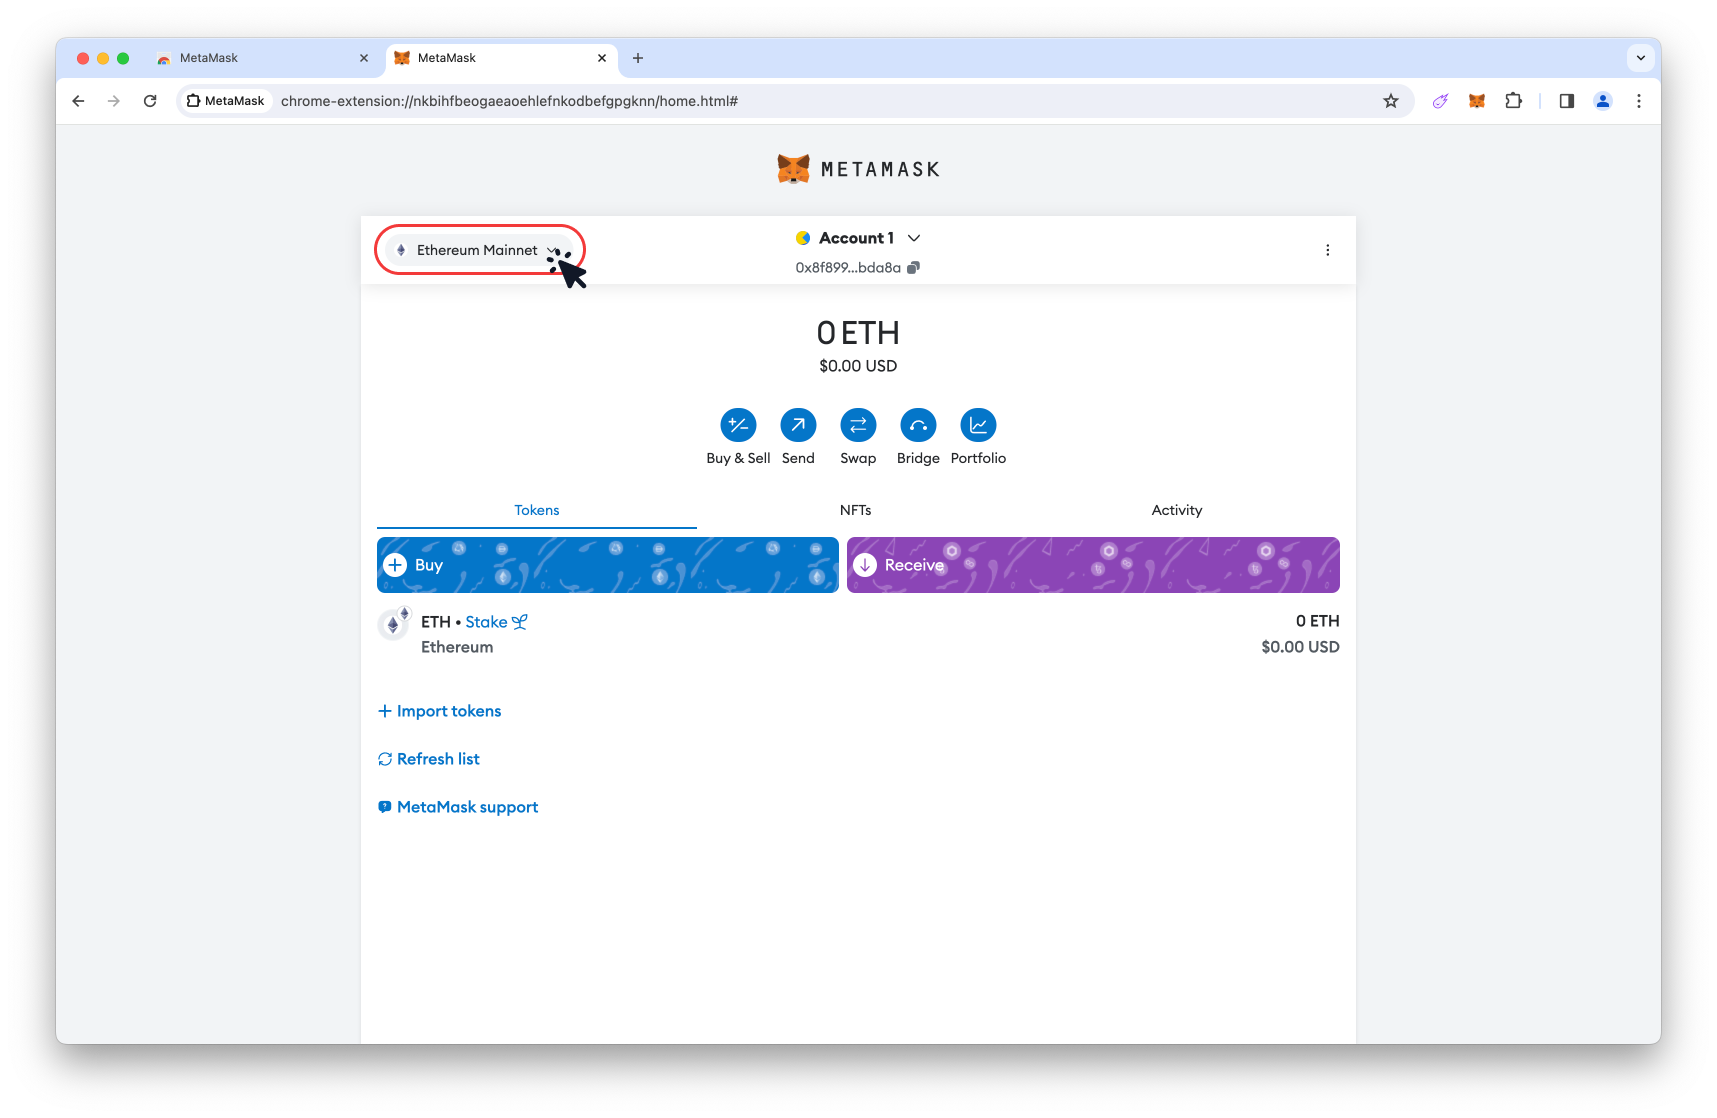
Step 3. Add BNB Chain network
To connect with PancakeSwap, your MetaMask wallet will need to have BNB Chain network active.
- 1. Click the network selector dropdown.
- 2. Click the + Add Network button.
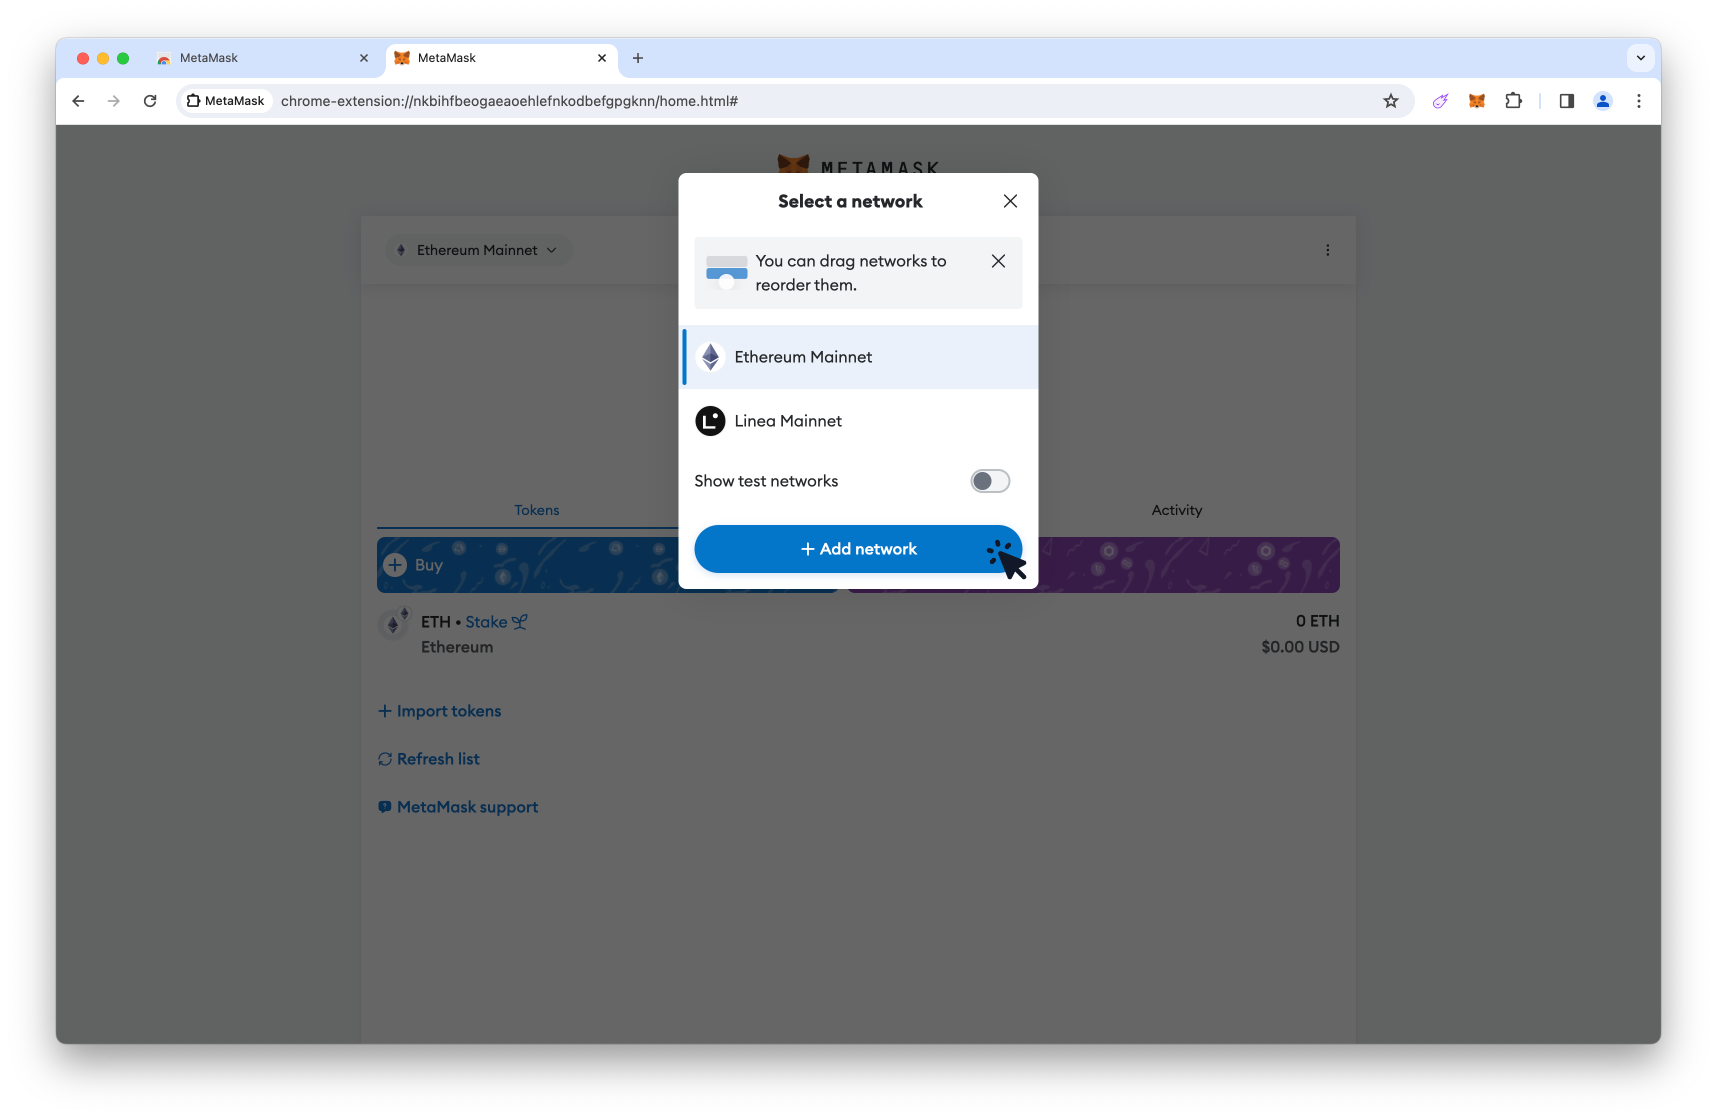
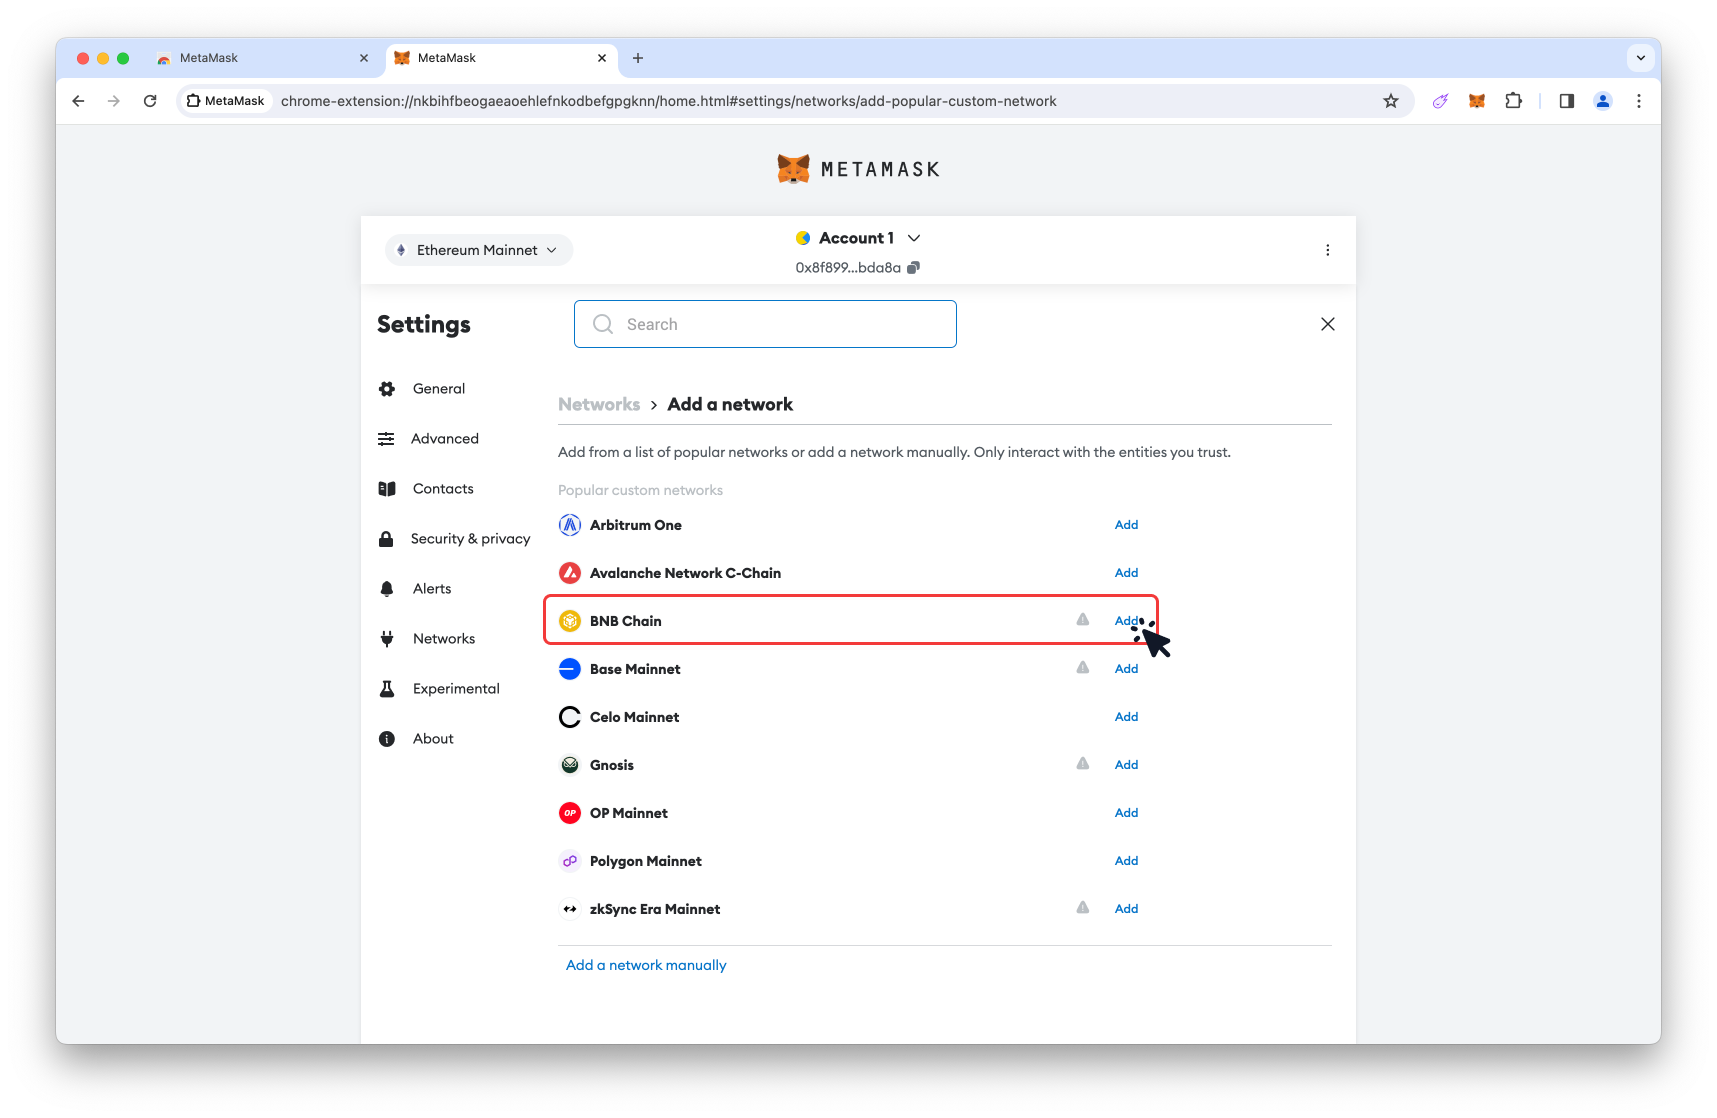
- 3. Locate BNB Chain within the list and click Add.
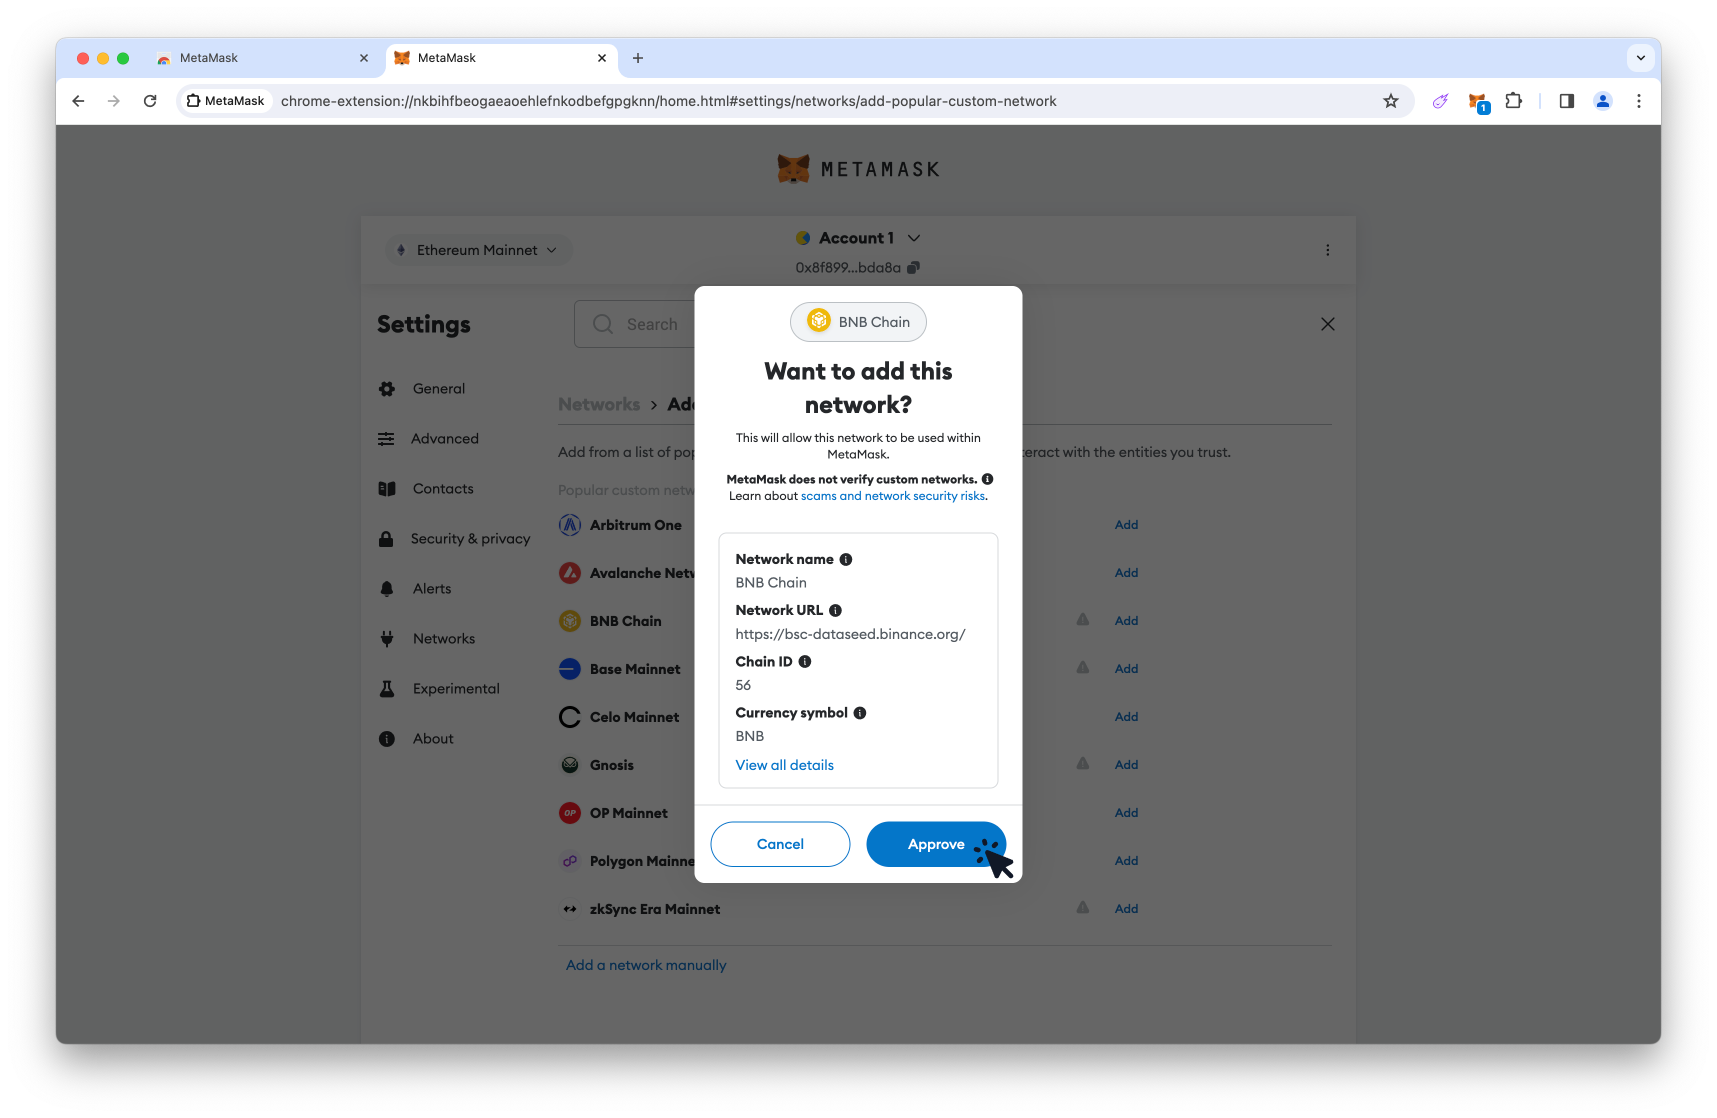
TIP: BNB Chain is also known as BNB Smart Chain and was rebranded from Binance Smart Chain (BSC) in 2022.
- 4. Click the Approve button.
- 5. Click the Switch to BNB Chain button.
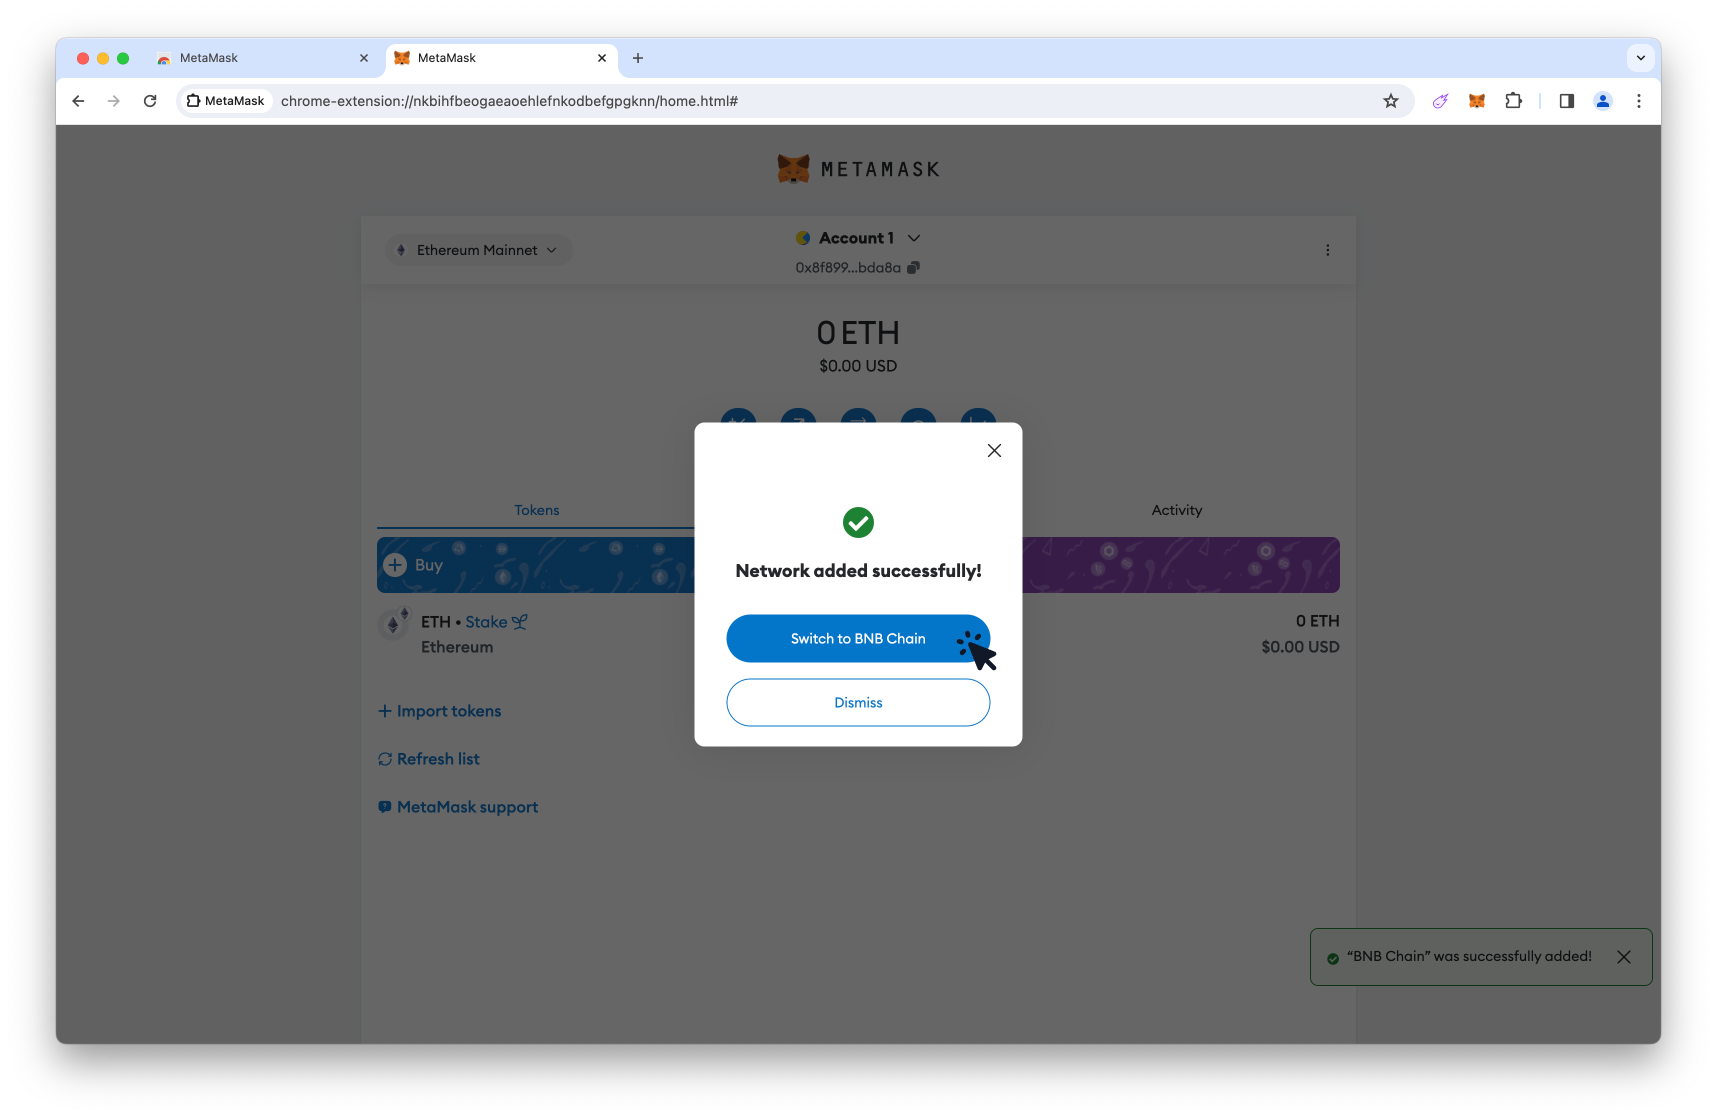
- 6. Read the tips on screen and then click the Got it button.

Step 4. Purchase $BNB and swap asset
Your MetaMask wallet will need a small amount of $BNB token to pay for the trading and transaction fees (similar to needing $VTHO when transacting on vechain network).
Also, you will need to purchase the asset you want to swap for $SHA. You may choose to use $BNB, $BUSD or $USDT.
TIP: Using $BNB as your asset for swapping will result in fewer purchases and transfers as $BNB can pay the fees and be swapped for $SHA.
Option 1. Purchase via MetaMask
⚠️ Important – purchasing tokens via the MetaMask extension offers convenience to eligible users, but the rates and fees are not as favorable compared to purchasing via a centralized exchange (CEX).
- 1. Click the Buy button.

- 2. After reading the available information, click the Get started button.

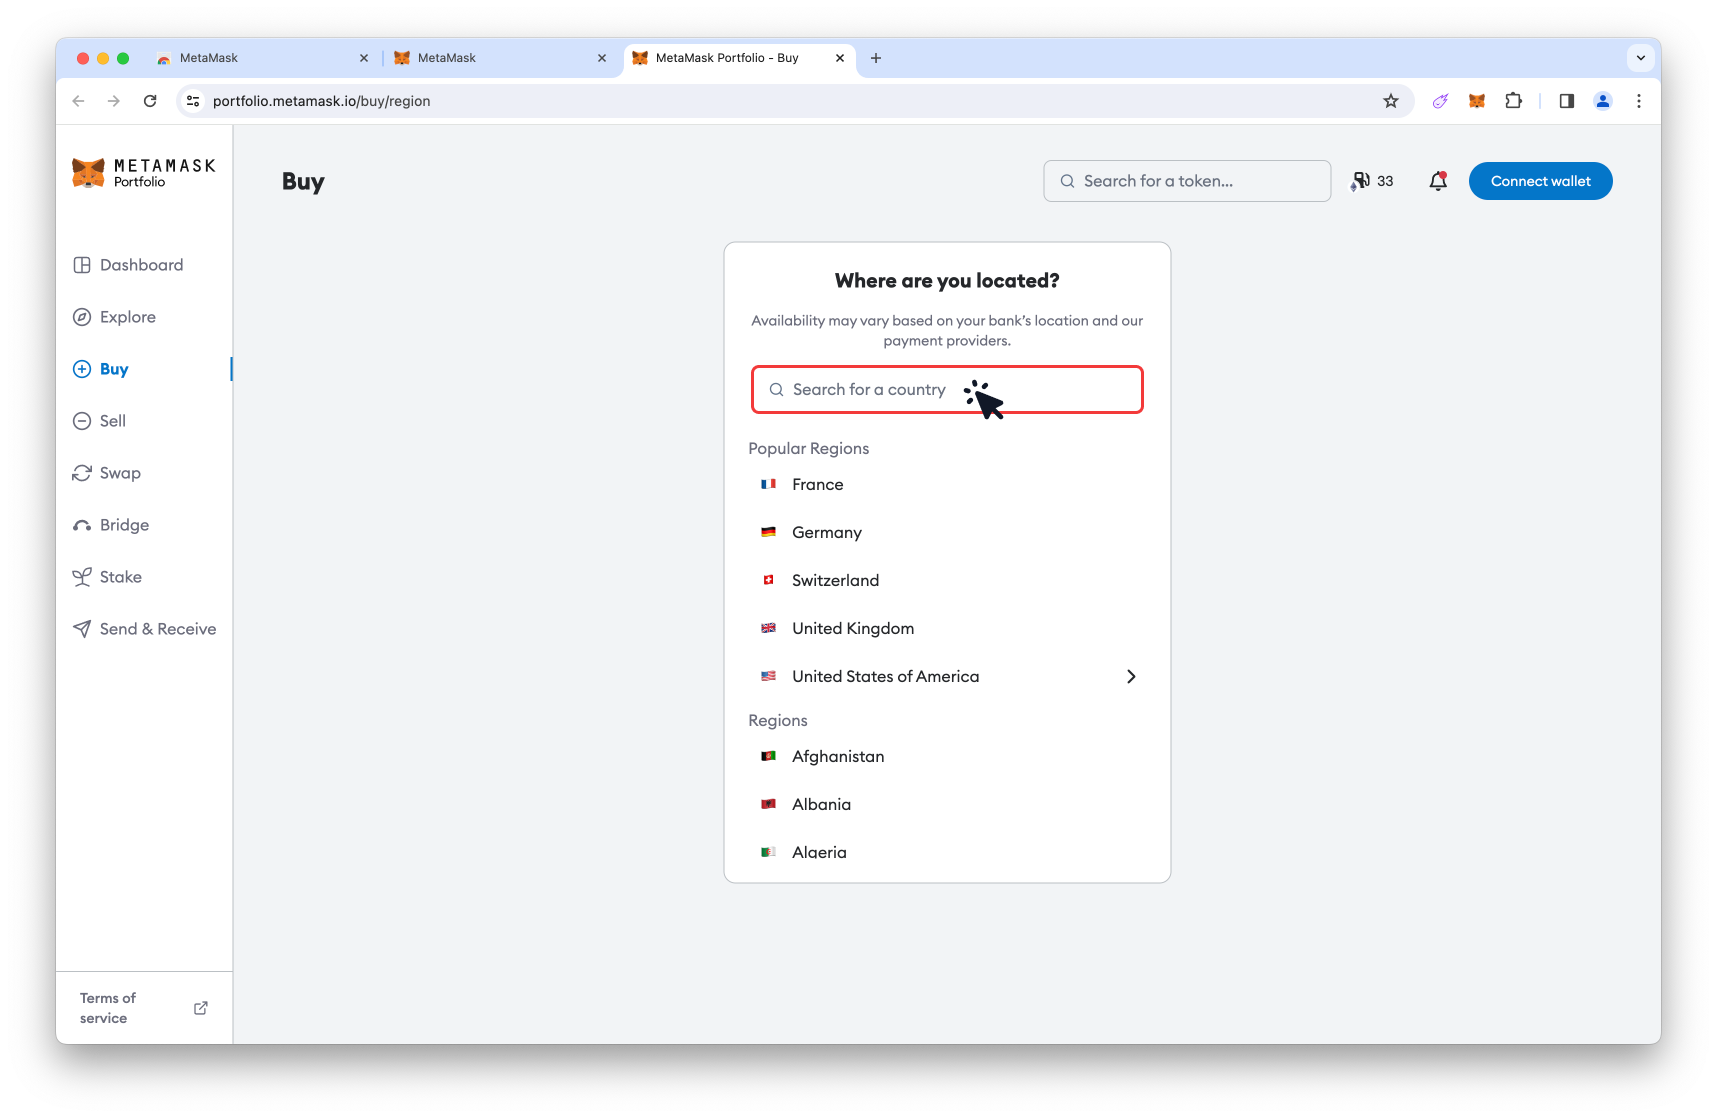
- 3. Select your location to check if you’re eligible to use the service.
- 4. Choose your preferred payment method from the available options.
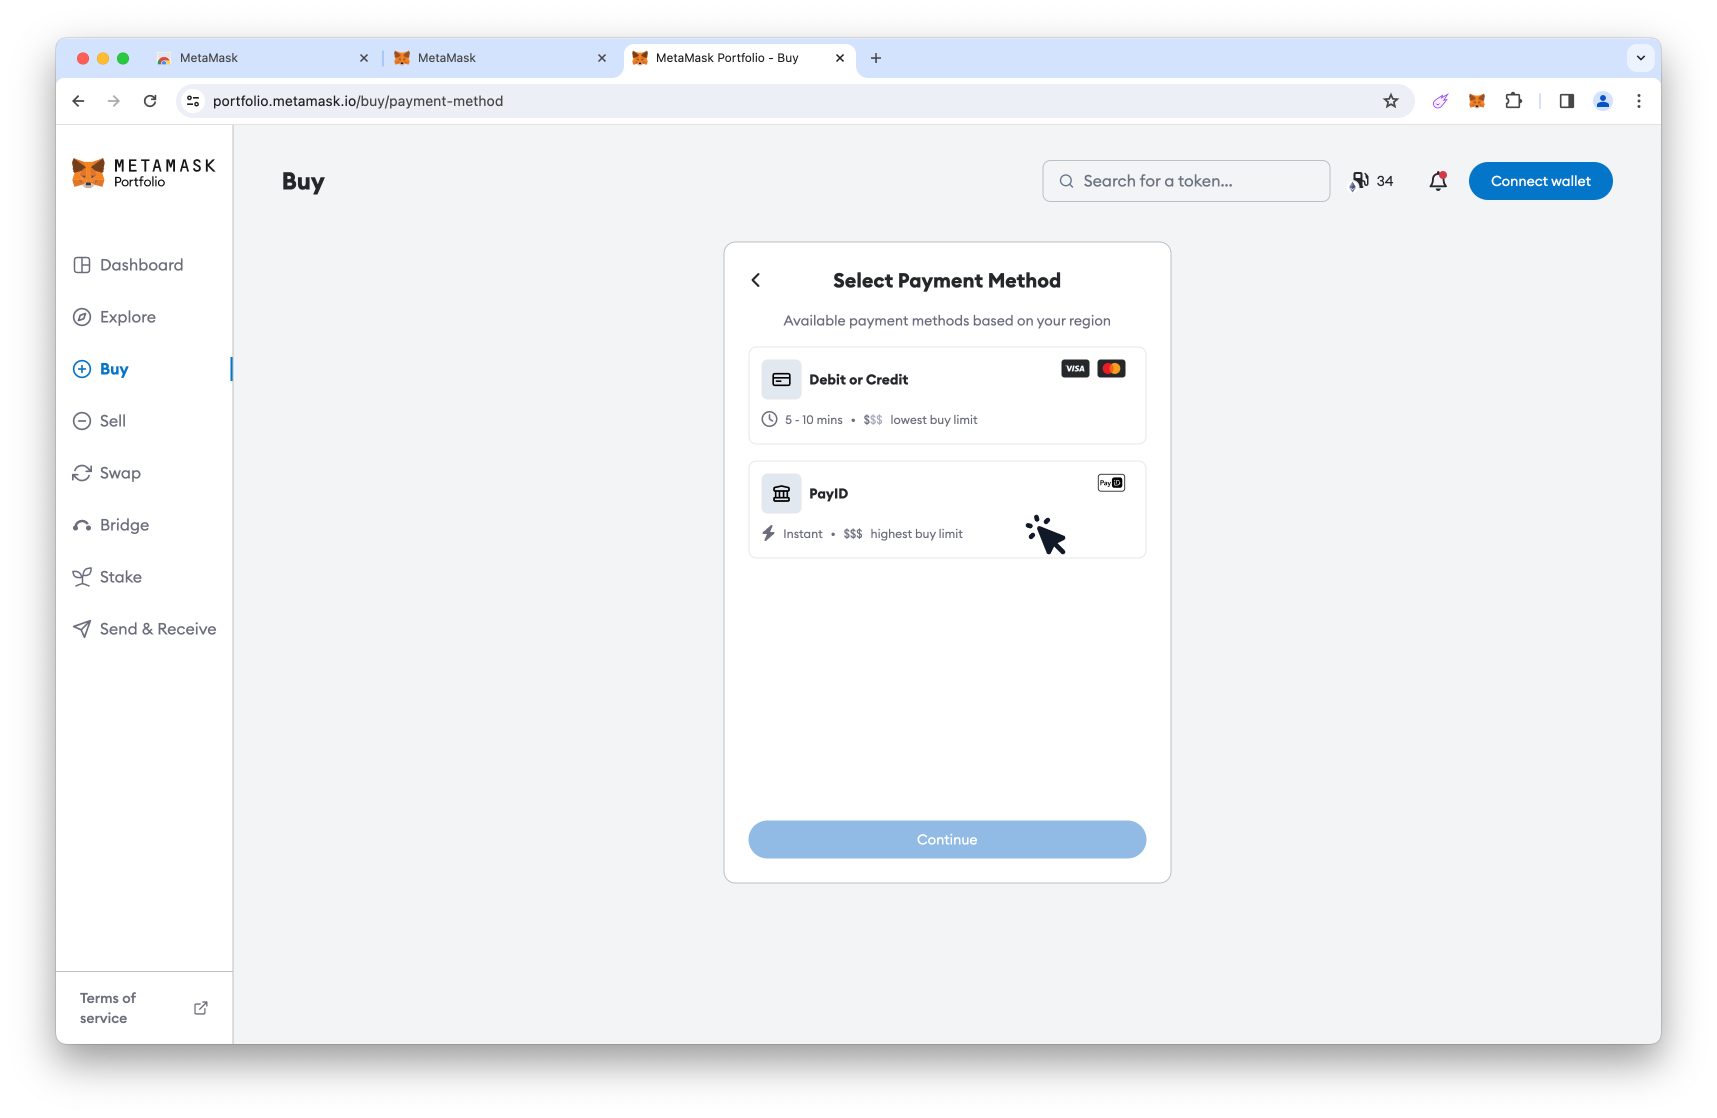
- 5. Click the Continue button.

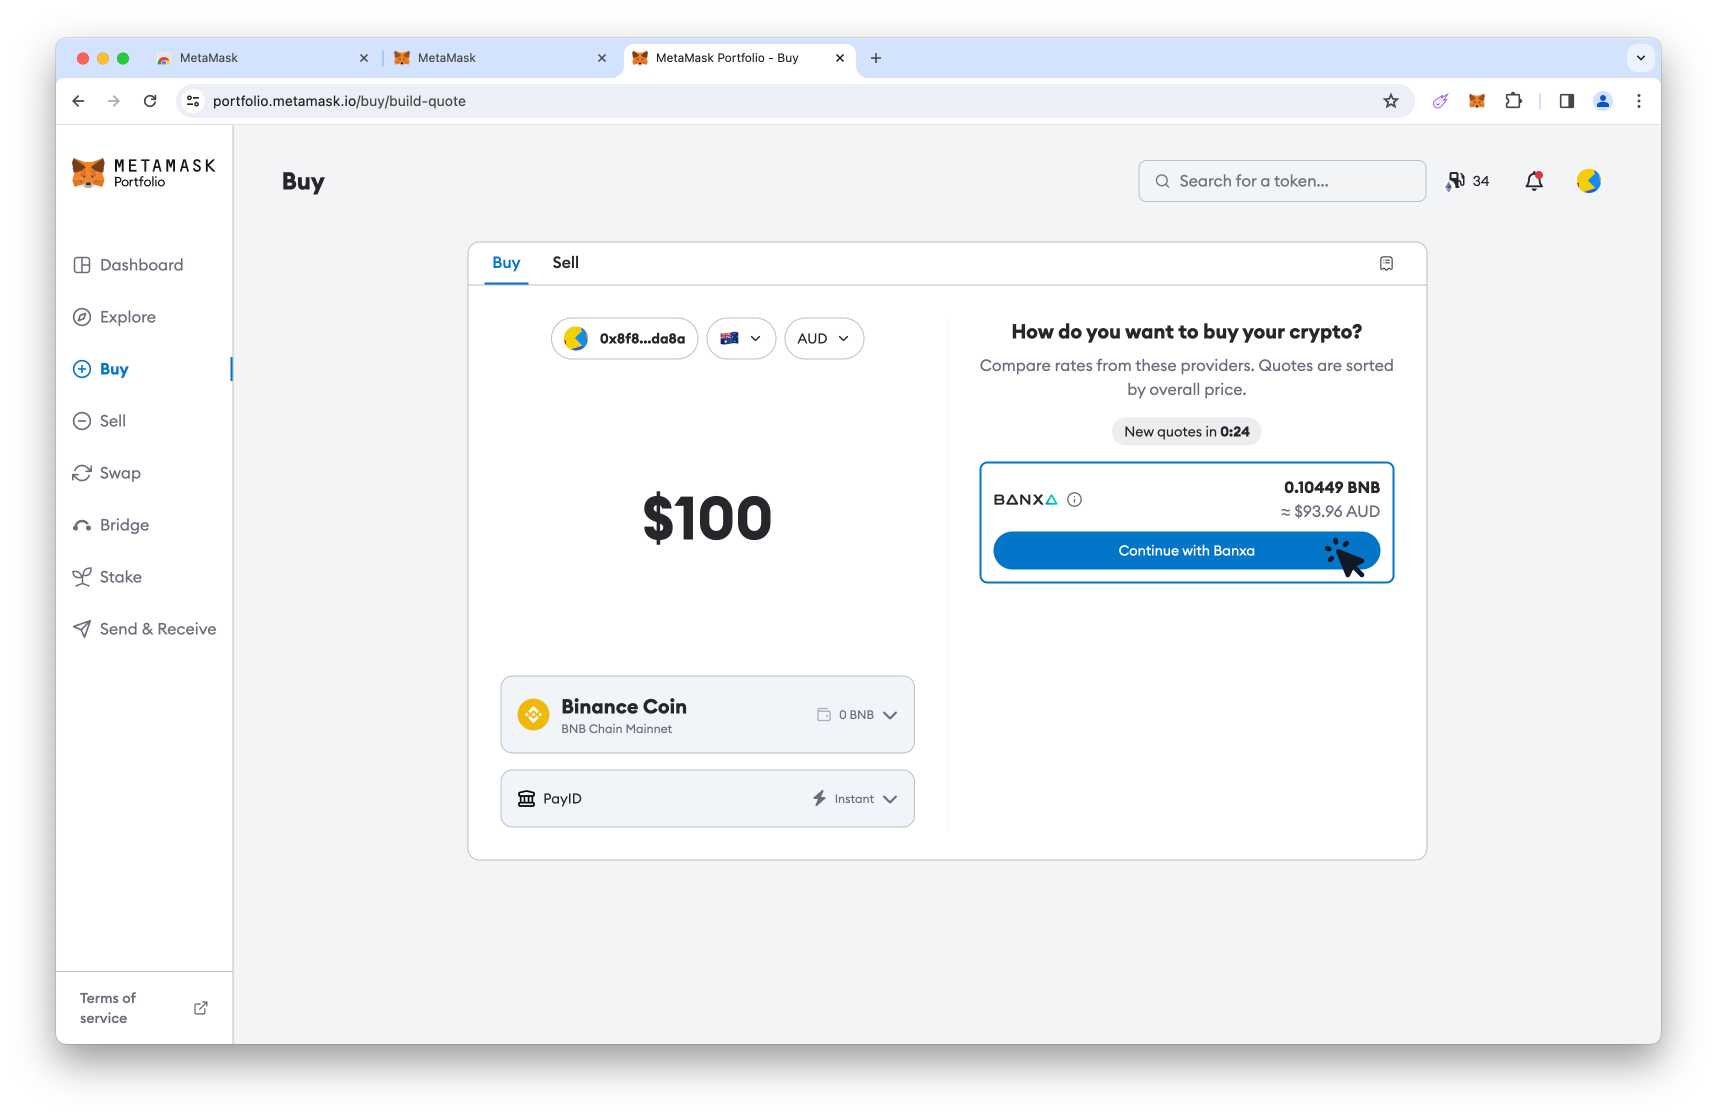
- 6. Click on the asset selector.
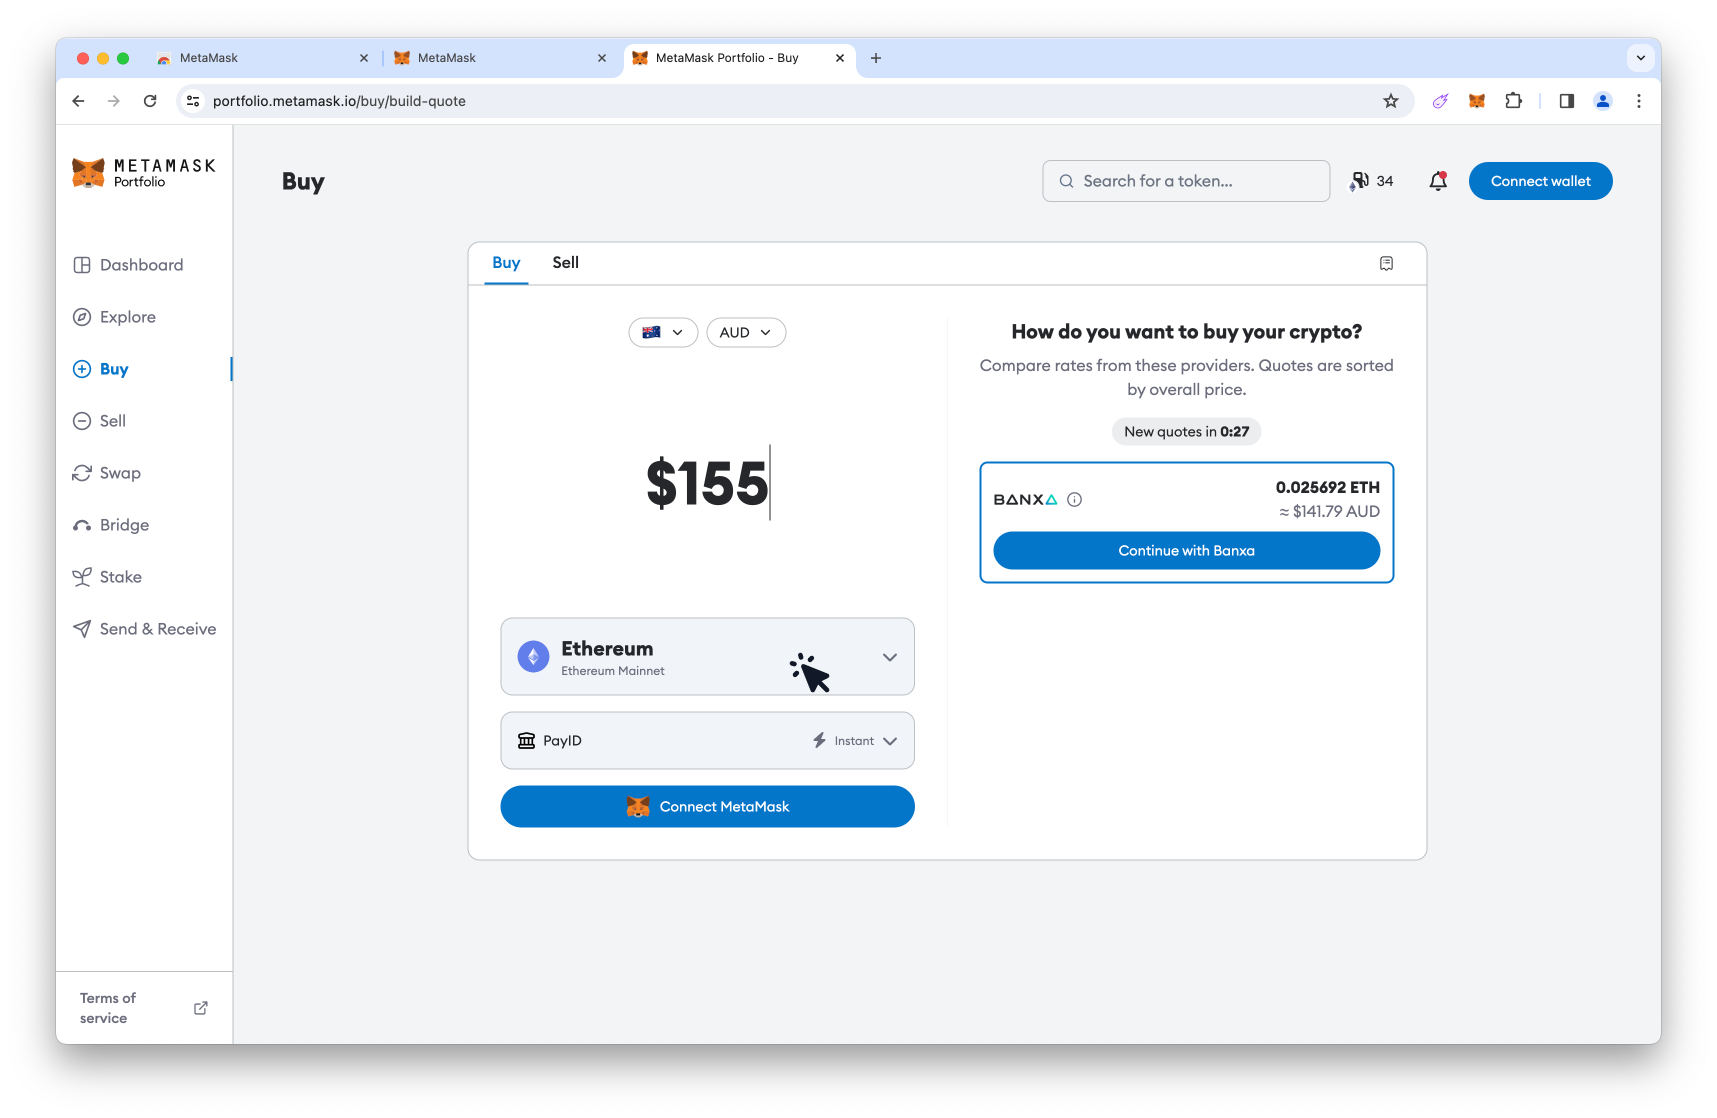
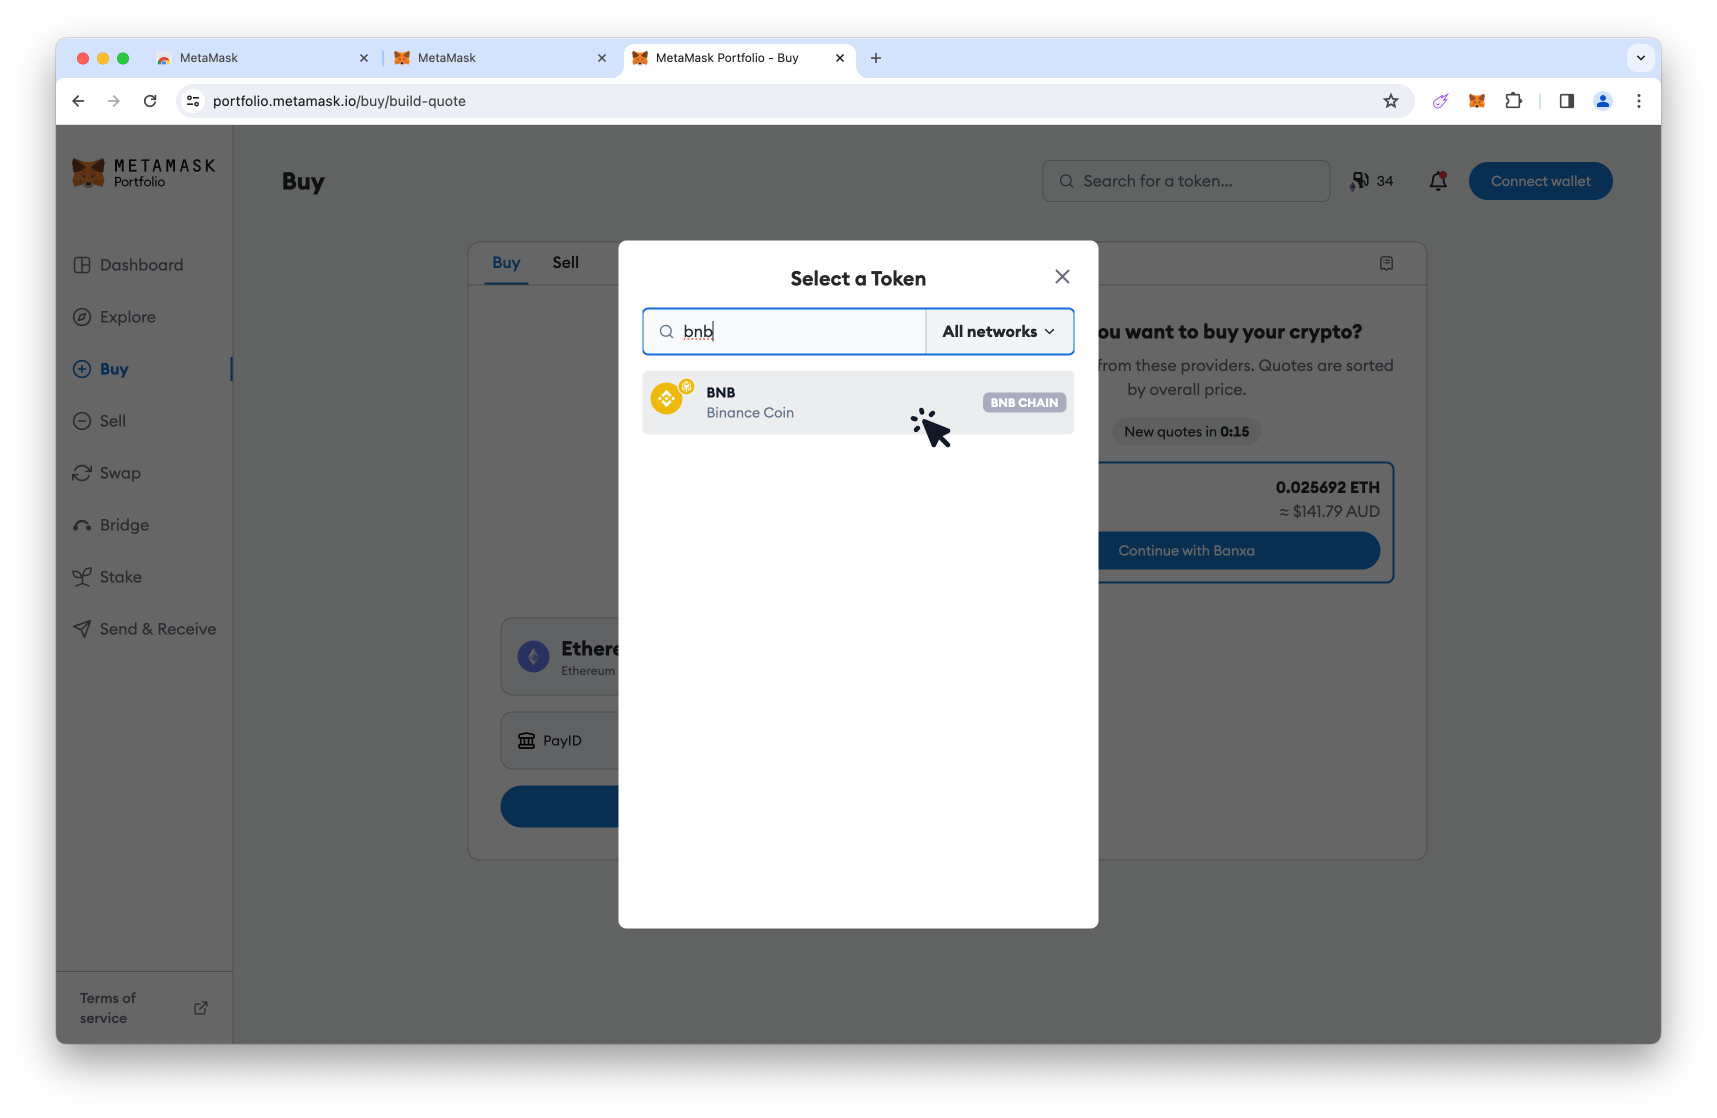
- 7. Click the input field and type BNB.
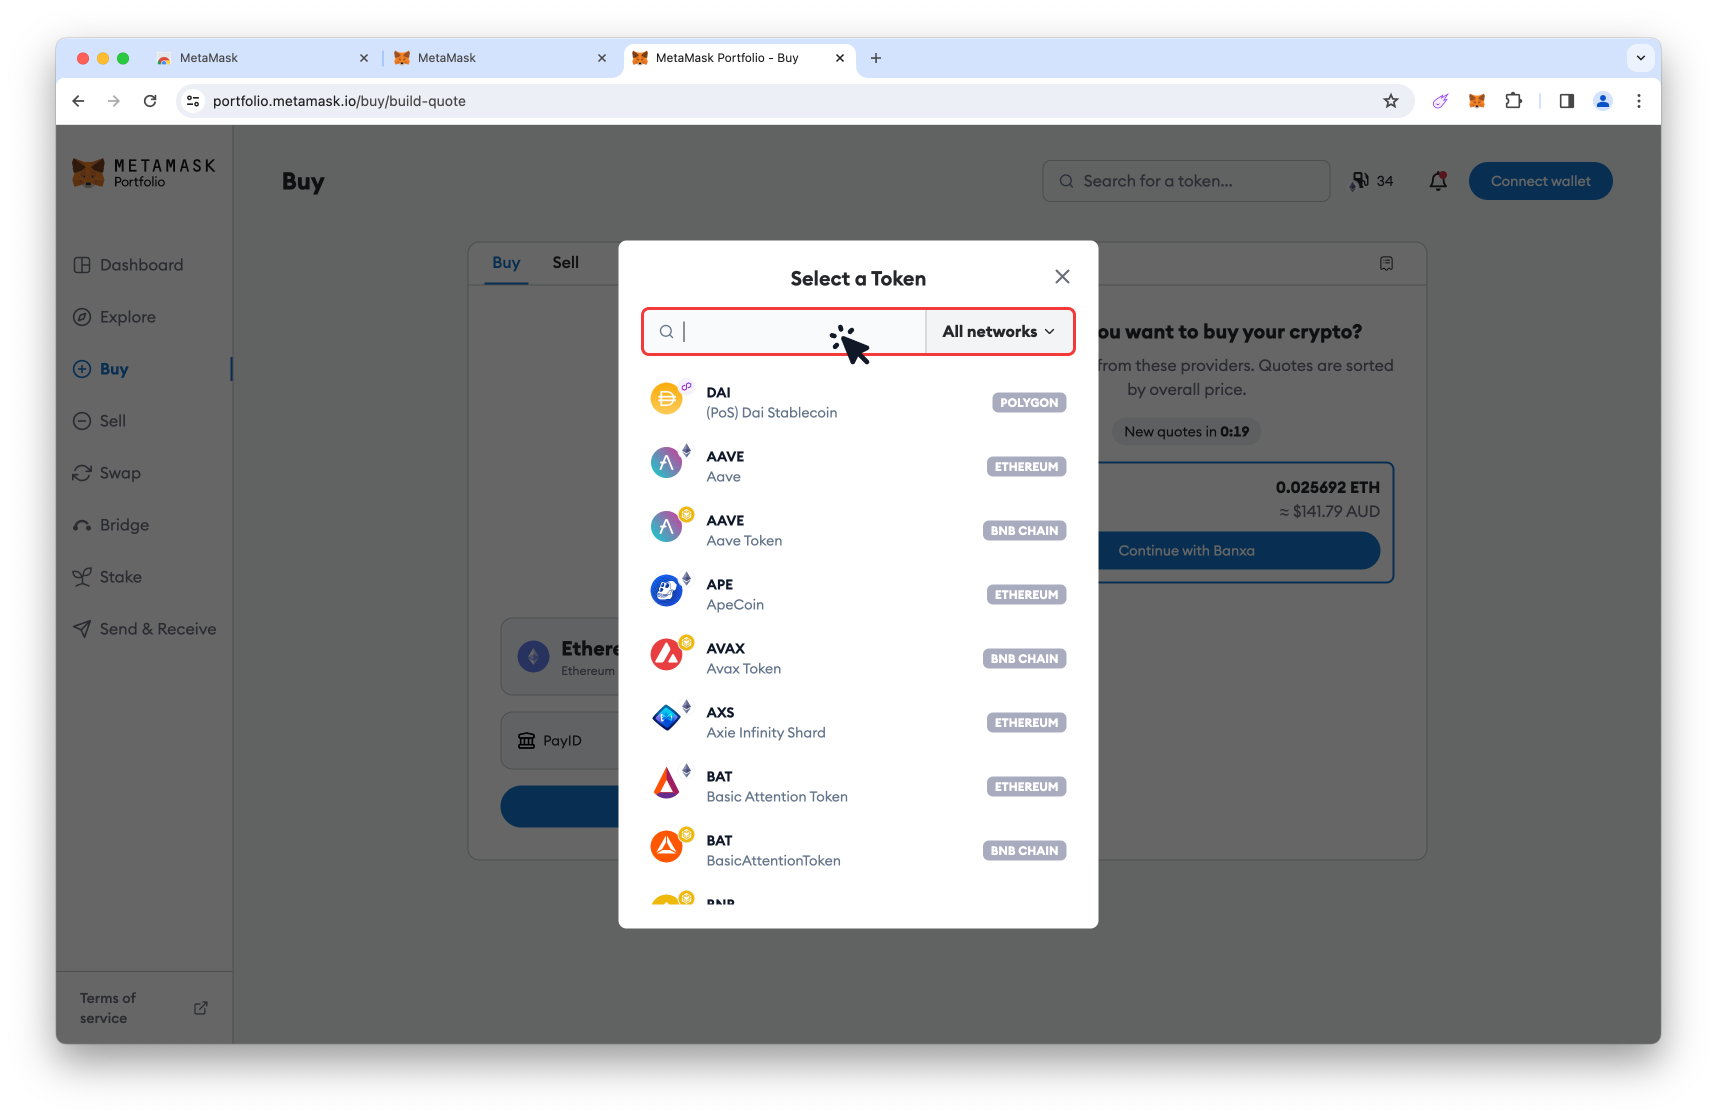
- 8. Click BNB Binance Coin.
TIP: Notice the network displayed on the right side is BNB Chain.
- 9. Click the dollar value and type how much you want to purchase.
TIP: On the right side you will see how much you will receive after the provider’s fee is removed.
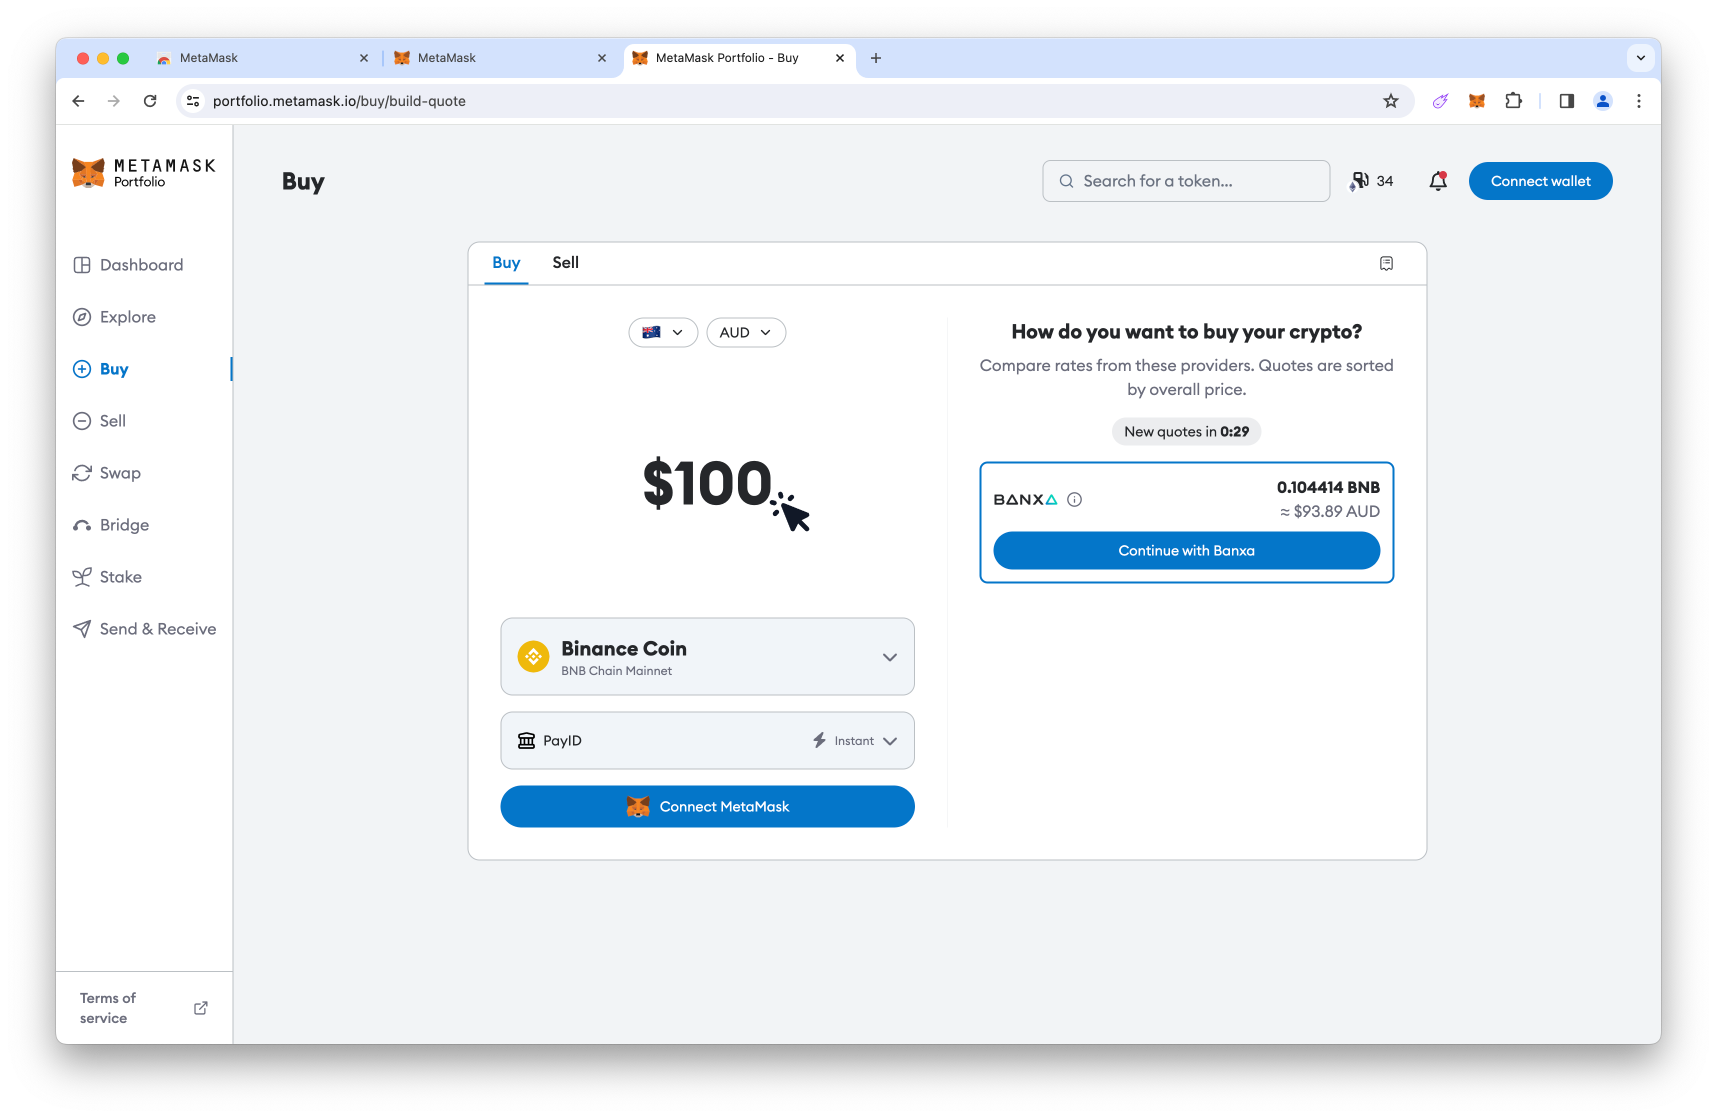
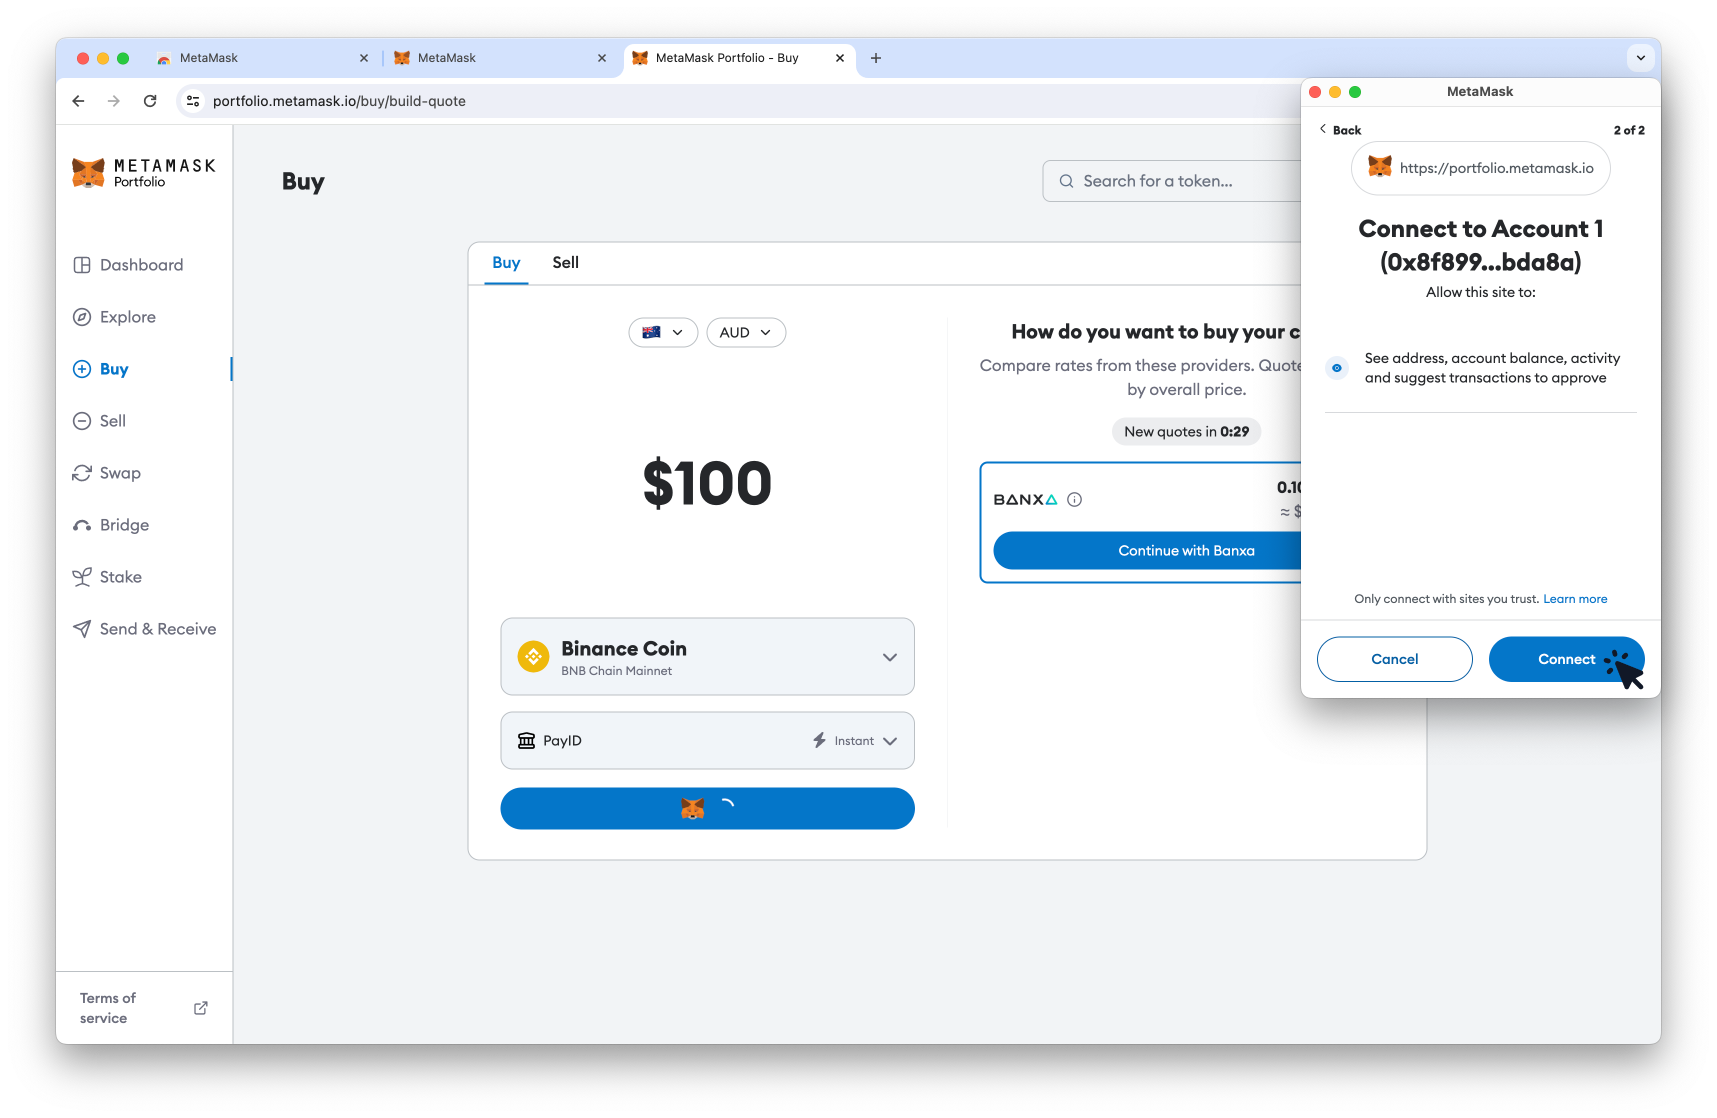
- 10. Click the Connect MetaMask button.

- 11. When the MetaMask popup appear, click the Next button.
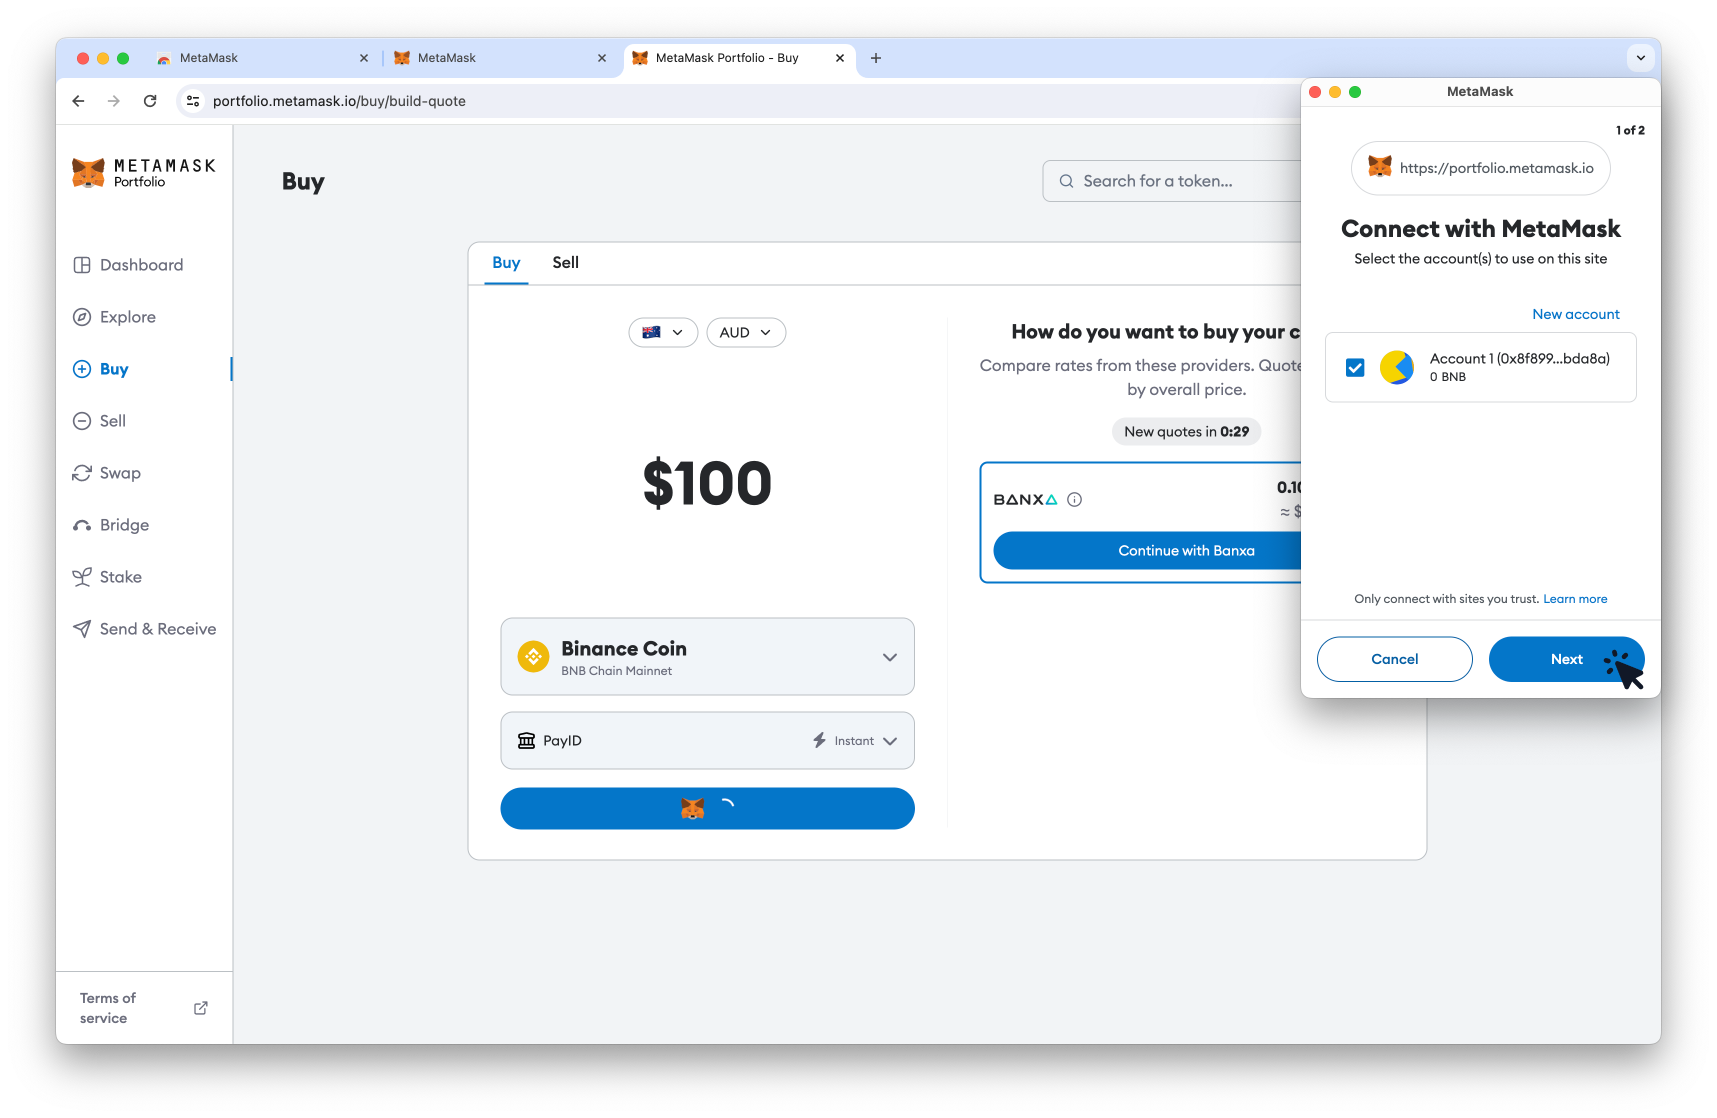
- 12. Click the Connect button to connect your wallet to the MetaMask buy dApp.
- 13. Once your wallet is connected, click on your preferred provider to proceed.
- 14. Follow the on-screen prompts for your chosen provider to complete your purchase and your $BNB will be deposited to your wallet.

- (Optional) Repeat this step if you prefer to swap a different asset ($BUSD or $USDT) for $SHA.
Option 2. Purchase via a Centralized Exchange (CEX)
- 1. Login to your preferred CEX that supports the purchase of $BNB (and the other asset you want to use for swapping).
- 2. Navigate to the trading section and purchase your desired amount of $BNB. Repeat this step if you prefer to swap a different asset ($BUSD or $USDT) for $SHA.
TIP: The PancakeSwap trading fee is set to 0.25% and the network transaction fee varies, but an approximate range is 0.00006 – 0.001 BNB. Learn more here

Step 5. Send assets to your wallet
Please note that all CEX interfaces will vary. This step is meant to provide a general overview of the withdrawal process and ensure your assets are withdrawn on the BNB Chain network.
⚠️ This step is only required if you chose to purchase $BNB via a CEX.
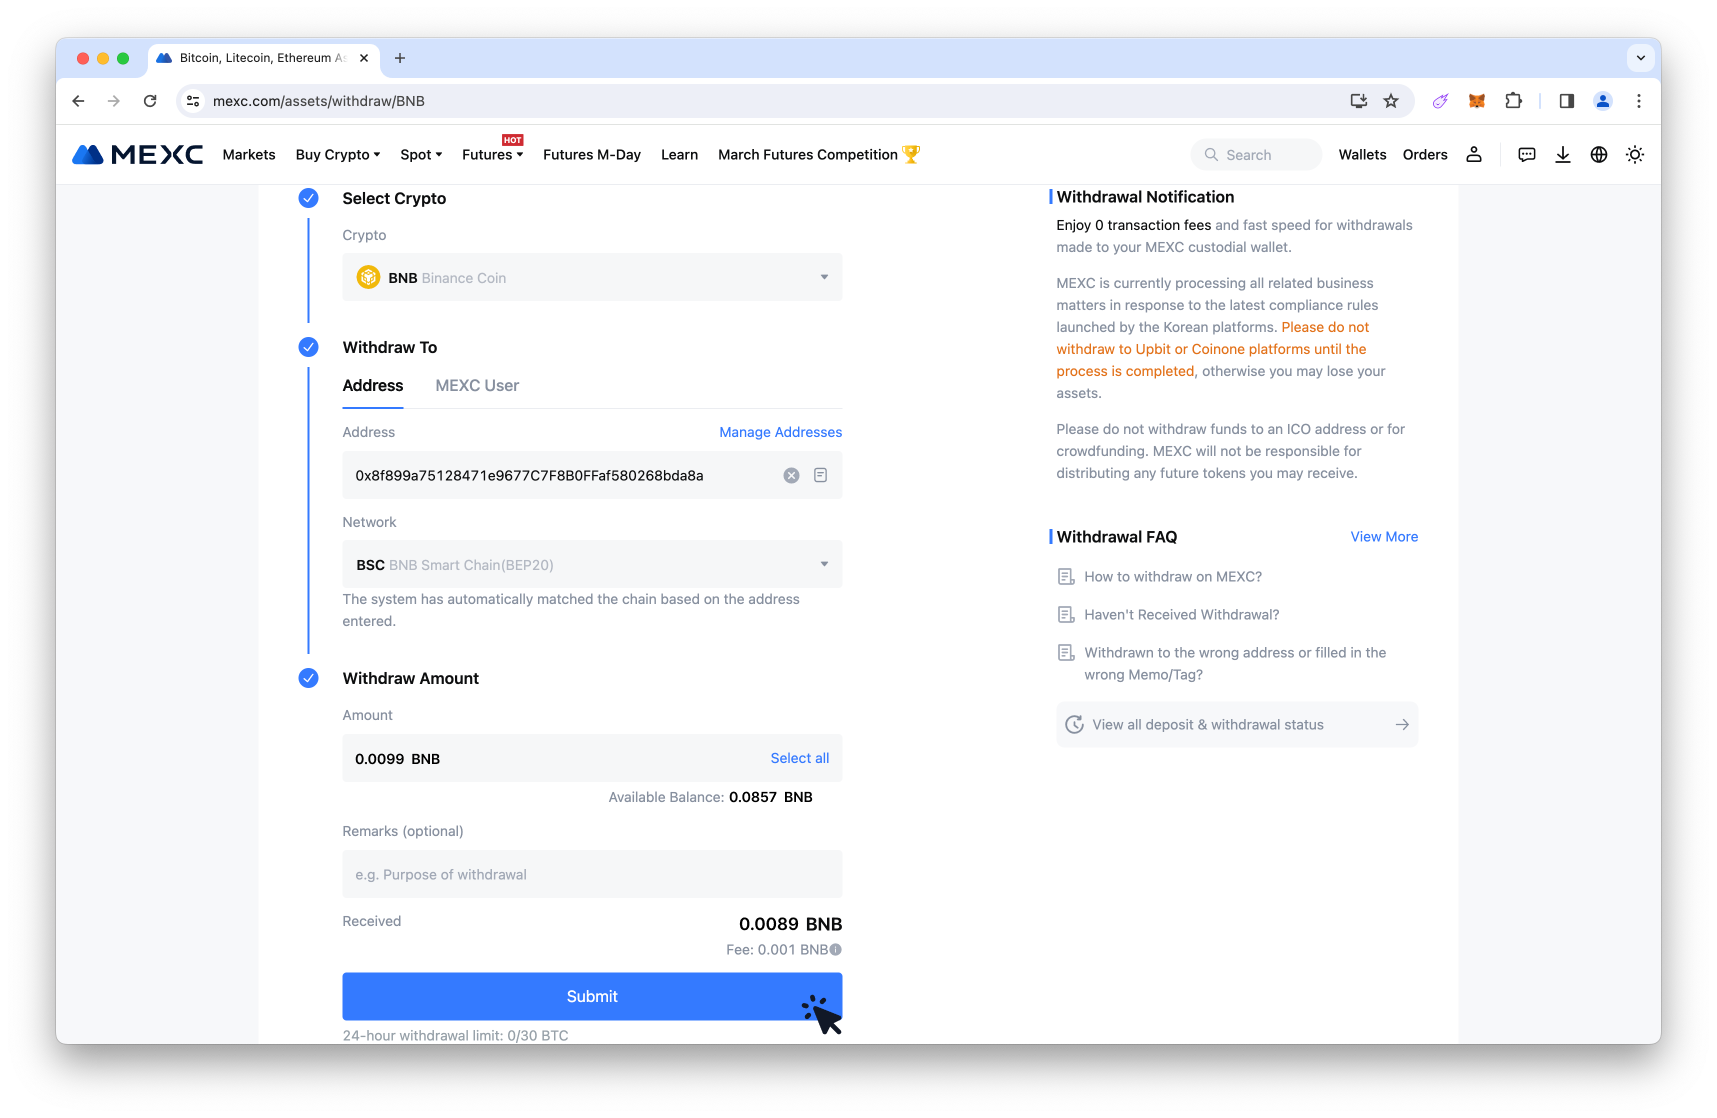
- 1. Navigate to the withdraw section of your wallet.

- 2. Select $BNB as the asset for withdrawal.

- 3. Click the MetaMask extension icon in your browser to open your MetaMask wallet.
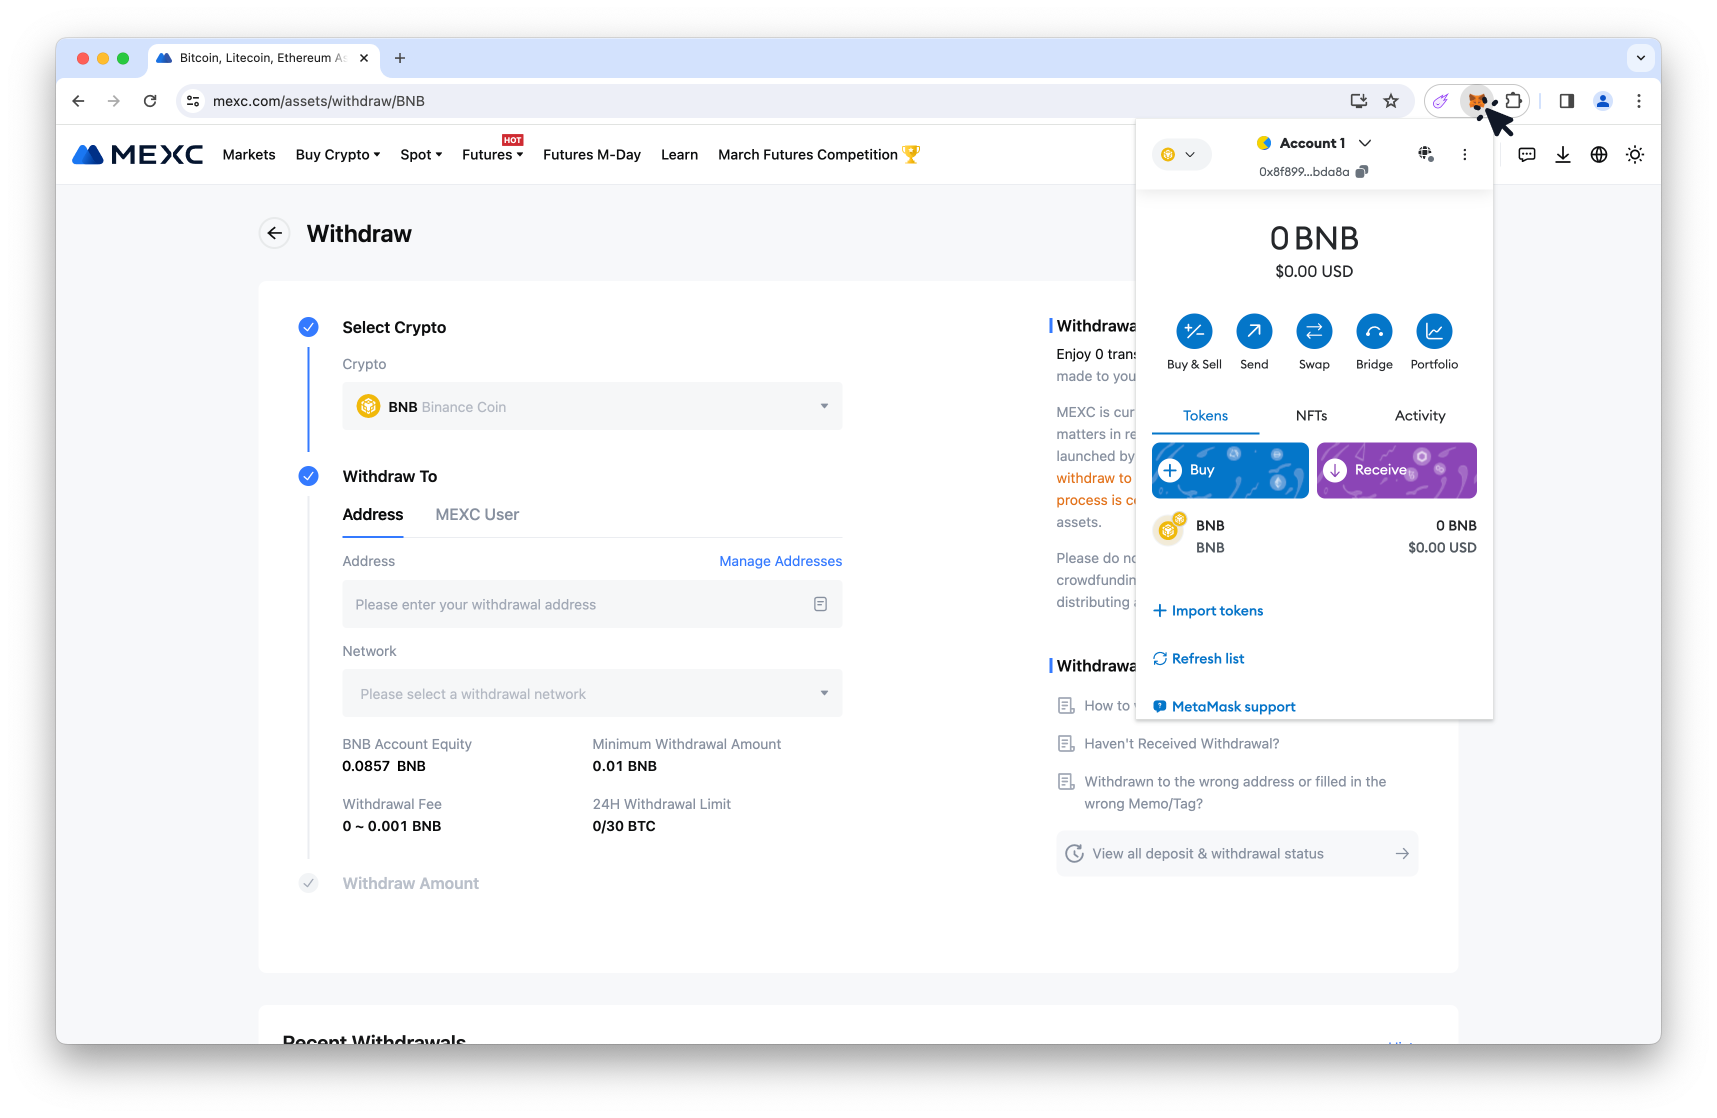
- 4. Copy your public receiving address by clicking on the address.
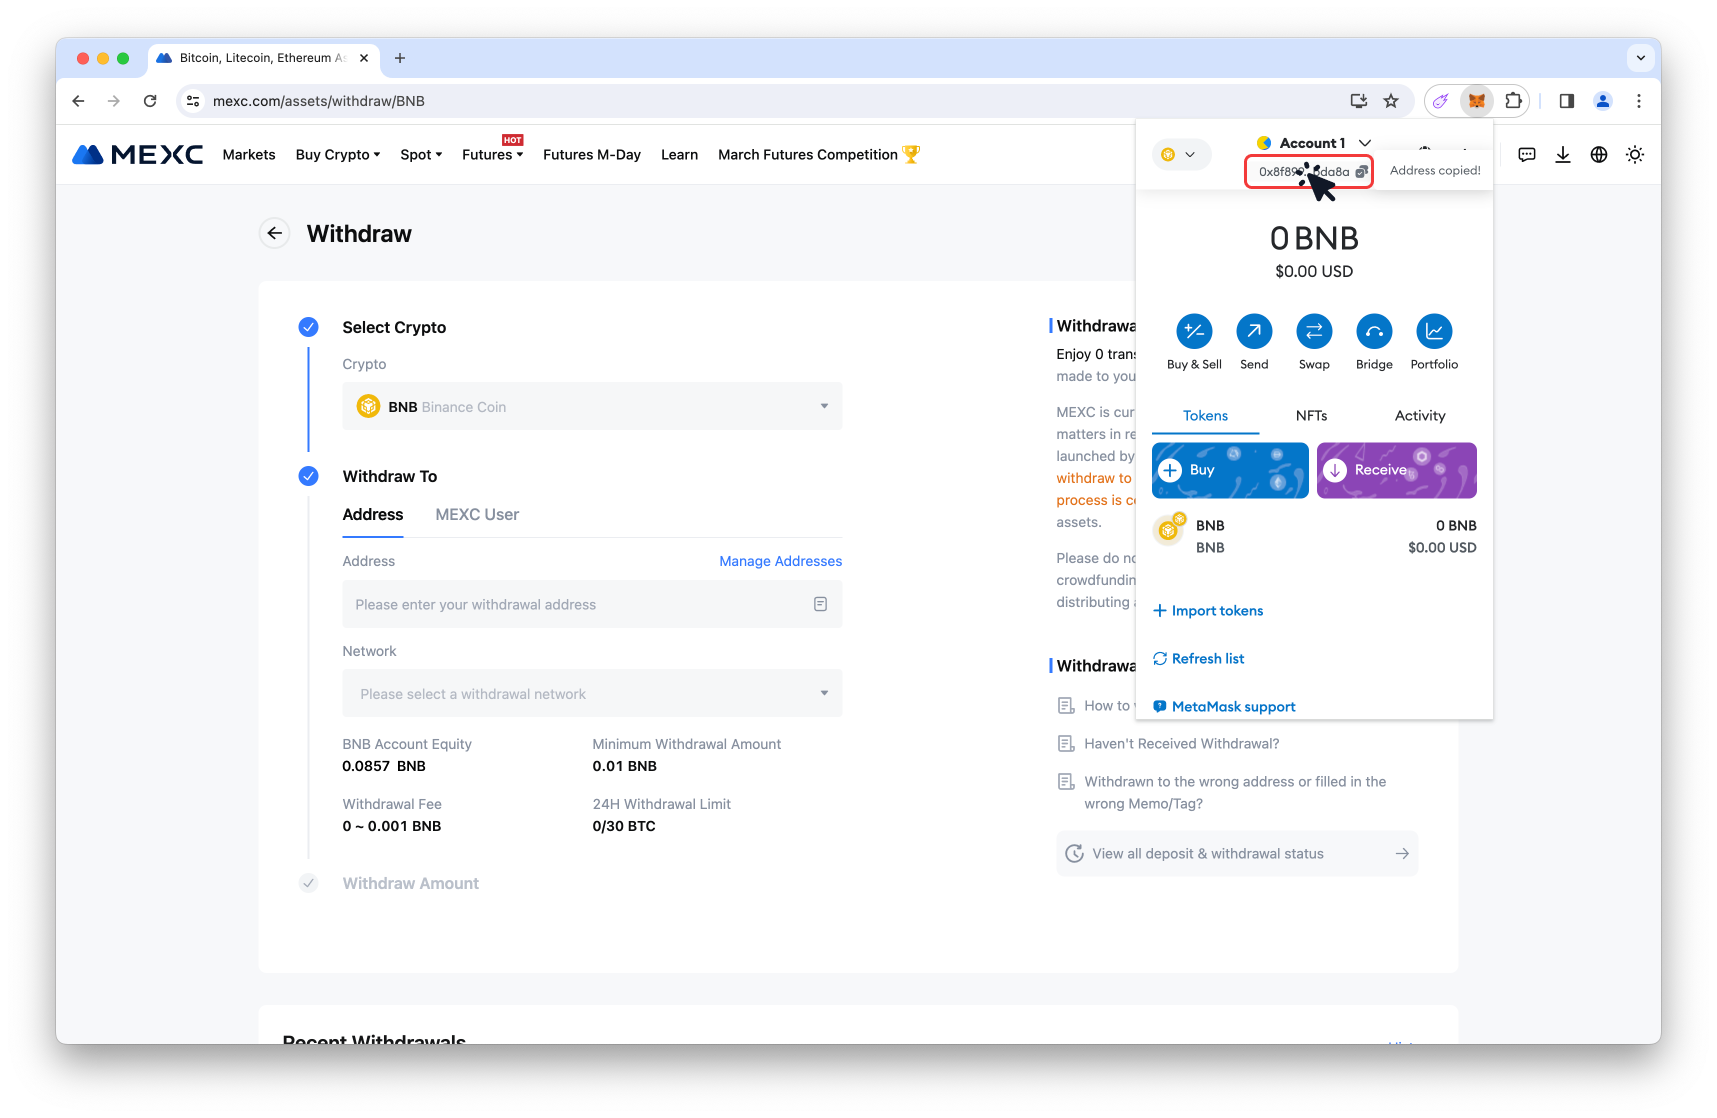
- 5. Paste your wallet address in the withdrawal address input field.
⚠️ Important: Sending funds to the wrong address will result in a loss of funds.

- 6. Ensure the withdrawal network is BNB Chain (BEP20).
TIP: You may observe old network branding (BSC) mixed with the current branding (BNB Chain / BNB Smart Chain).
⚠️ Important: Sending funds via the wrong network may result in a loss of funds.

- 7. Input the amount to withdraw.

- 8. Click the Submit button (or similar confirmation button) to initiate the withdraw process.
- 9. Follow your exchange’s withdrawal prompts which may include verifying the withdraw address and network, providing 2fa security codes or whitelisting the new withdraw address.
TIP: Withdrawal times vary by CEX and asset, but you can track the progress via your account’s withdrawal transaction details.
- 10. (Optional) Repeat these steps if you chose to purchase another asset such as $BUSD or $USDT.
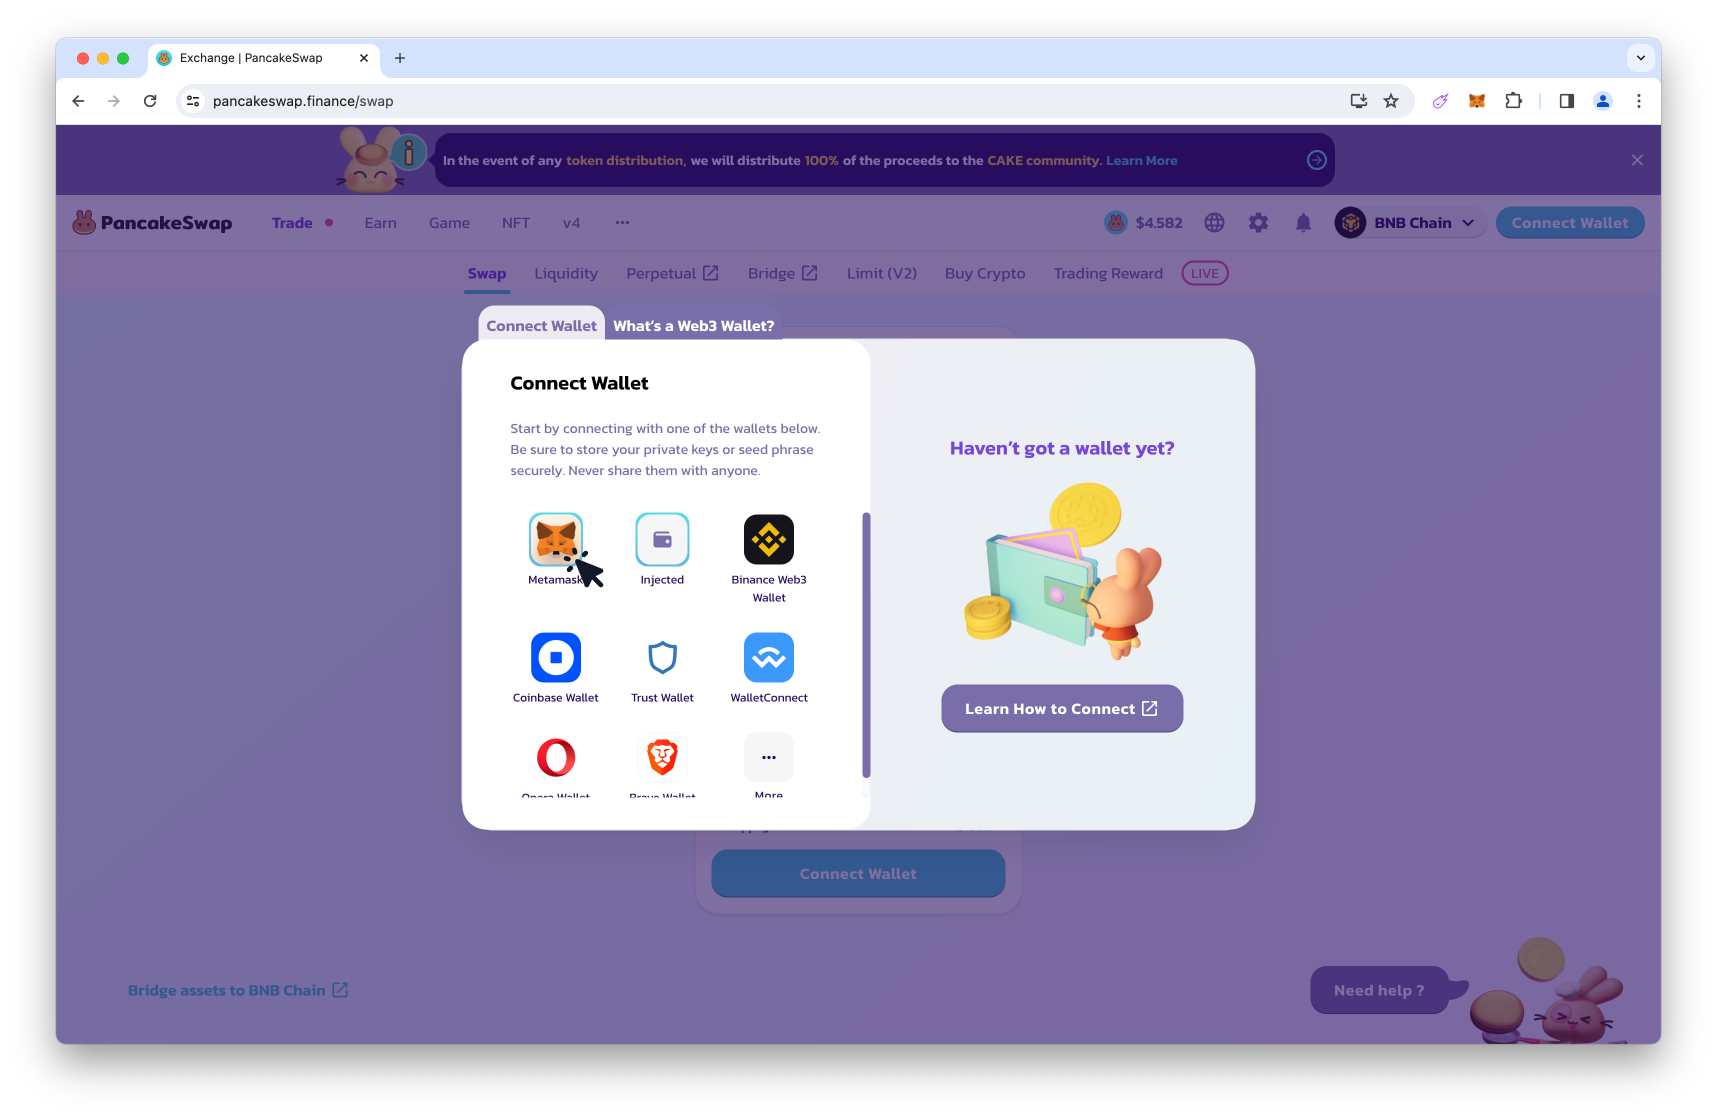
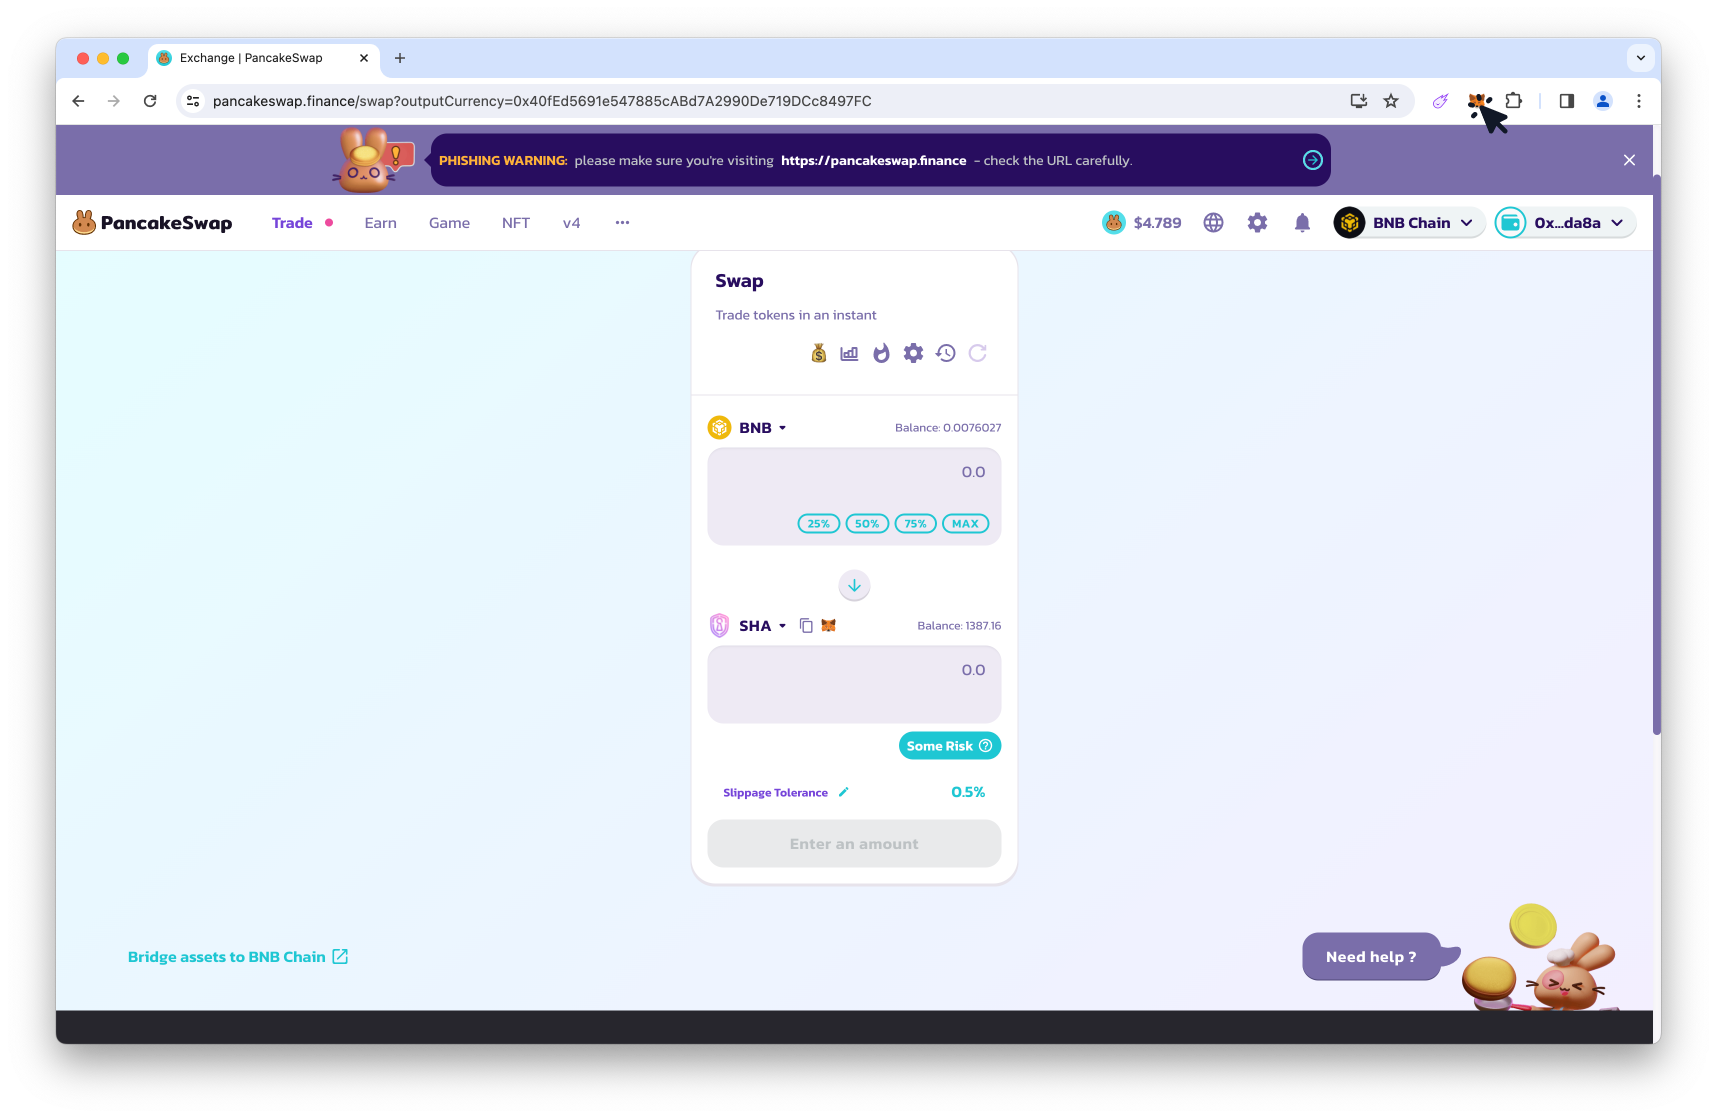
Step 6. Connect to PancakeSwap
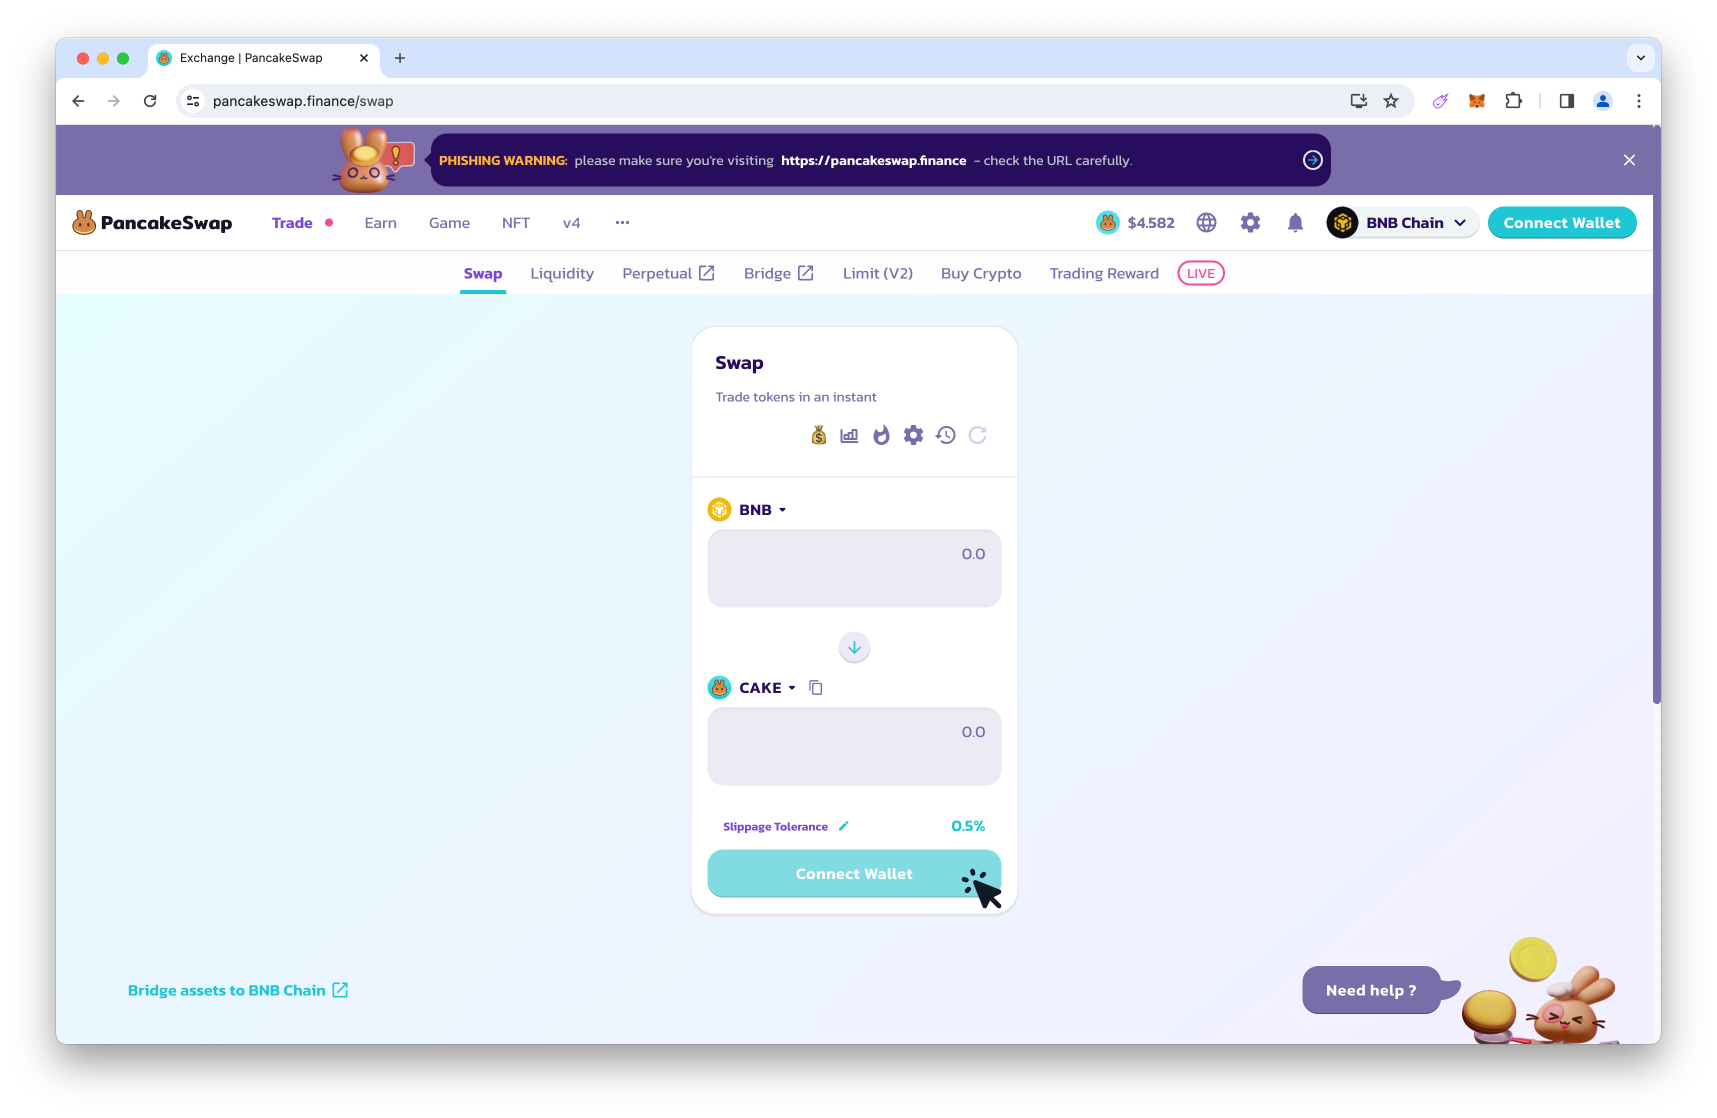
- 1. Open PancakeSwap in your browser.
TIP: Ensure the URL is https://pancakeswap.finance/swap
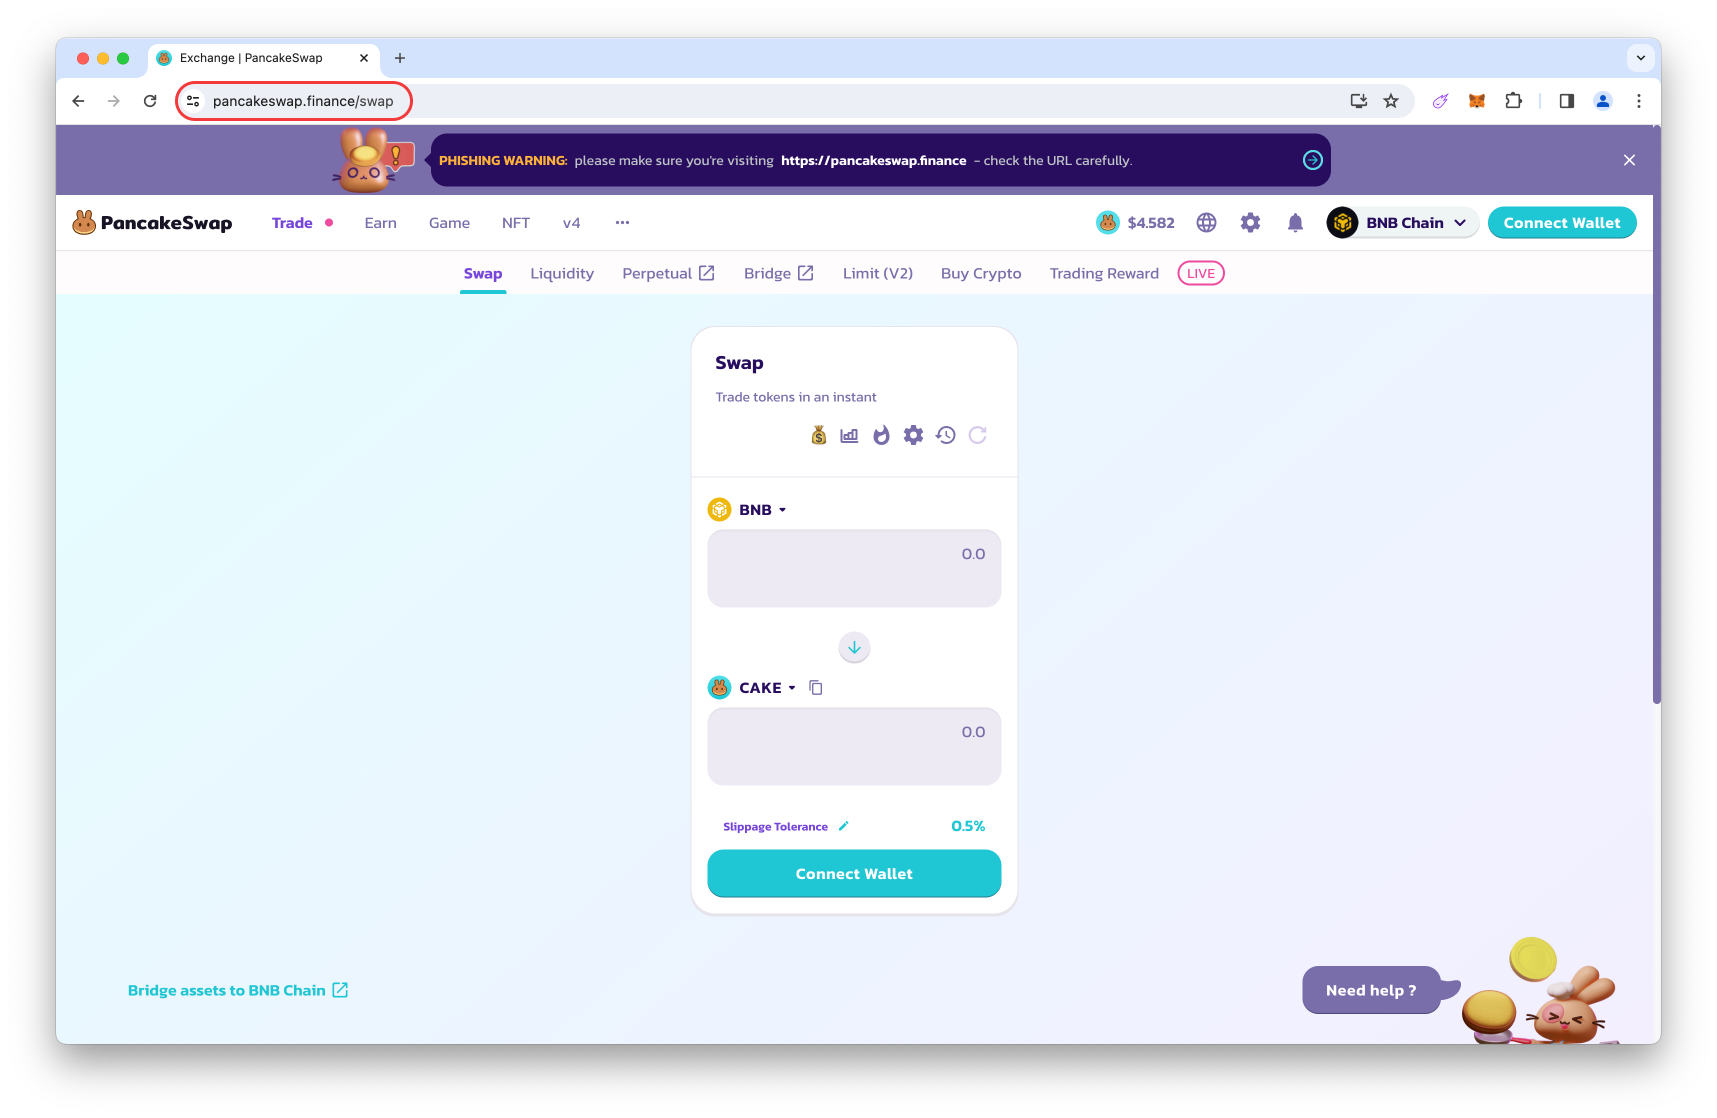
- 2. Click the Connect Wallet button.
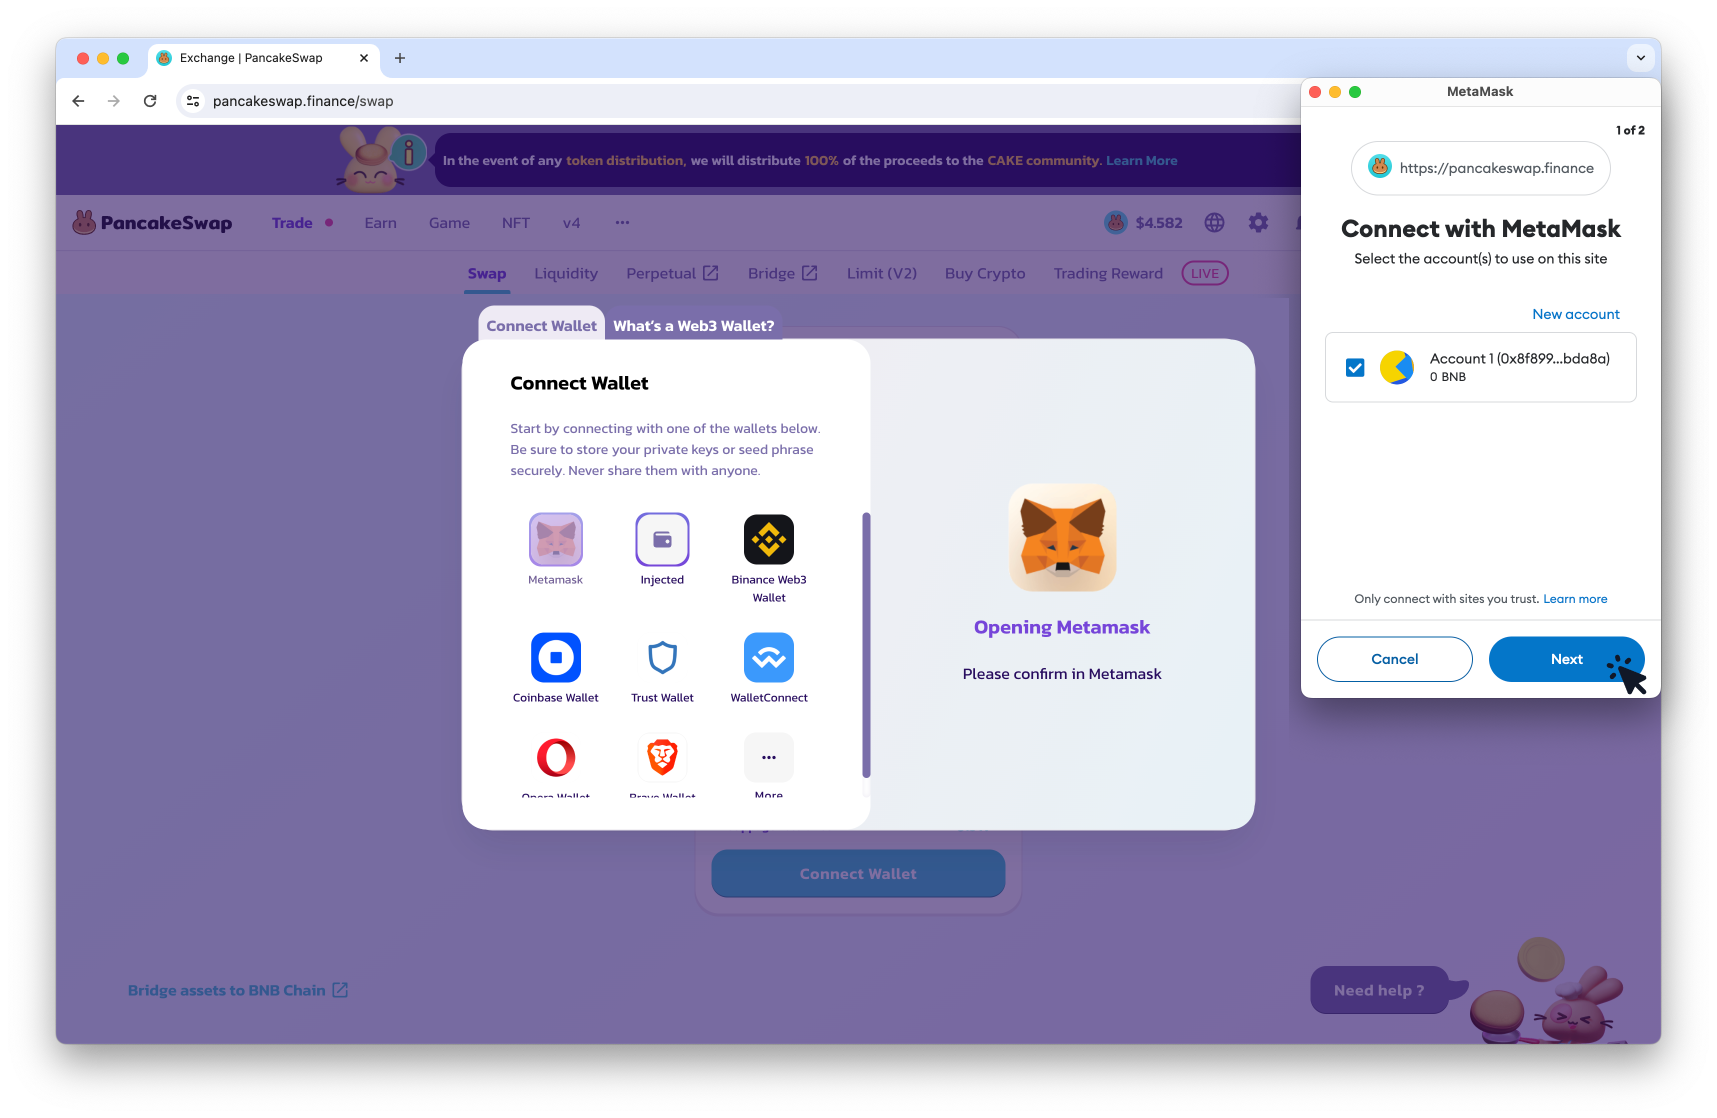
- 3. Select MetaMask as your wallet option.
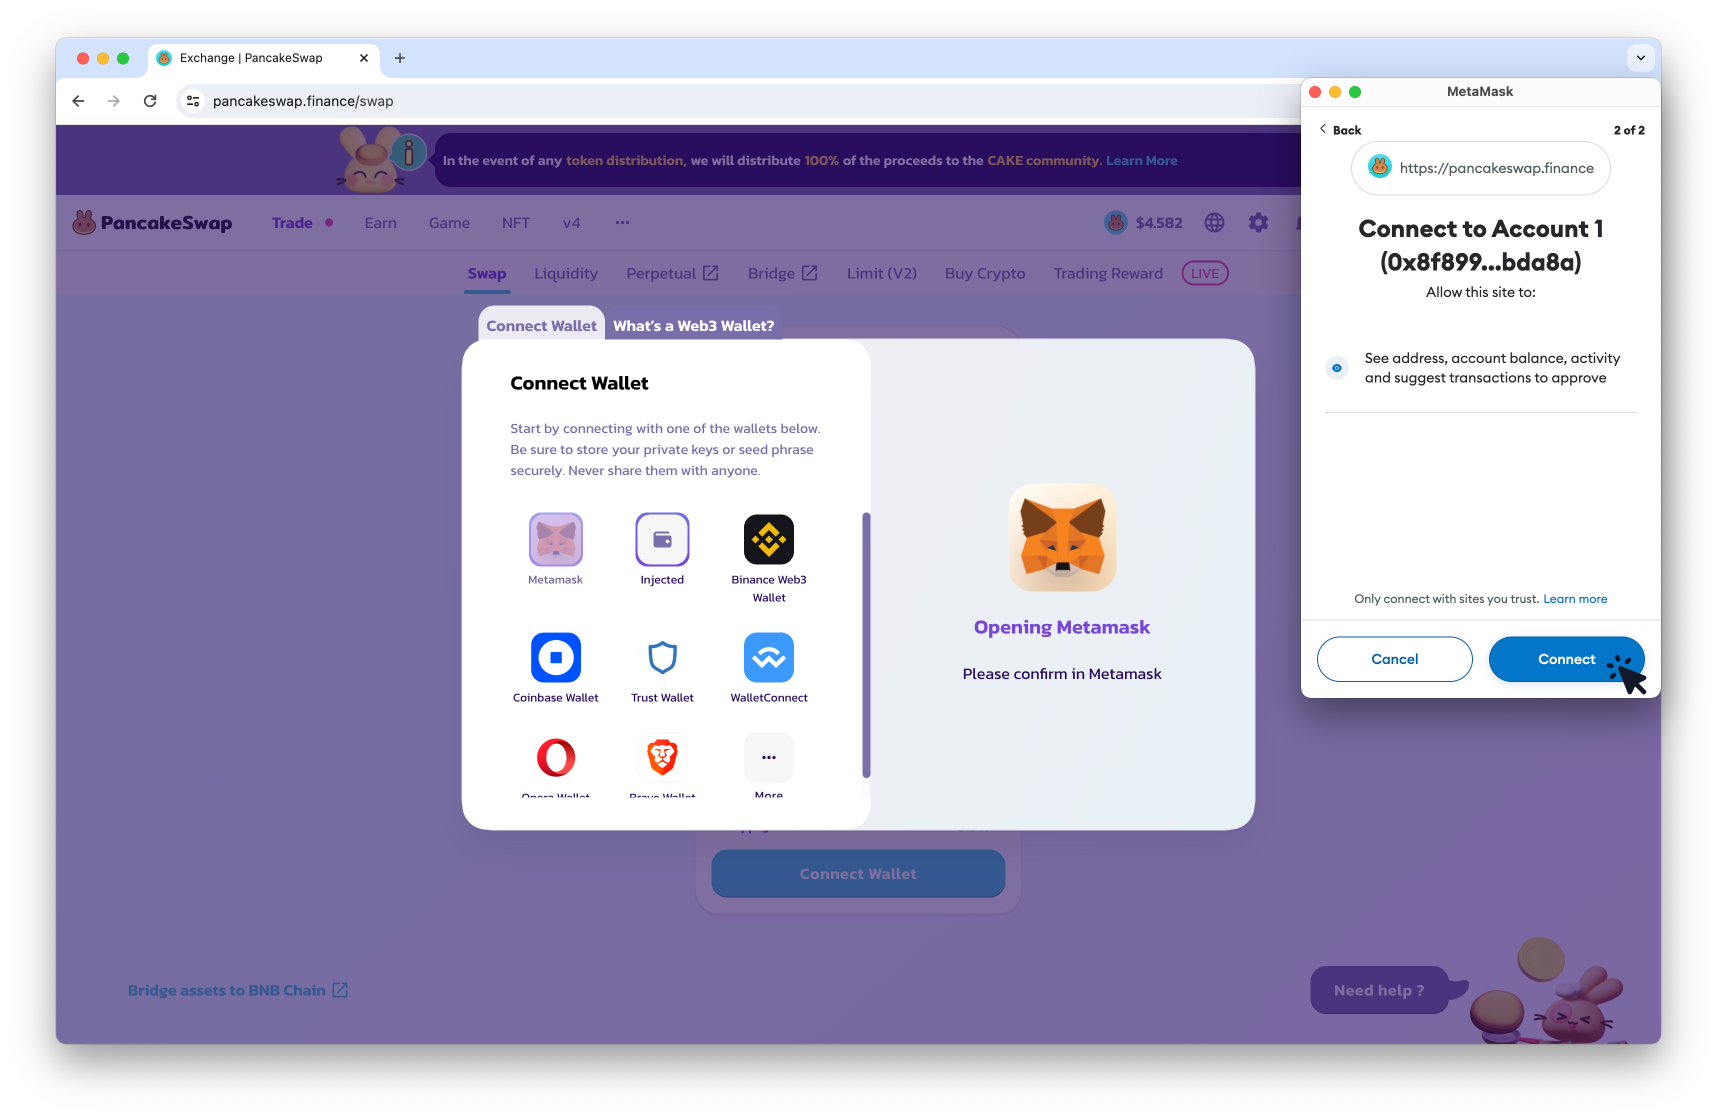
- 4. Click the Next button when the MetaMask popup appears.
- 5. Click the Connect button to connect MetaMask to PancakeSwap.
Step 7. Setup your swap
If you are using $BNB as your swap token, you can skip steps 1 & 2.
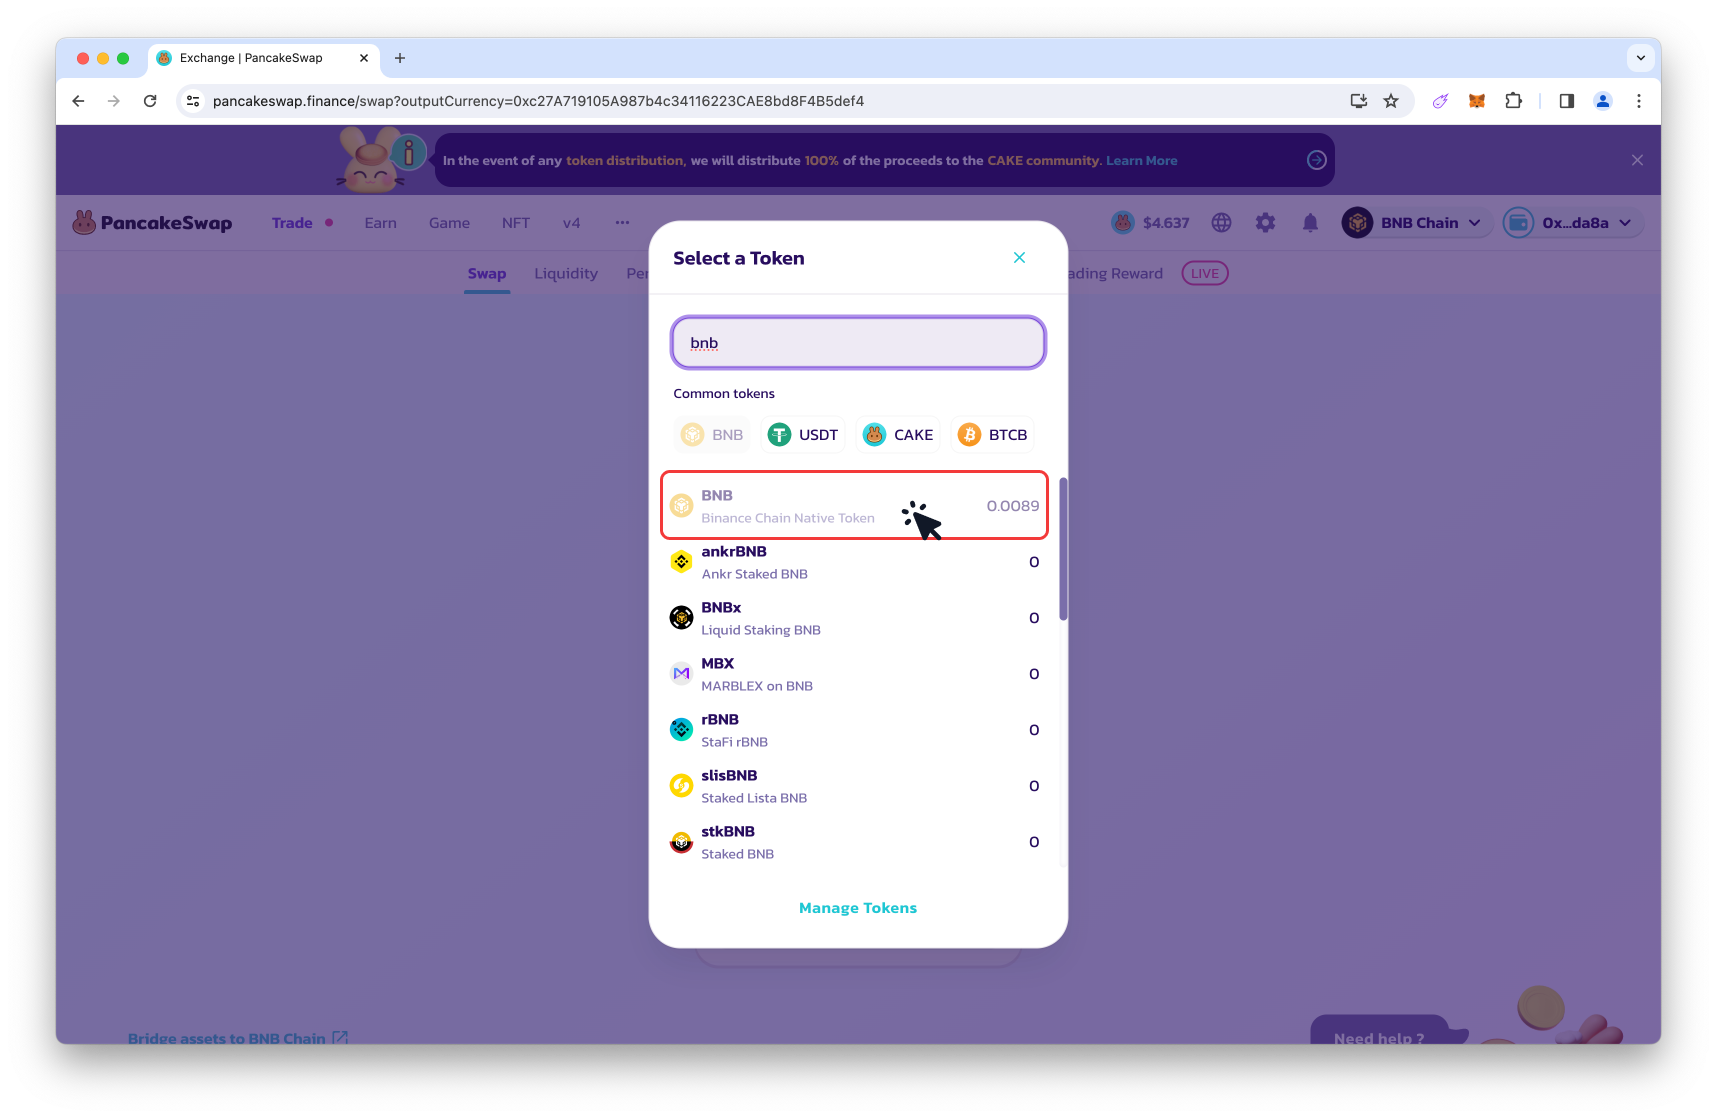
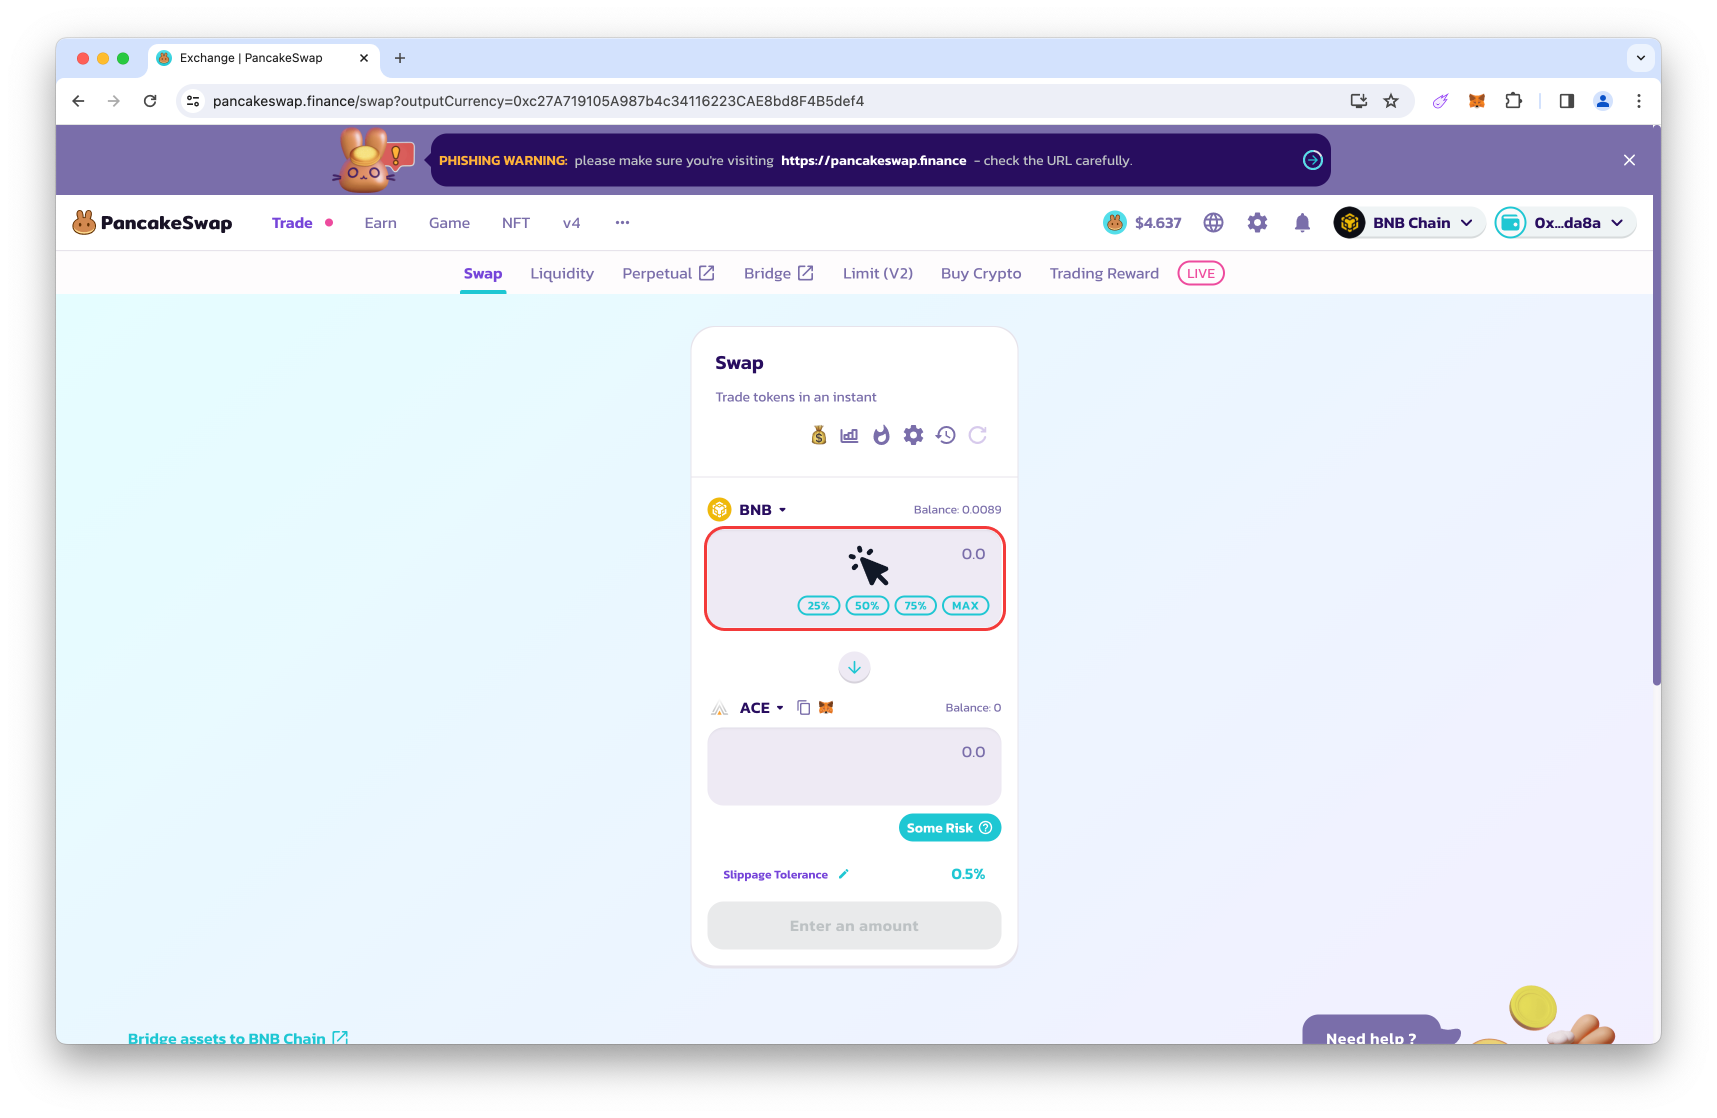
- 1. Click the asset selector.

- 2. Choose the token you wish to swap for $SHA.
- 3. Input the amount you want swap.
- 4. Click the asset selector.

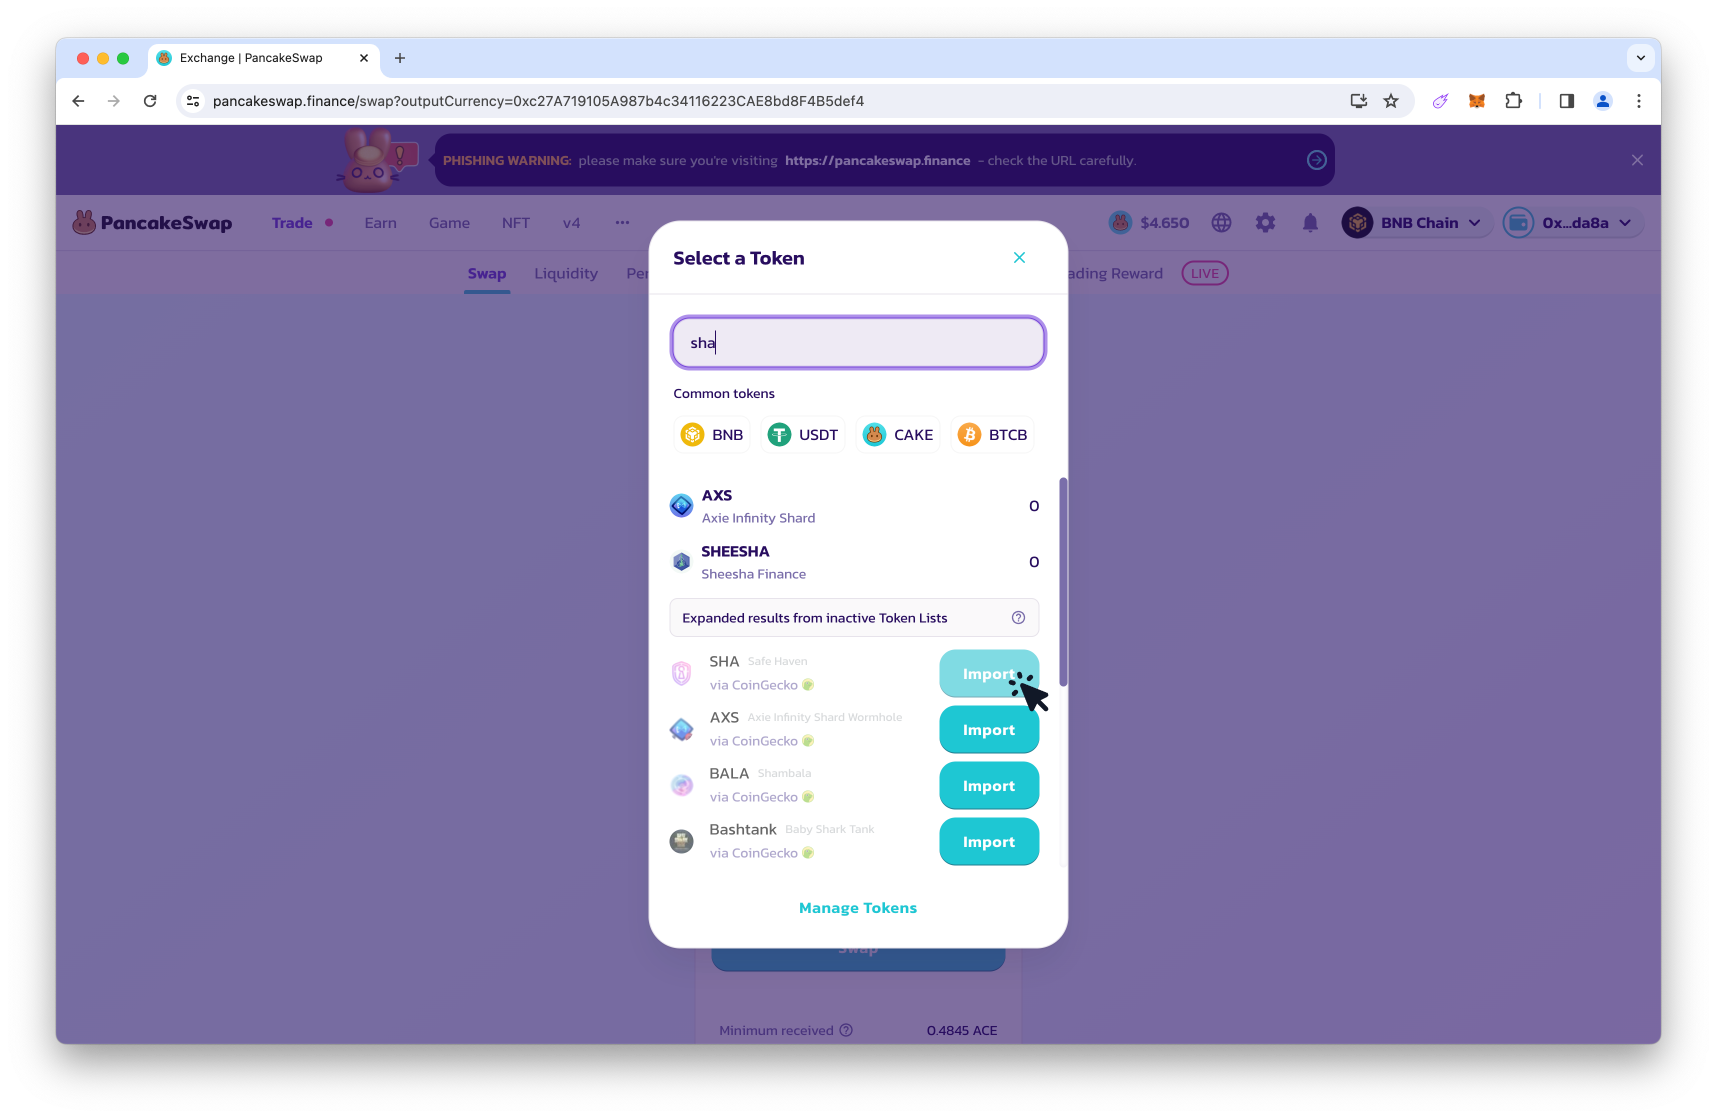
- 5. Search for $SHA.
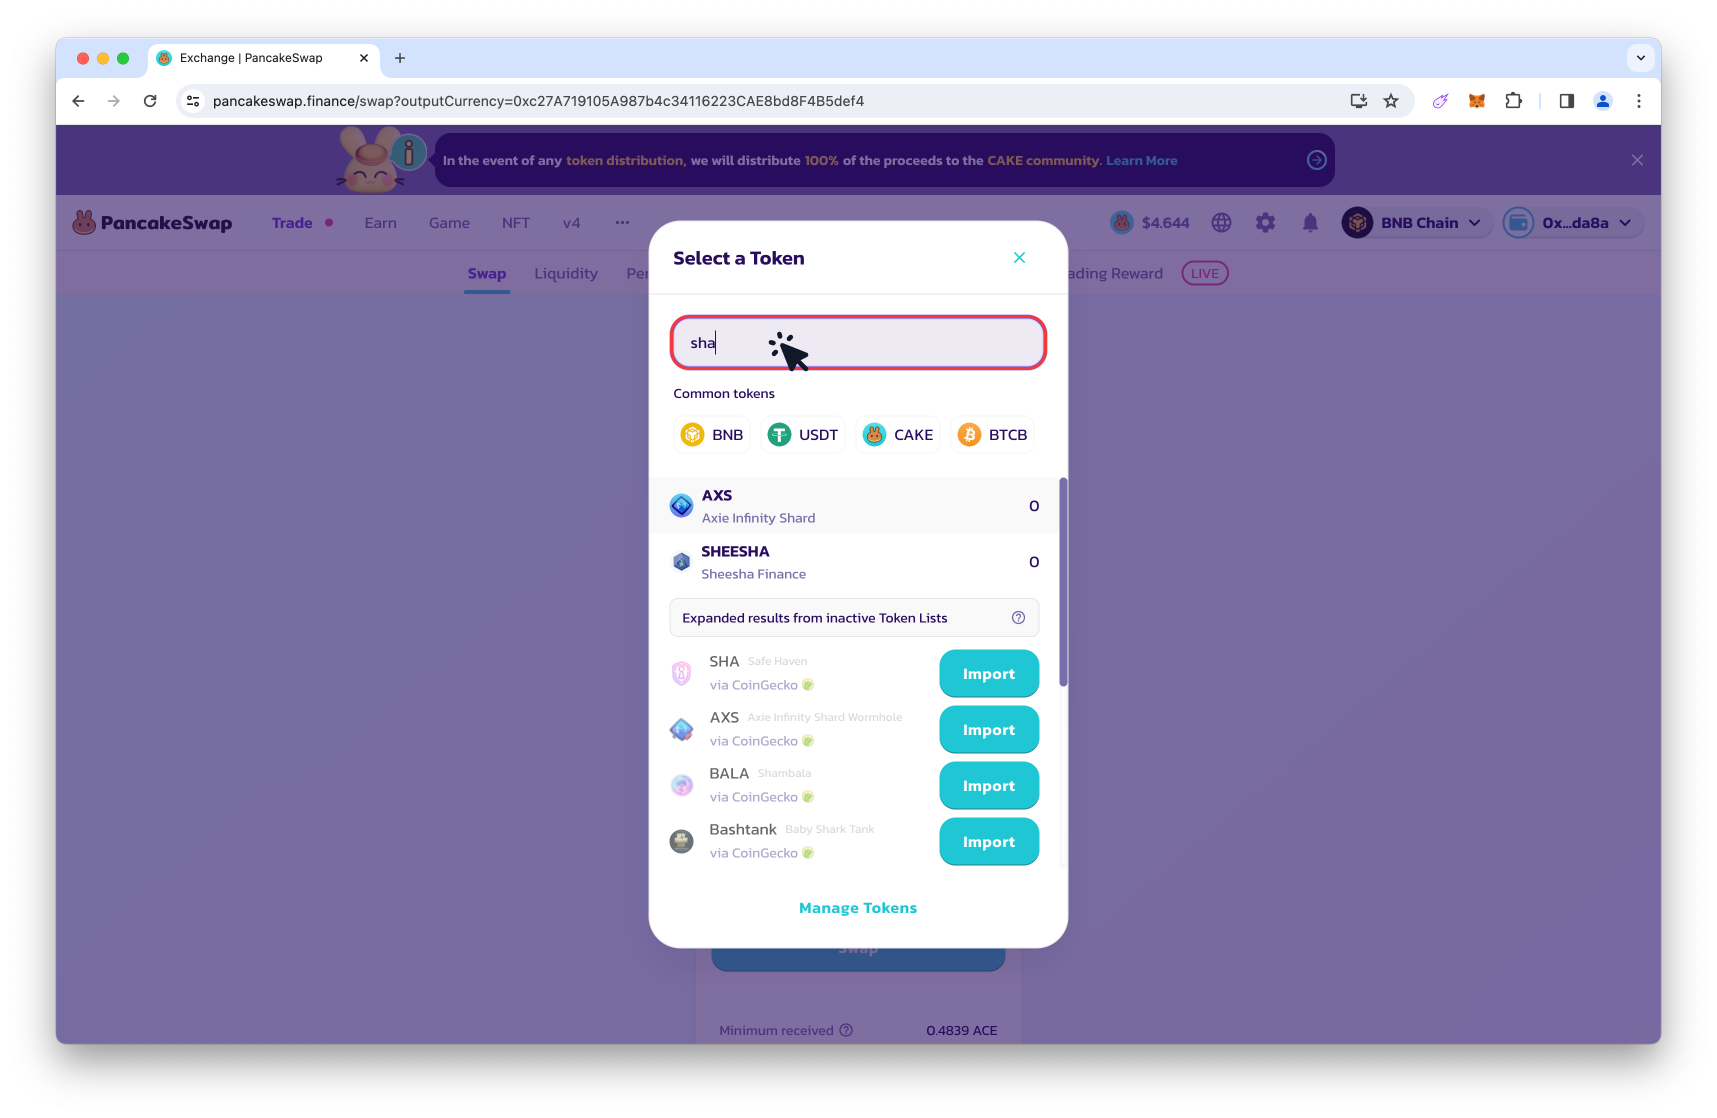
- 6. Click the Import button.
- 7. After reading the information on screen, click the checkbox to acknowledge the information above.
TIP: You can confirm the correct $SHA token is being imported by ensuring the contract address matches.
Click here to view the correct SHA contract.
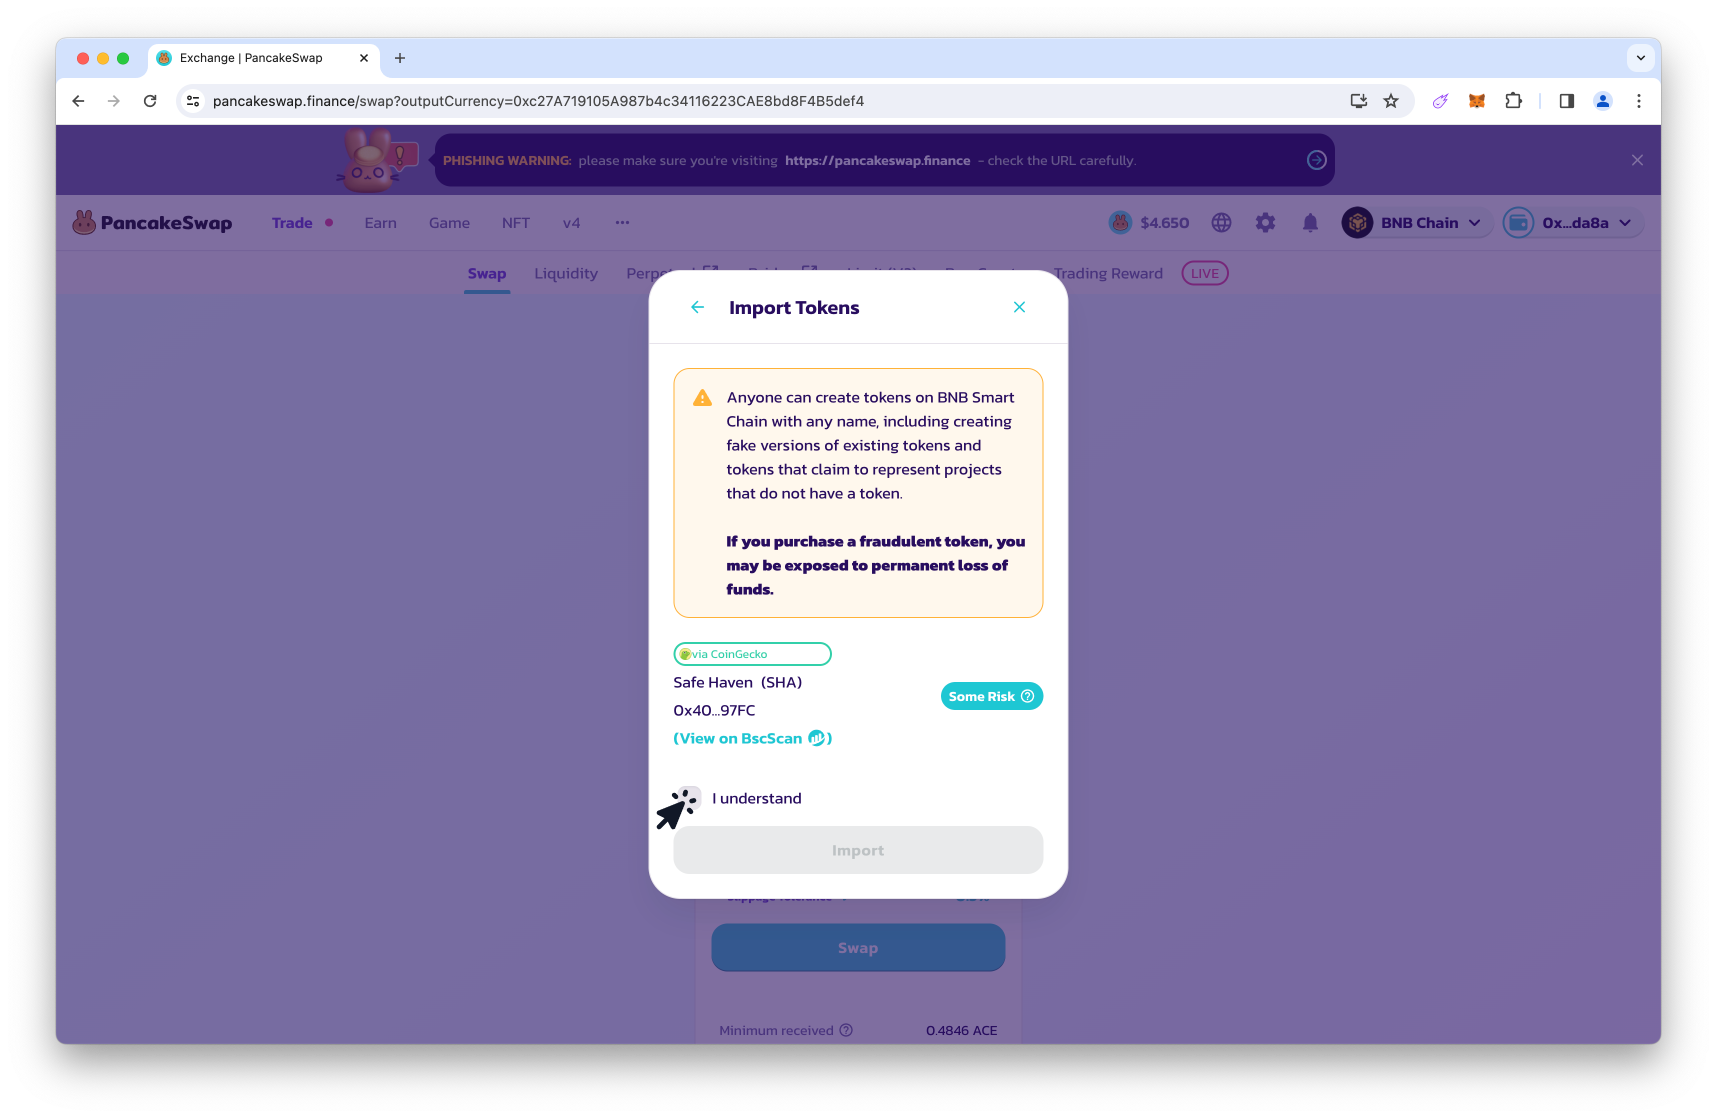
- 8. Click the Import button.

Step 8. Perform the swap
- 1. Review both the estimated & minimum amount of $SHA you will receive. Notice the slight variance due to slippage which is automatically set to 0.5%.
TIP: Advanced features such as slippage and trade route adjustments are available and you can learn more here.

- 2. Click the Swap button.
- 3. After reviewing the information on screen, click Confirm Swap.
TIP: If too much time elapses a price variance may occur and you will need to accept the updated swap amounts.

- 4. After reviewing the transaction fee and total amount, click the Confirm button to execute the swap.

- 5. A confirmation popup will appear when the swap is successfully completed.

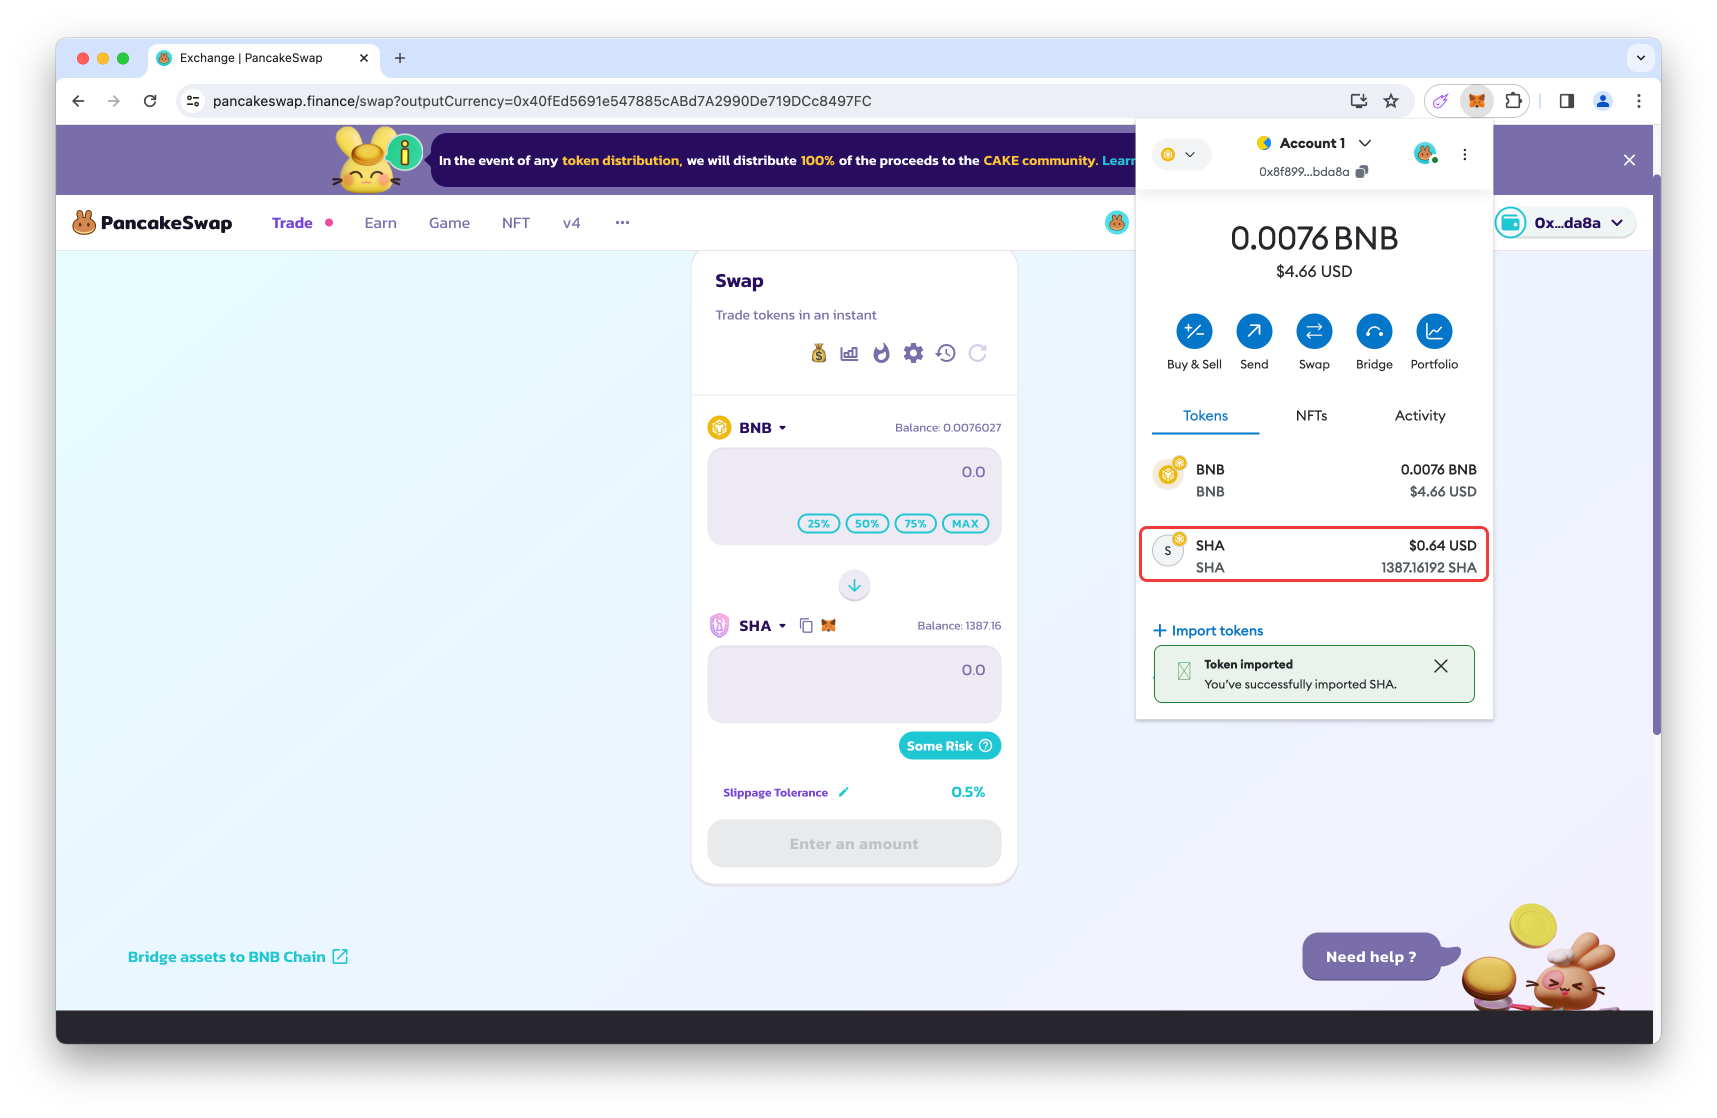
Step 9. Display $SHA in your wallet
On occasion, tokens do not appear immediately in your wallet. Follow these simple steps to display your recently acquired token.
- 1. Copy the $SHA token contract address shown below or visit bscscan.
0x40fEd5691e547885cABd7A2990De719DCc8497FC
- 2. Open MetaMask by clicking the MetaMask extension icon.
- 3. Click + Import Tokens.
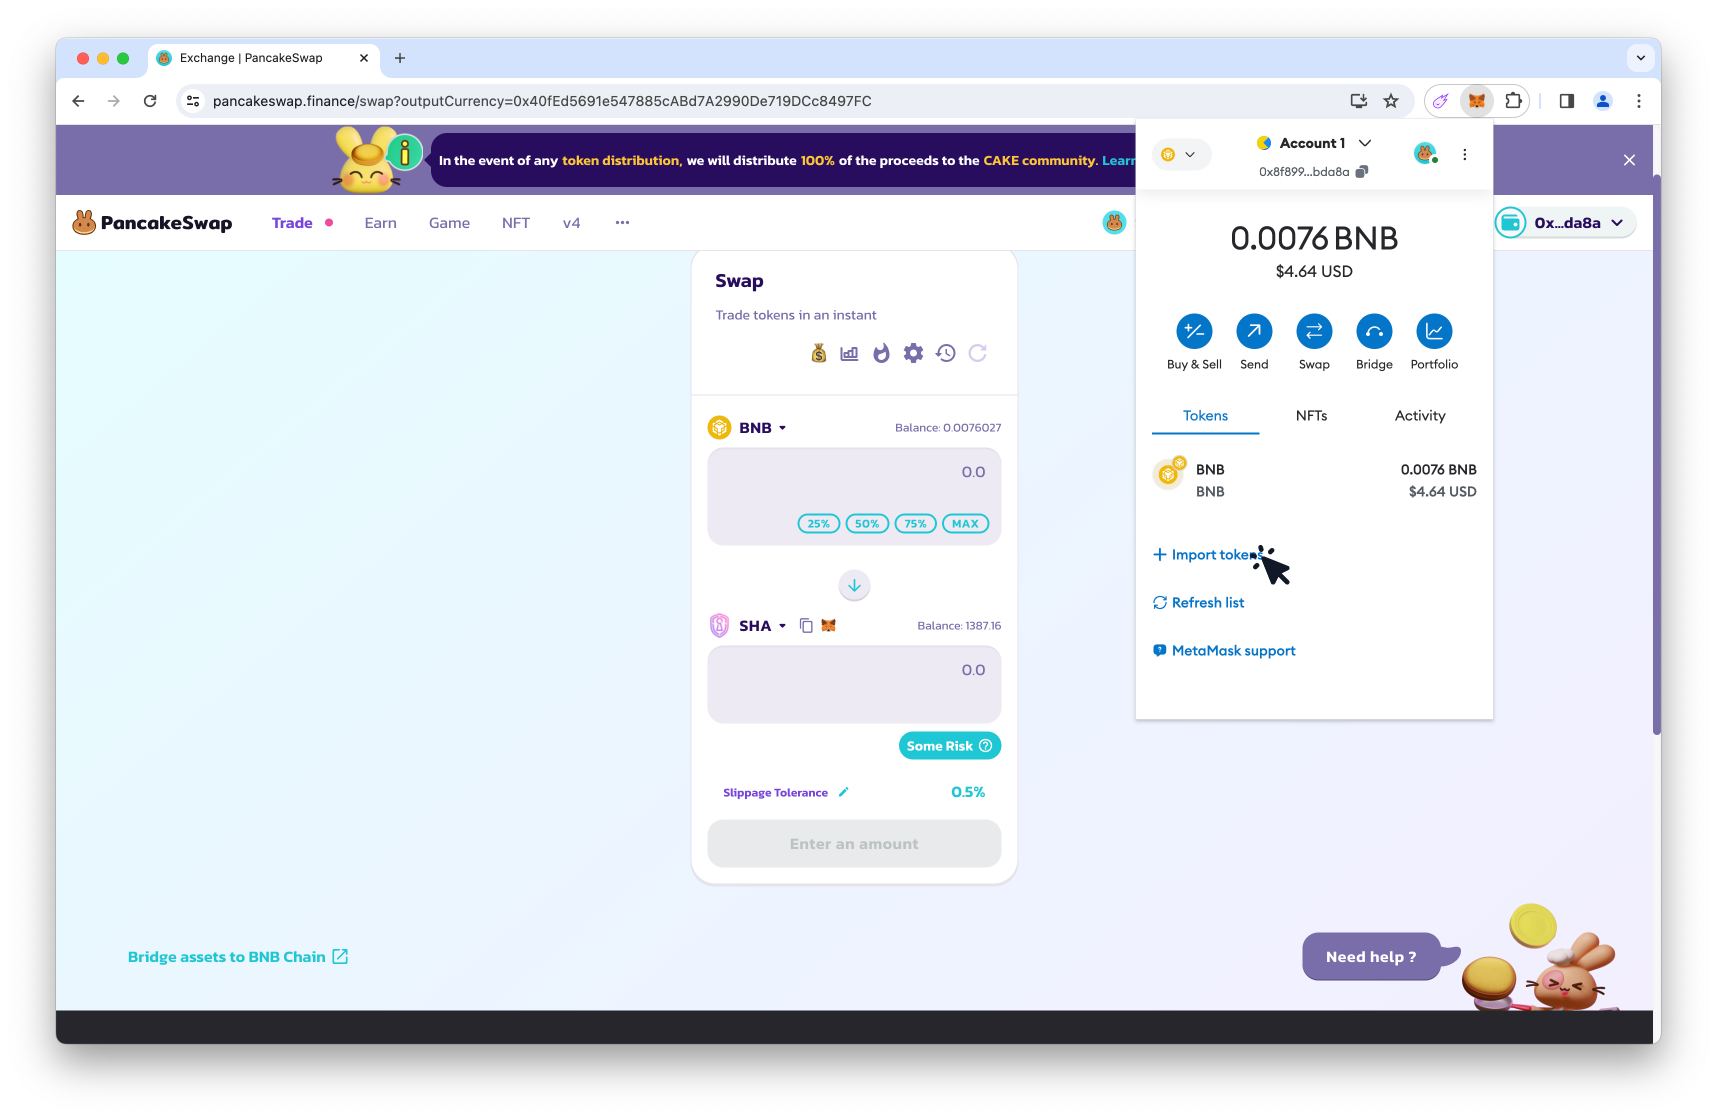
- 4. Paste the $SHA token contract address.
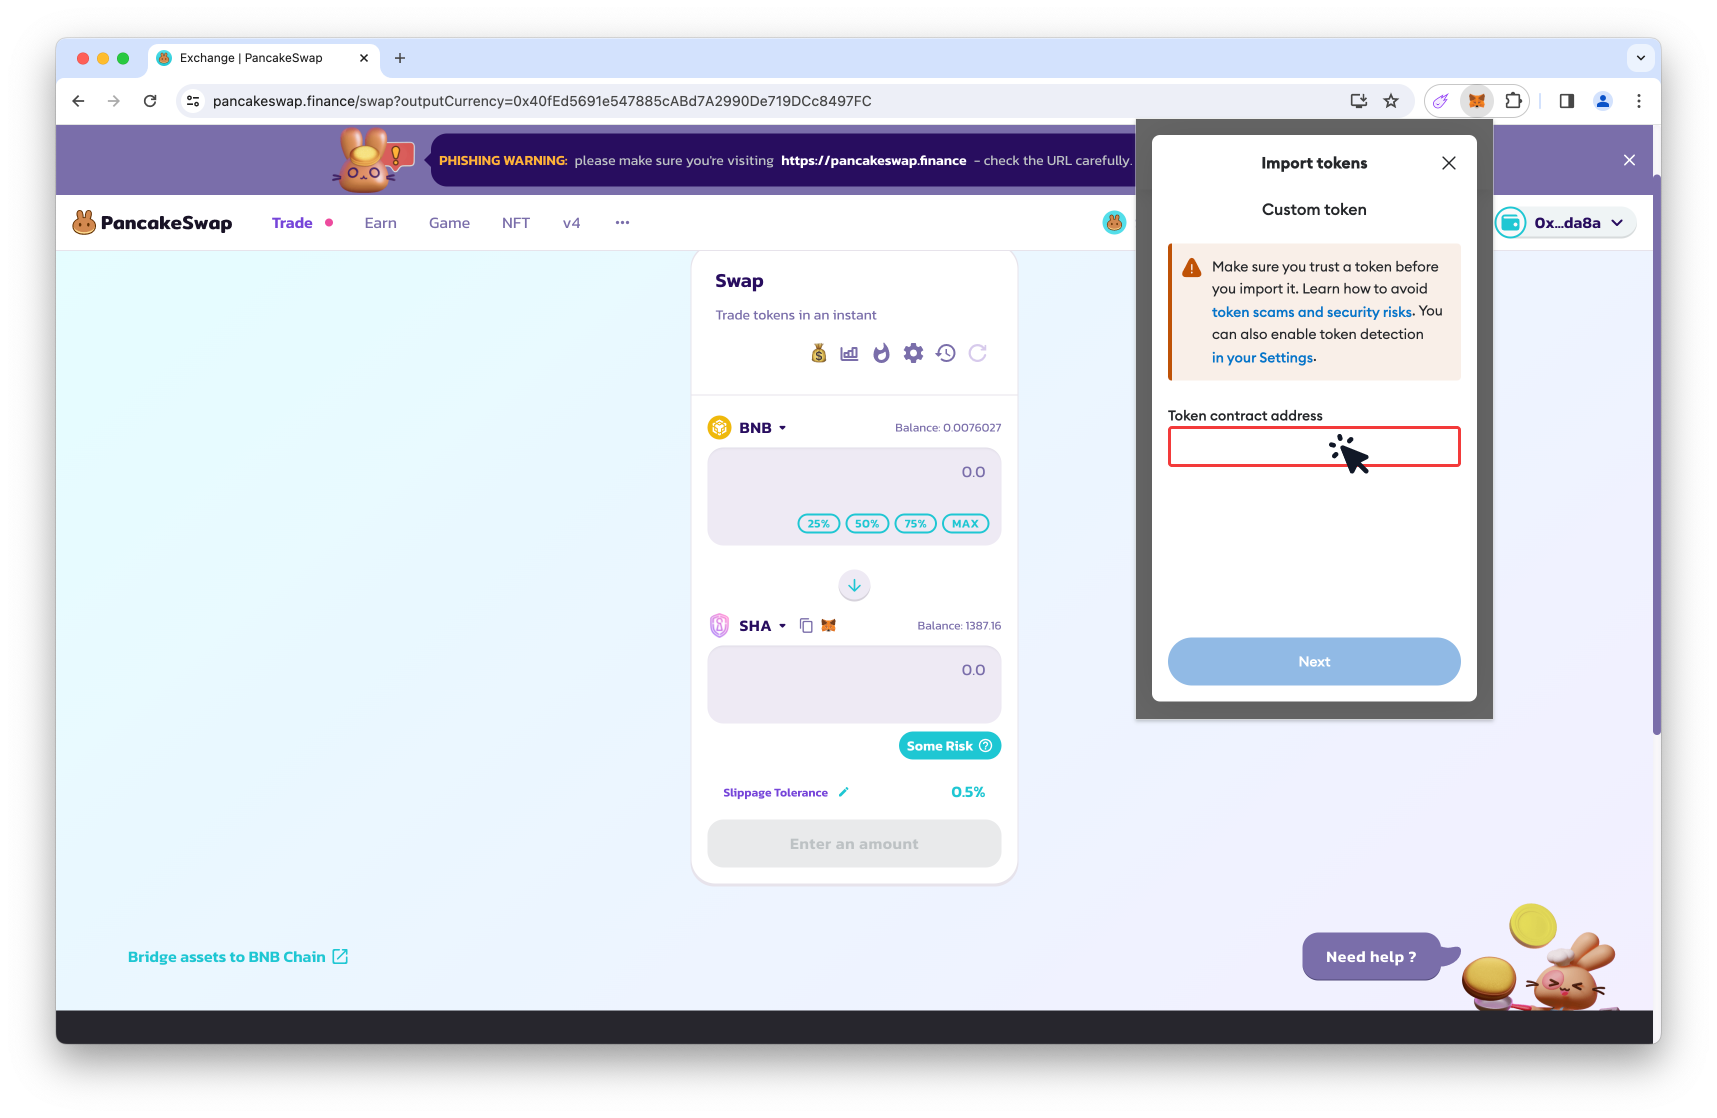
- 5. Review the token details and then click the Next button.

- 6. Click the Import button.
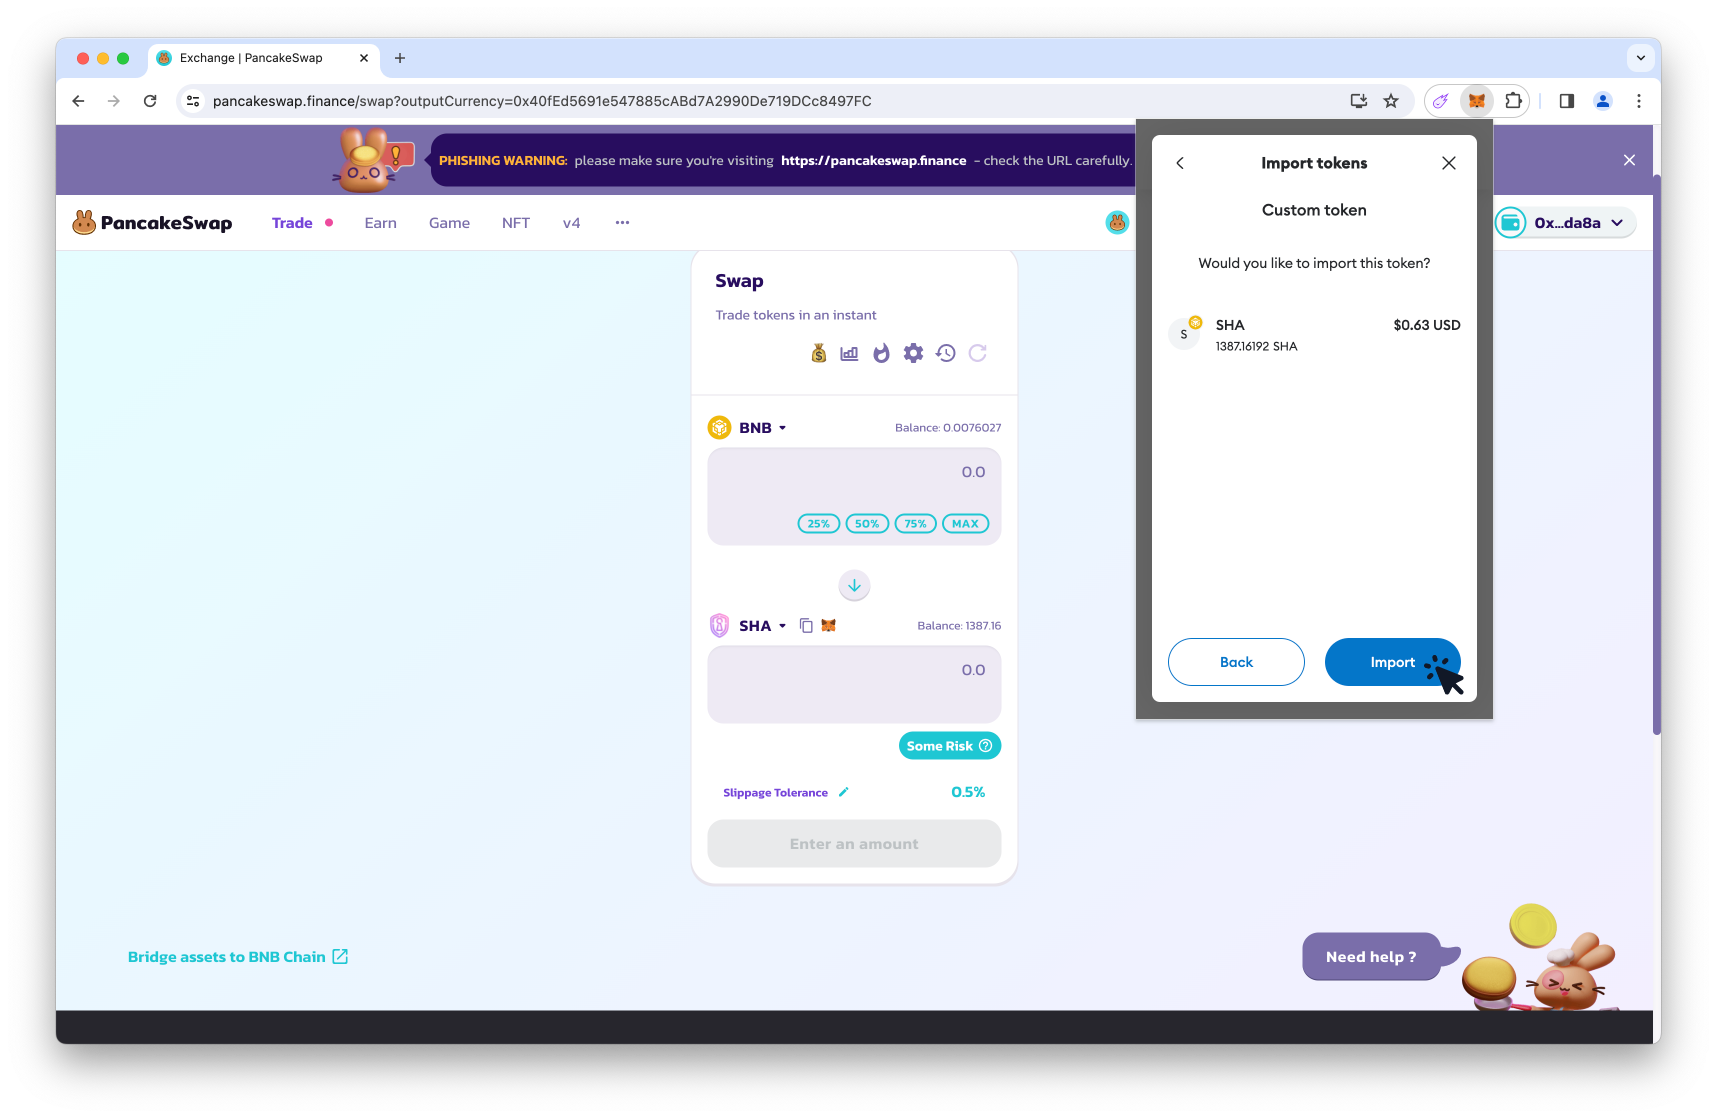
- 7. Your $SHA are now visible in your wallet.
✅ Congratulations! You have successfully purchased $SHA via PancakeSwap.
✳️ Go cross-chain: Use SafeSwap to bridge your SHA (BEP20) to SHA (vechain).
How to Purchase $SHA via PancakeSwap Using MetaMask (Mobile Edition)
Prior to using PancakeSwap, please keep in mind you:
- must install the MetaMask mobile app
- must hold a small amount of $BNB token to pay the fees (trade & network transaction fees)
- can use popular tokens such as $BNB, $BUSD or $USDT to swap for $SHA.
Quick links
Step 1. Install MetaMask mobile app
Step 4. Purchase $BNB and swap assets
Step 5. Send assets to your wallet
Step 6. Connect to PancakeSwap
Step 9. Display $SHA in your wallet
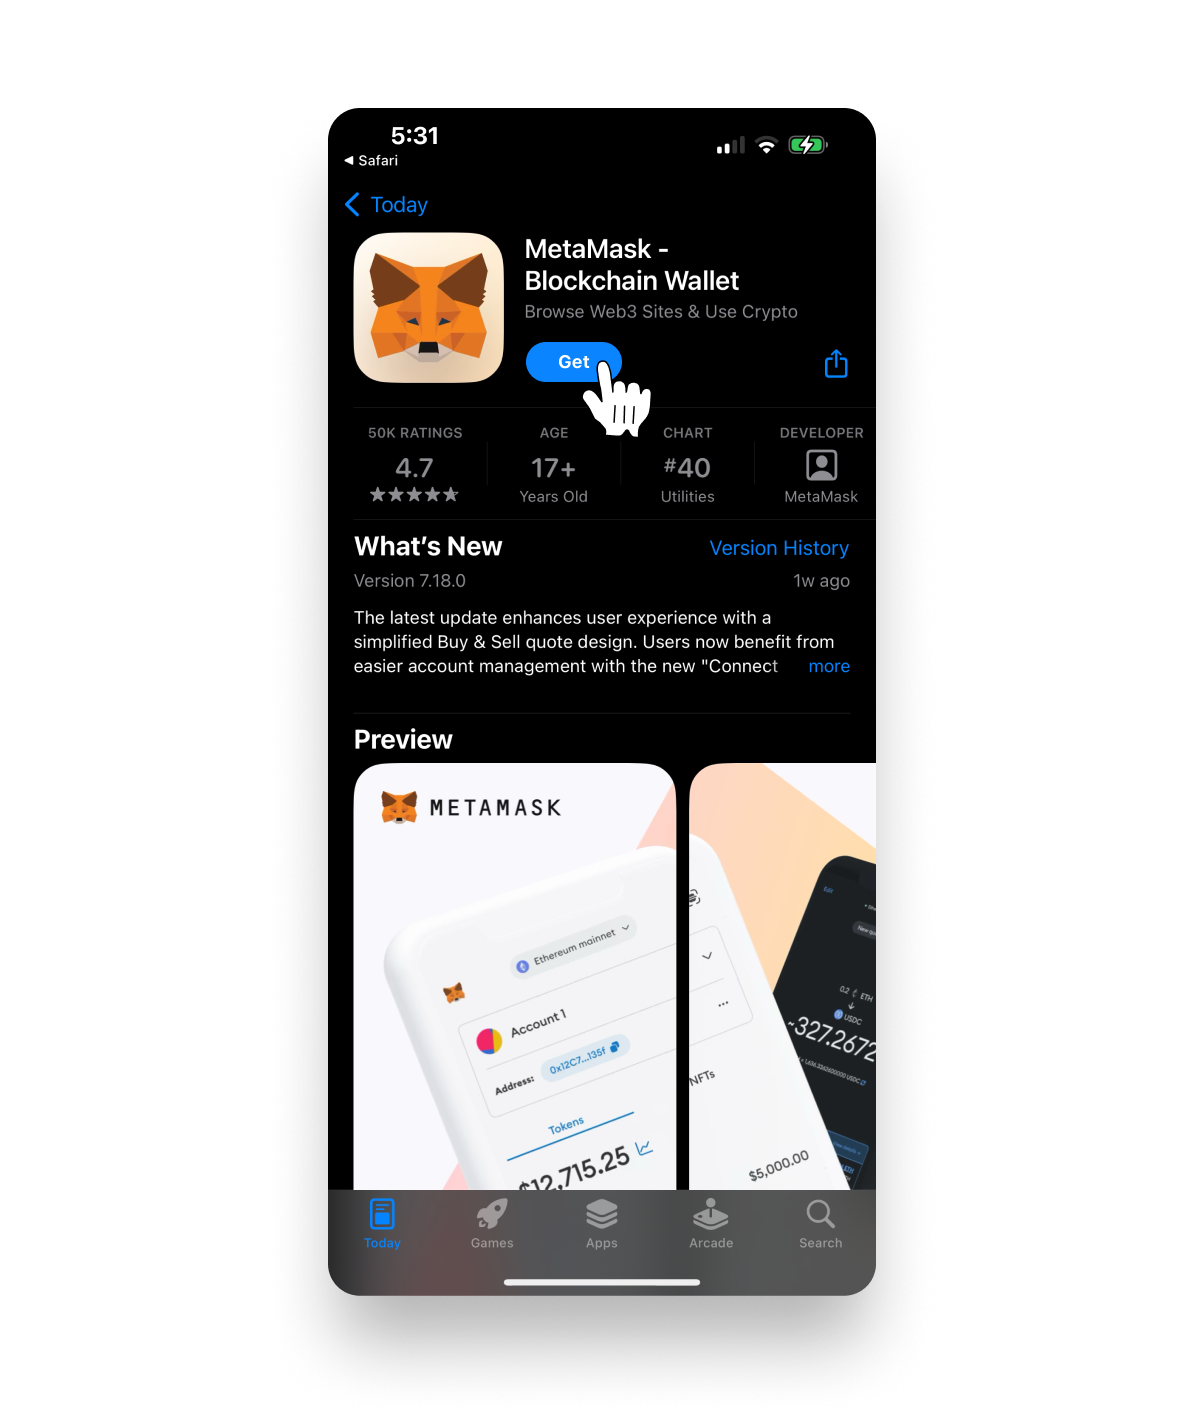
Step 1. Install MetaMask mobile app
- 1. Visit the MetaMask website and select your device.
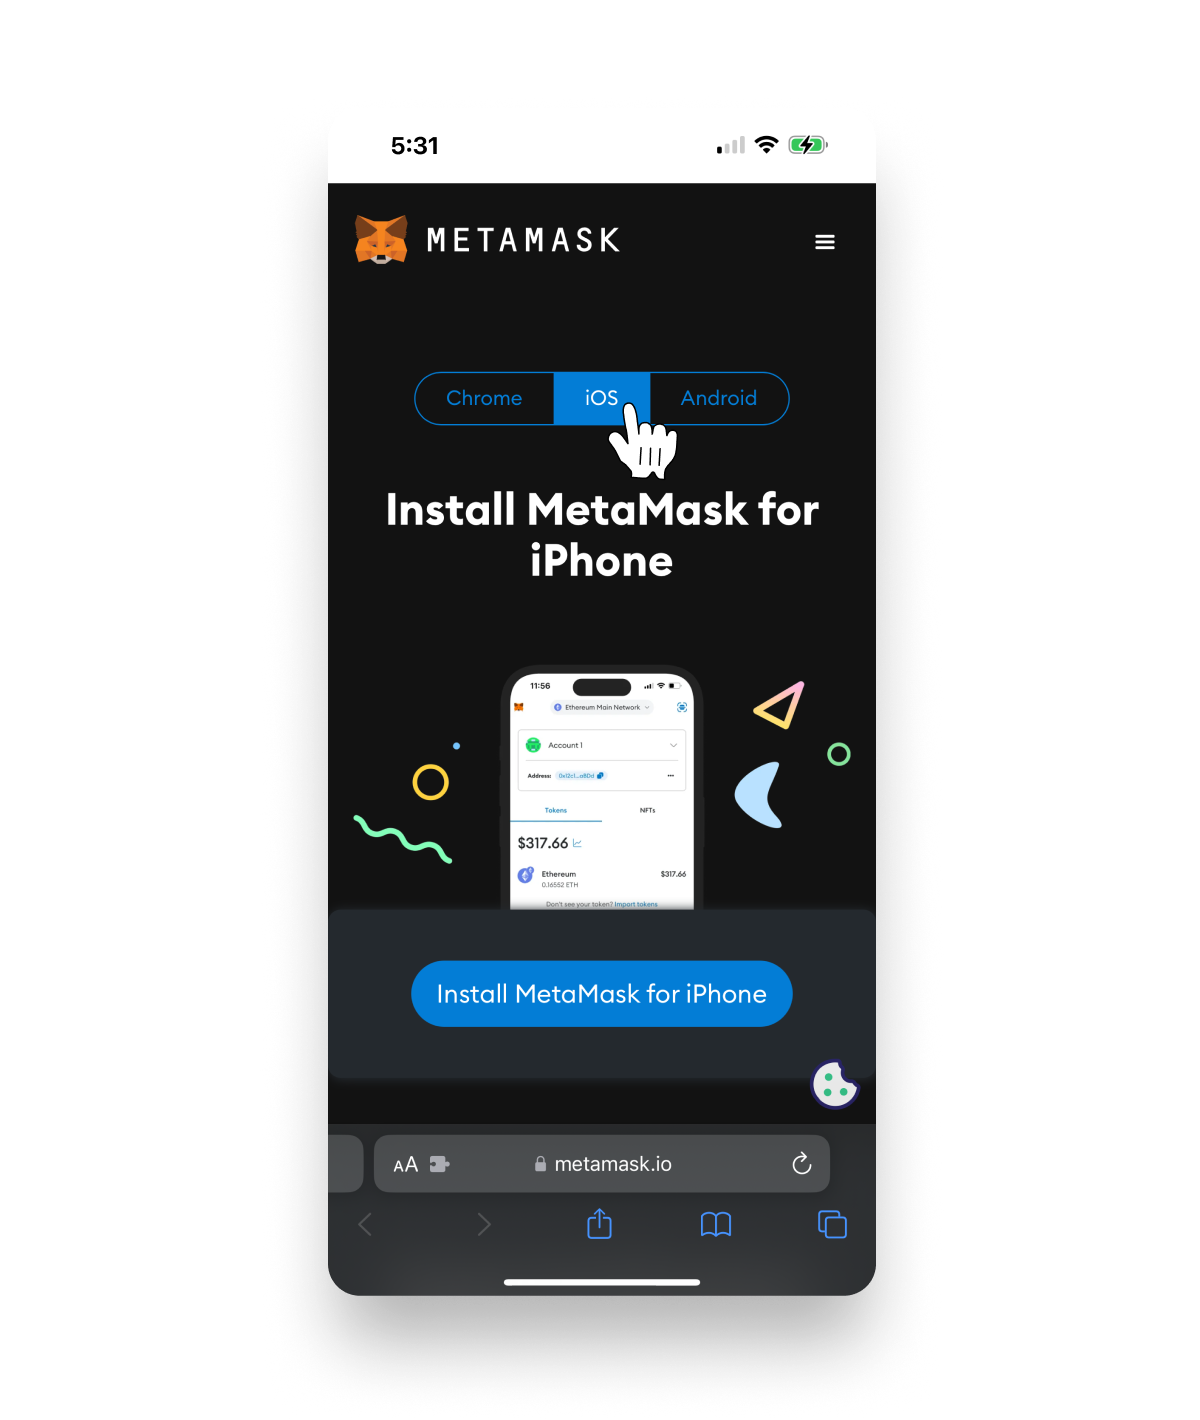
- 2. Click the Install MetaMask button.

- 3. Follow your device app store prompts to install the MetaMask app.
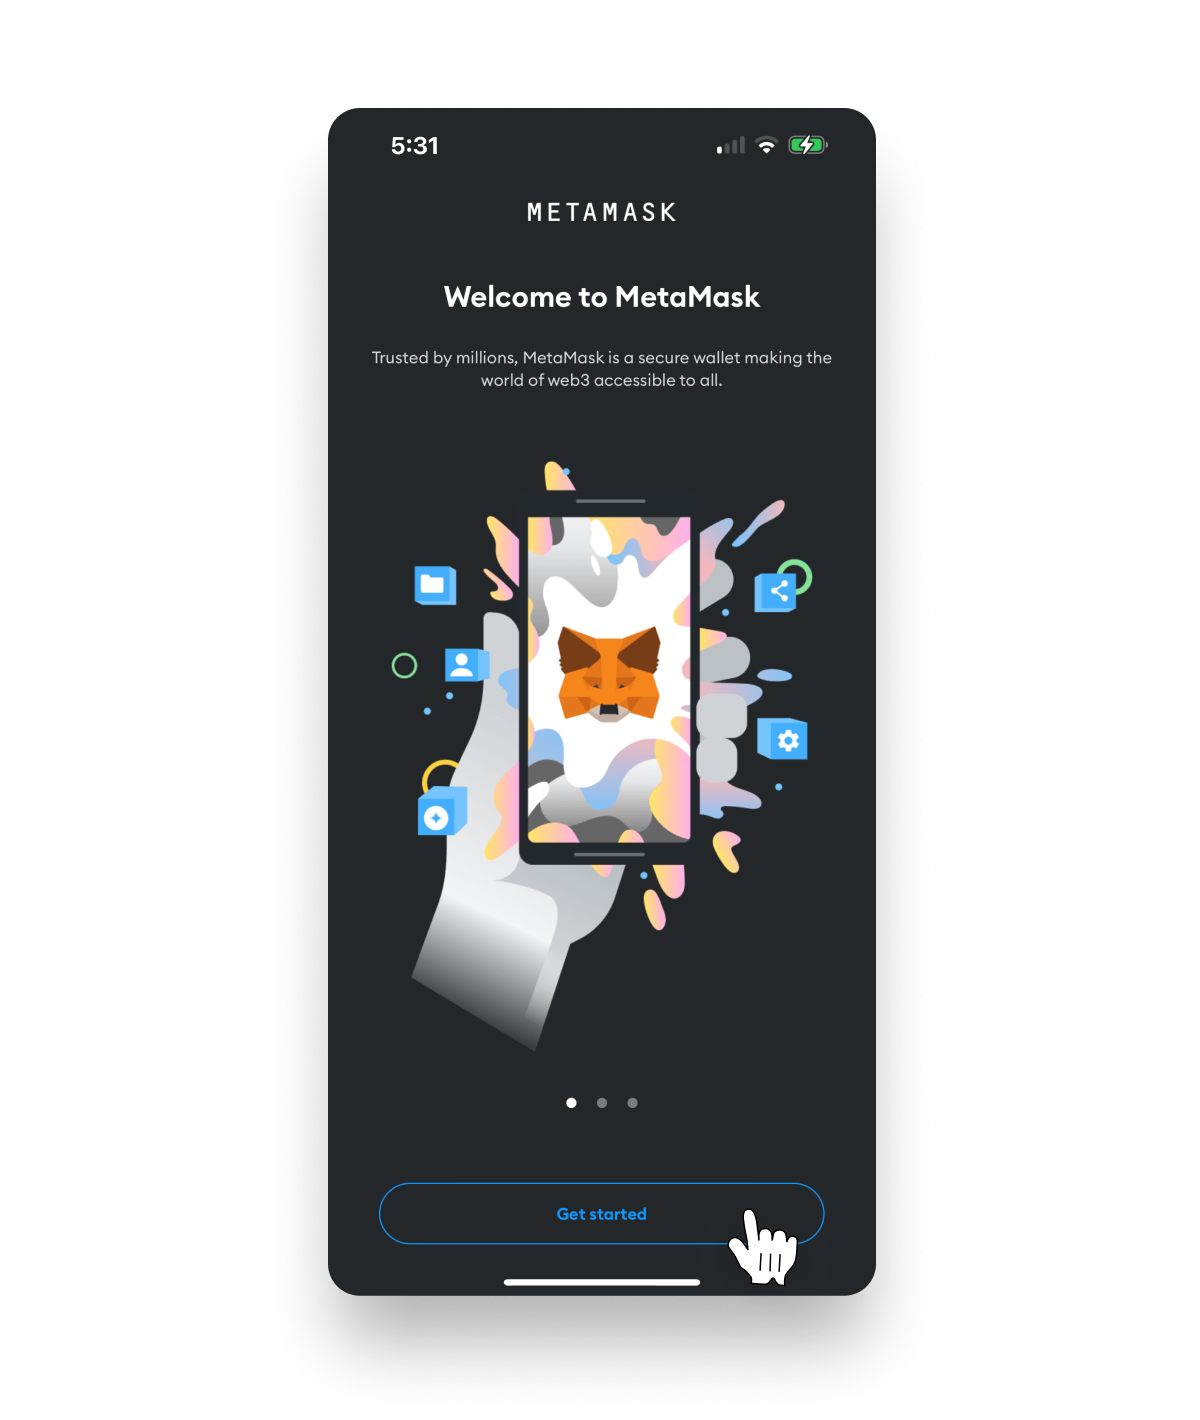
Step 2. Create your wallet
- 1. Open the MetaMask app.

- 2. Tap the Get started button.
- 3. Tap the Create a new wallet button
TIP: You can also choose to import a wallet if you have an existing seed phrase.

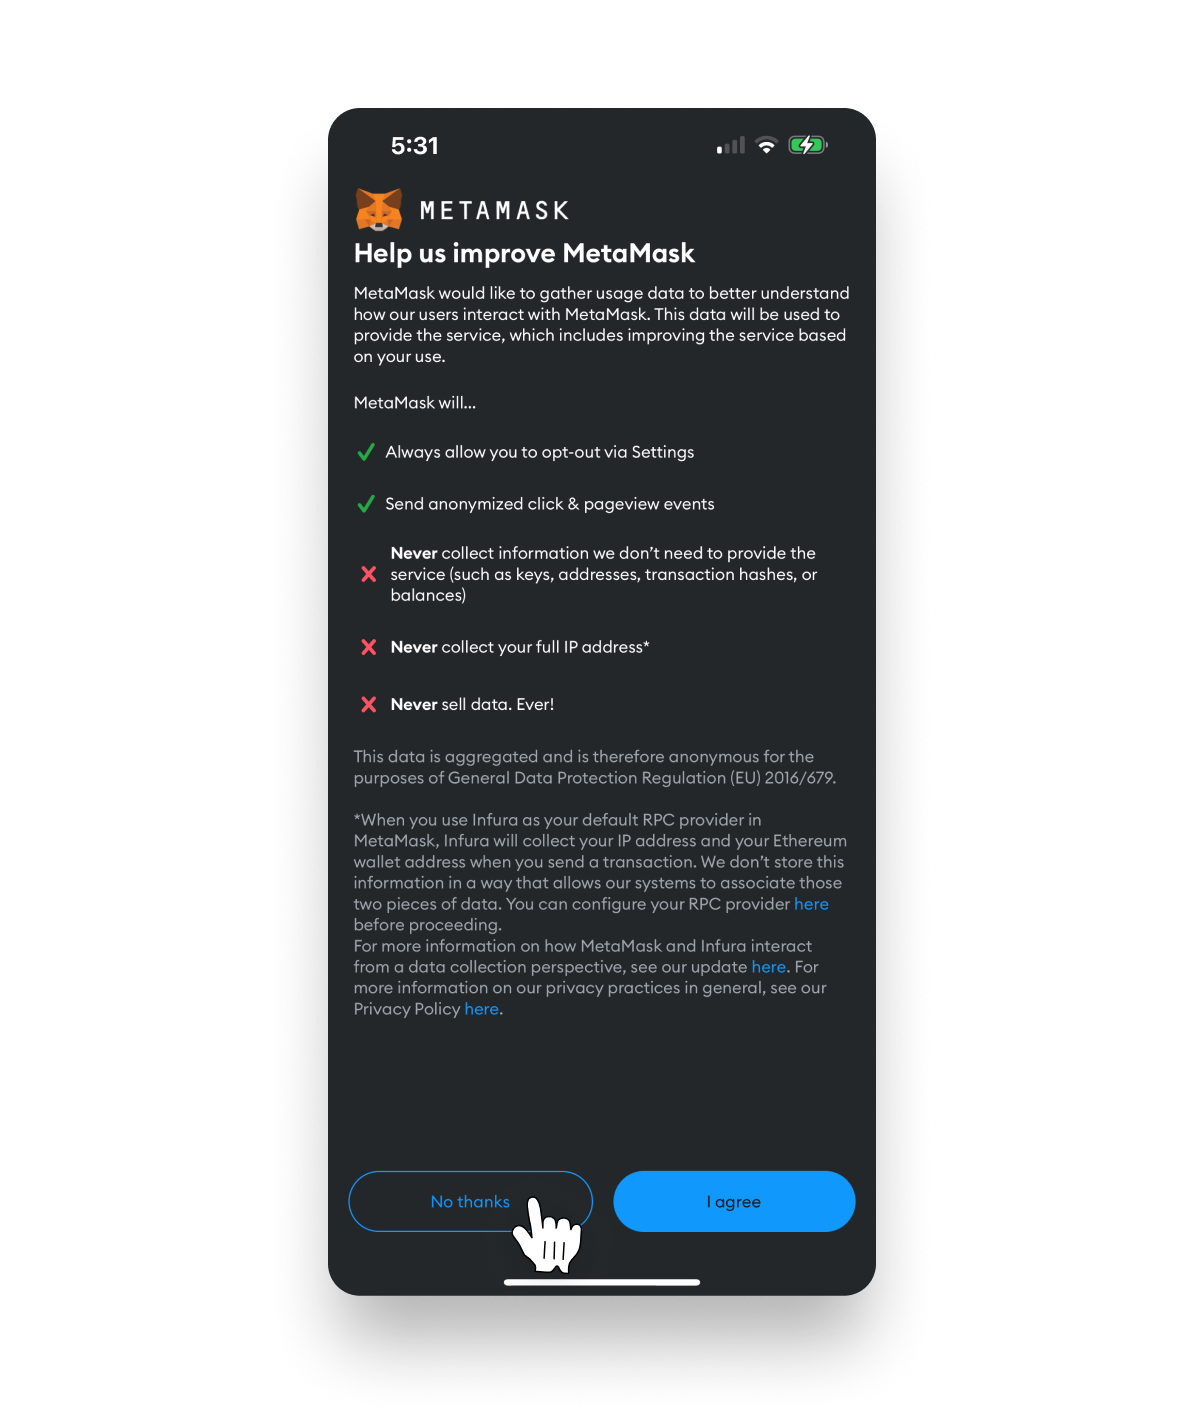
- 4. If you would like to share usage data with MetaMask click I agree, otherwise click No thanks.
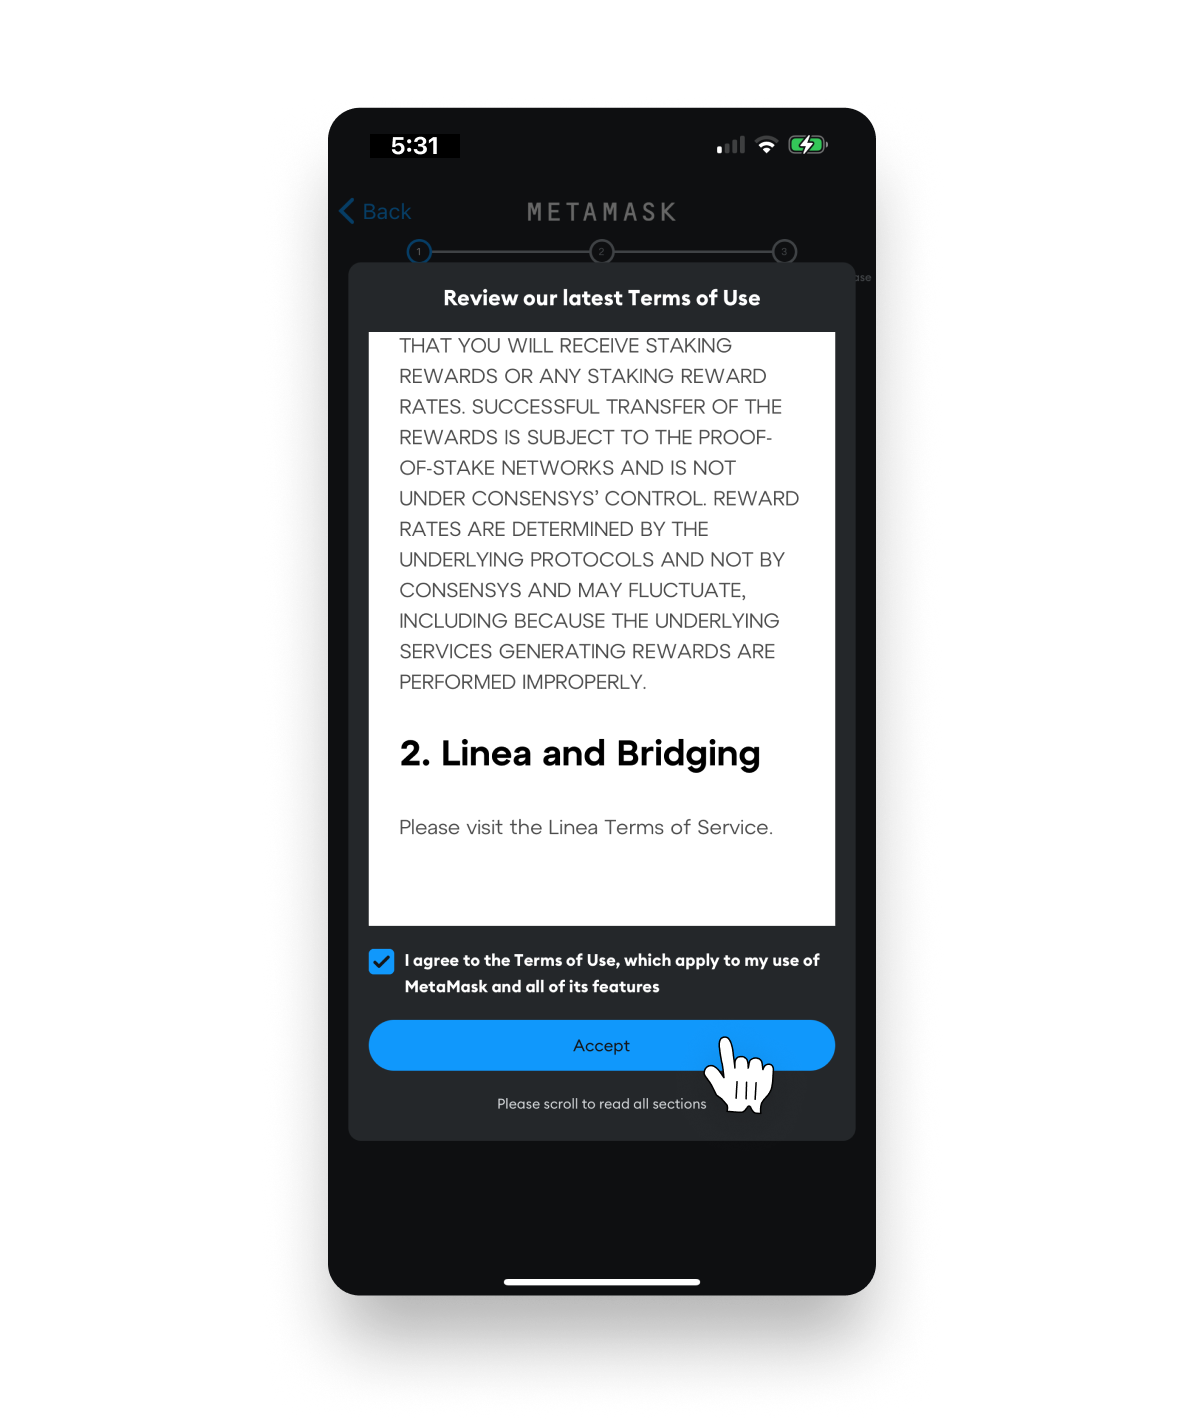
- 5. Review the Terms of Use and then tap the checkbox to agree to the terms.
TIP: You must scroll to the bottom of the terms to continue.

- 6. Tap the Accept button.
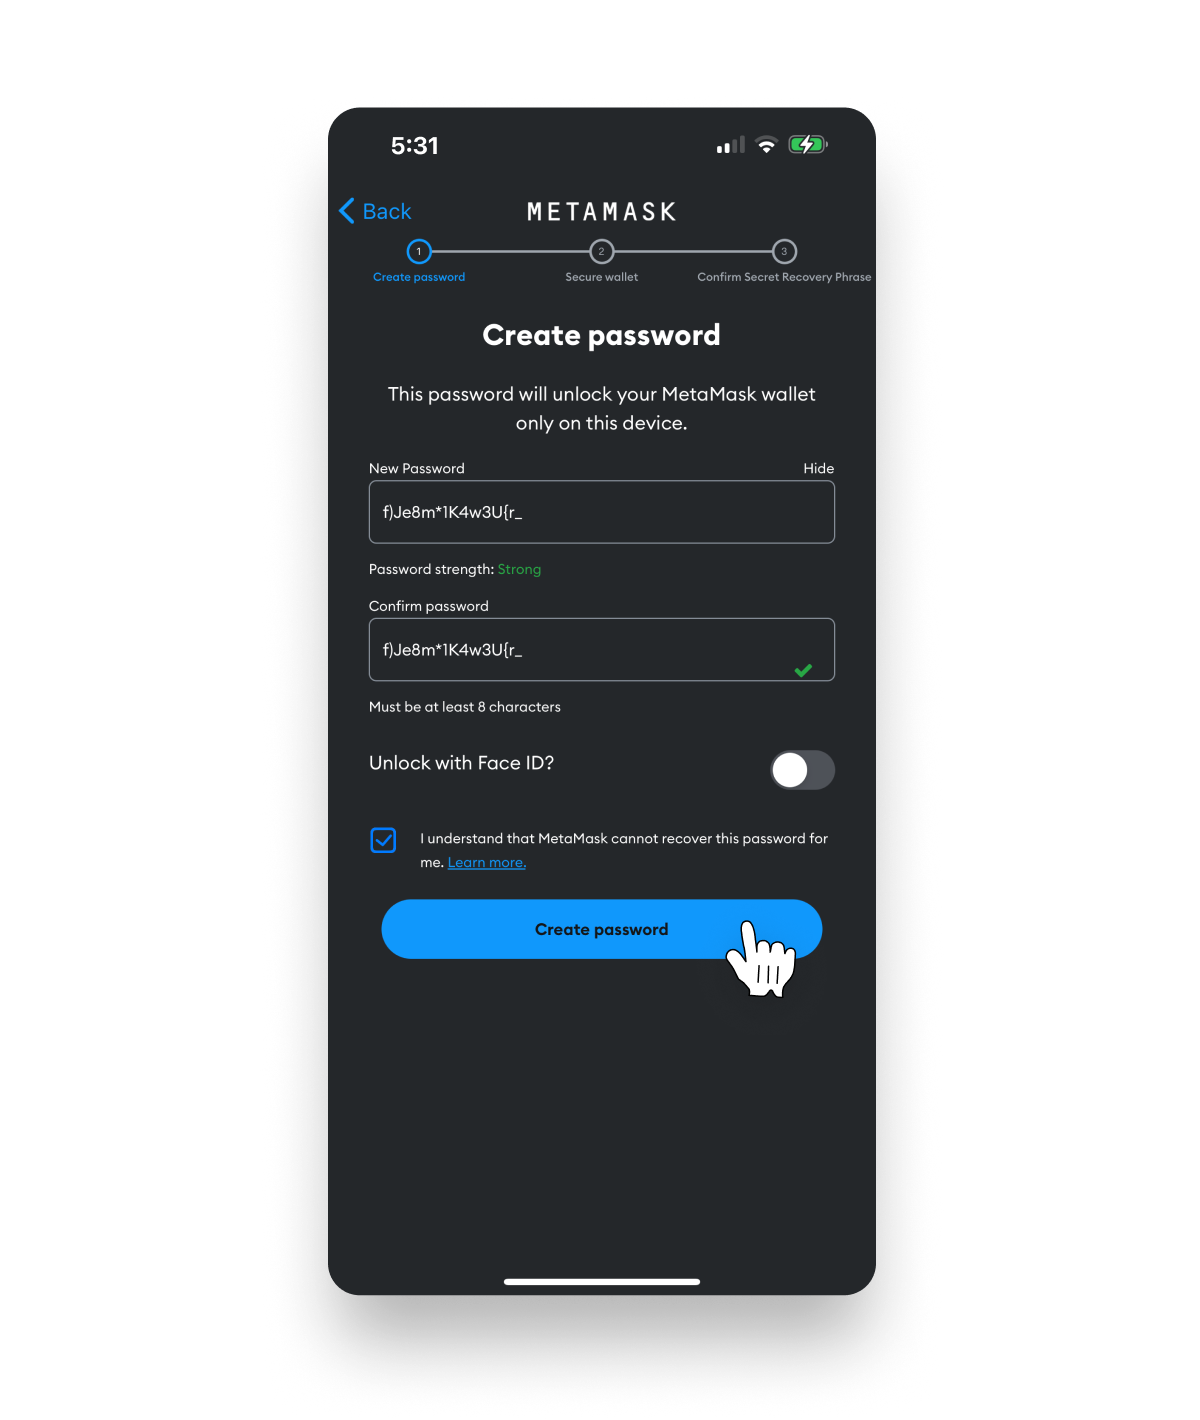
- 7. Create and confirm a secure password
TIP: A secure password contains a mixture of upper/lowercase letters, numbers, symbols and is at least 16 characters long.
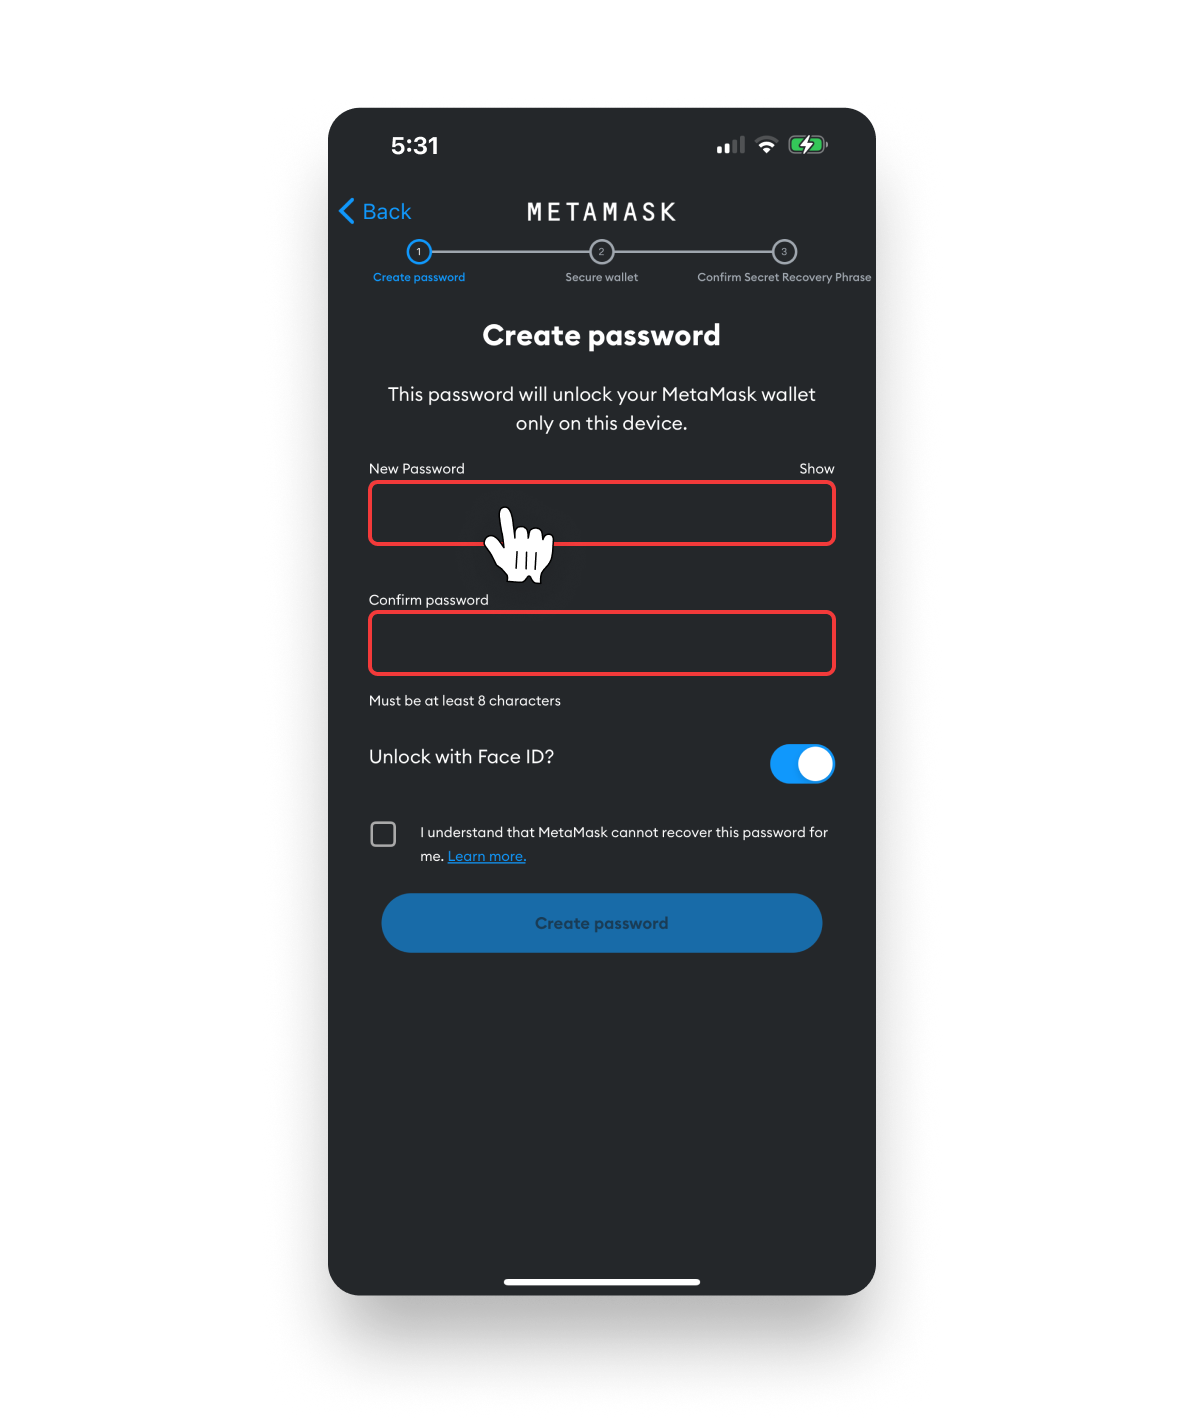
- 8. Once you have created and confirmed your password, tap the checkbox to confirm acknowledgment that MetaMask can not recover your password.

- 9. (Optional) If equipped, decide if you wish to unlock your wallet with FaceID.

- 10. Tap the Create password button.
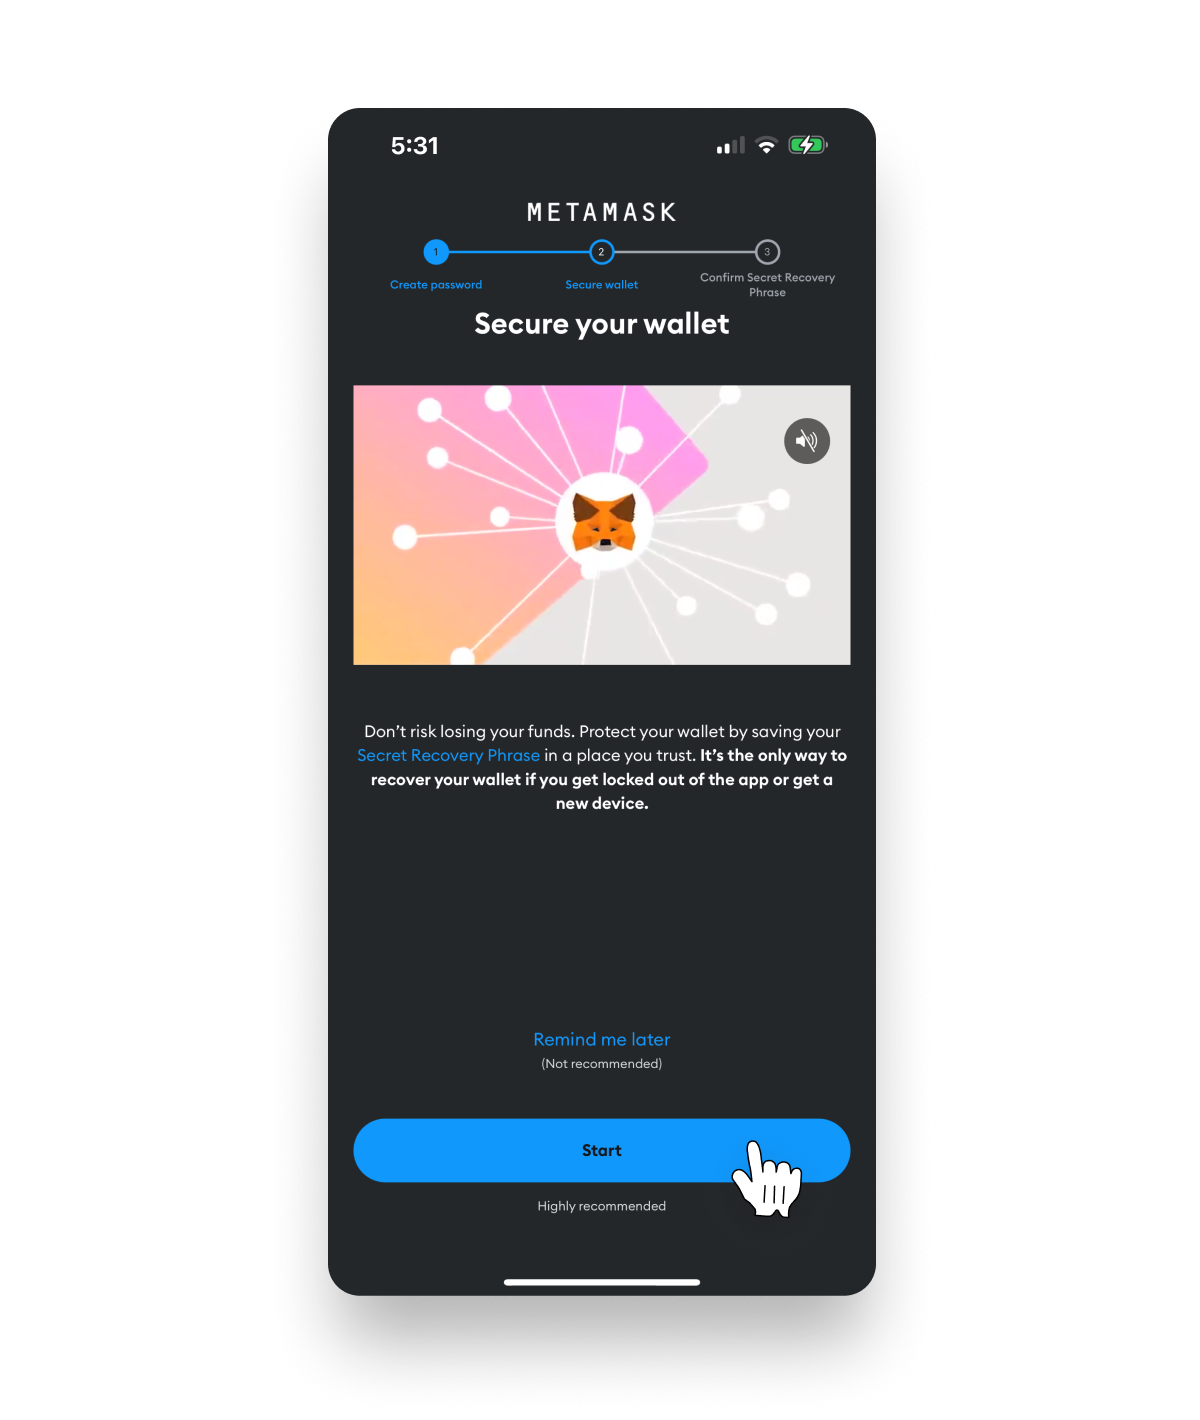
- 11. Tap the Start button to secure your wallet.
TIP: This step is highly recommended as your Secret Recovery Phrase is required to import your wallet on another device/browser or if you forget your password.
- 12. Tap the Start button after reading the information on screen.

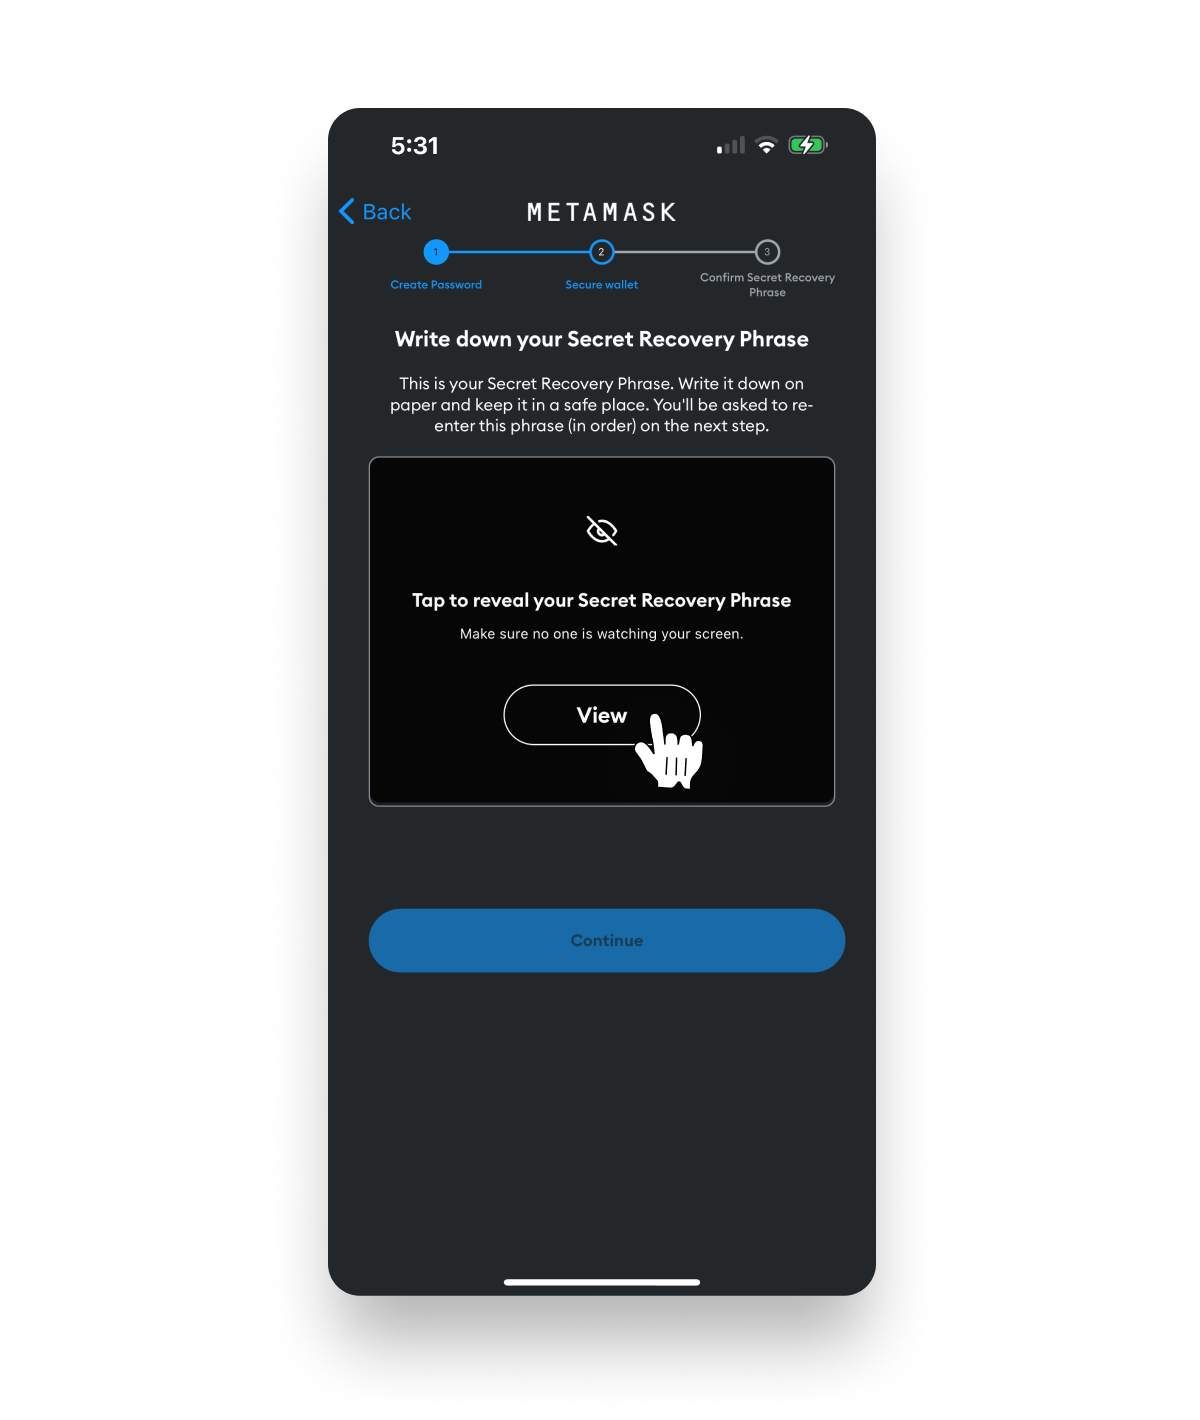
- 13. Tap the View button to reveal your Secret Recovery Phrase.
TIP: Never share this Secret Recovery Phrase with anyone. If someone asks you to share your Secret Recovery Phrase they are attempting to scam you.
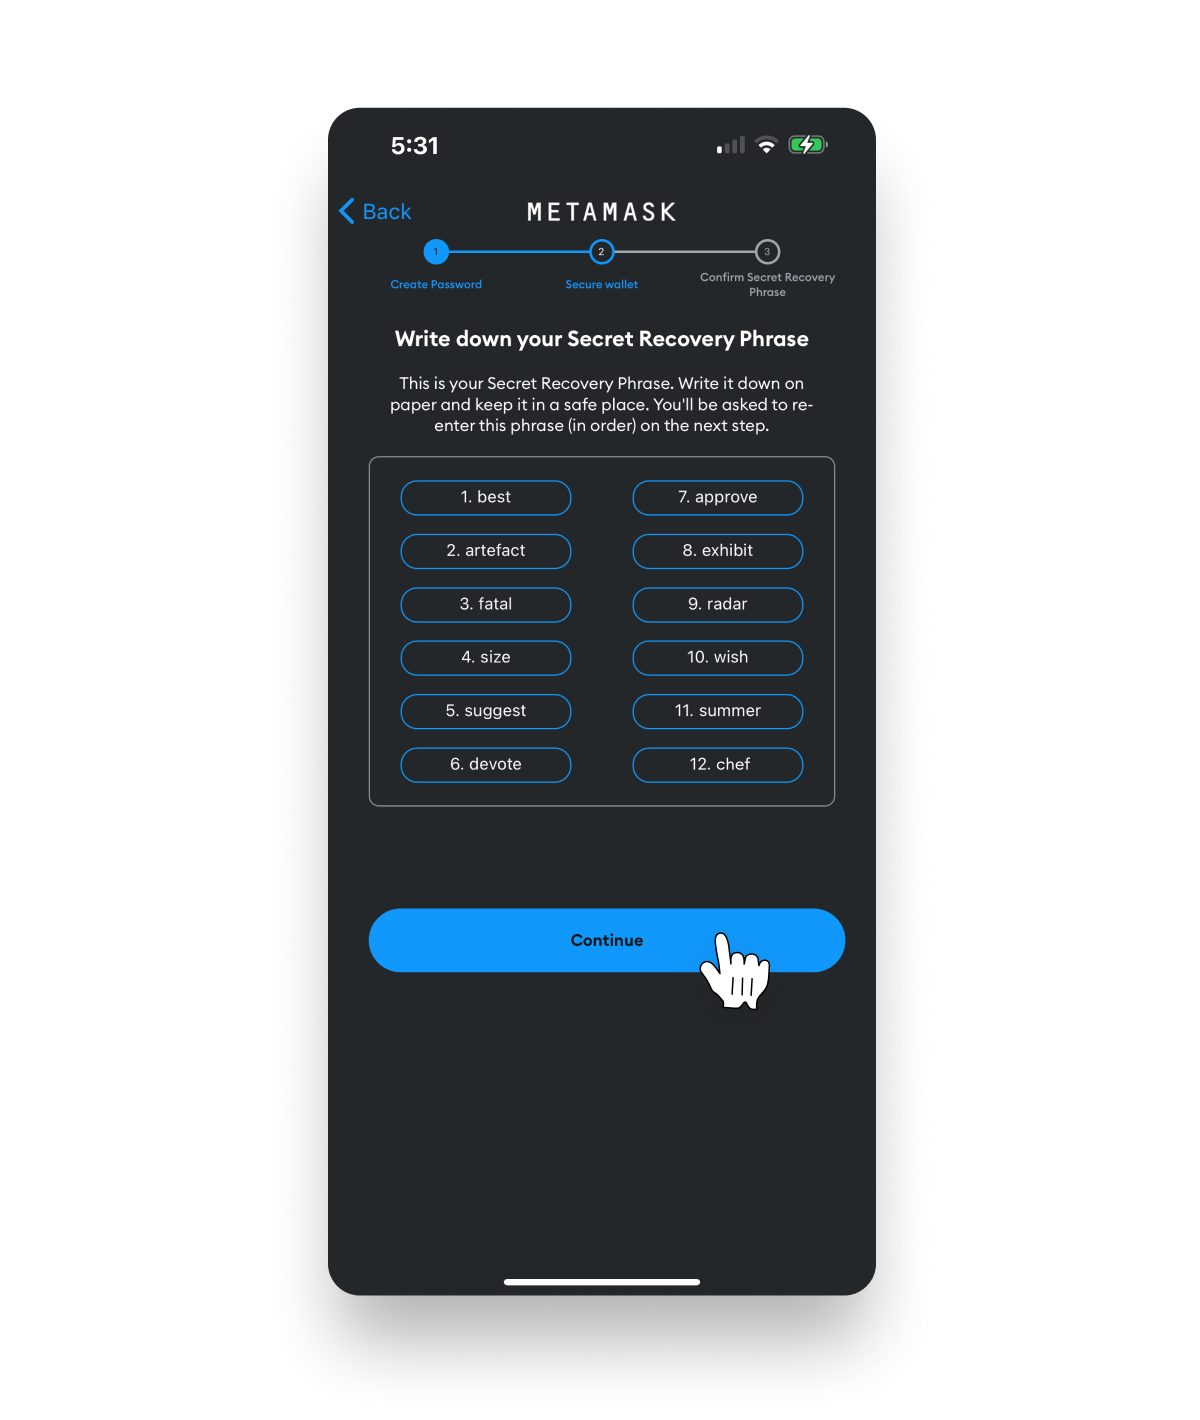
- 14. Securely store your Secret Recovery Phrase.
TIP: Remember to carefully check the spelling and order of the words in your recovery phrase.
🔒 Get the ultimate peace of mind by creating a protection plan with Inheriti® to securely store your sensitive data.
- 15. Tap the Continue button after carefully storing your Secret Recovery Phrase.
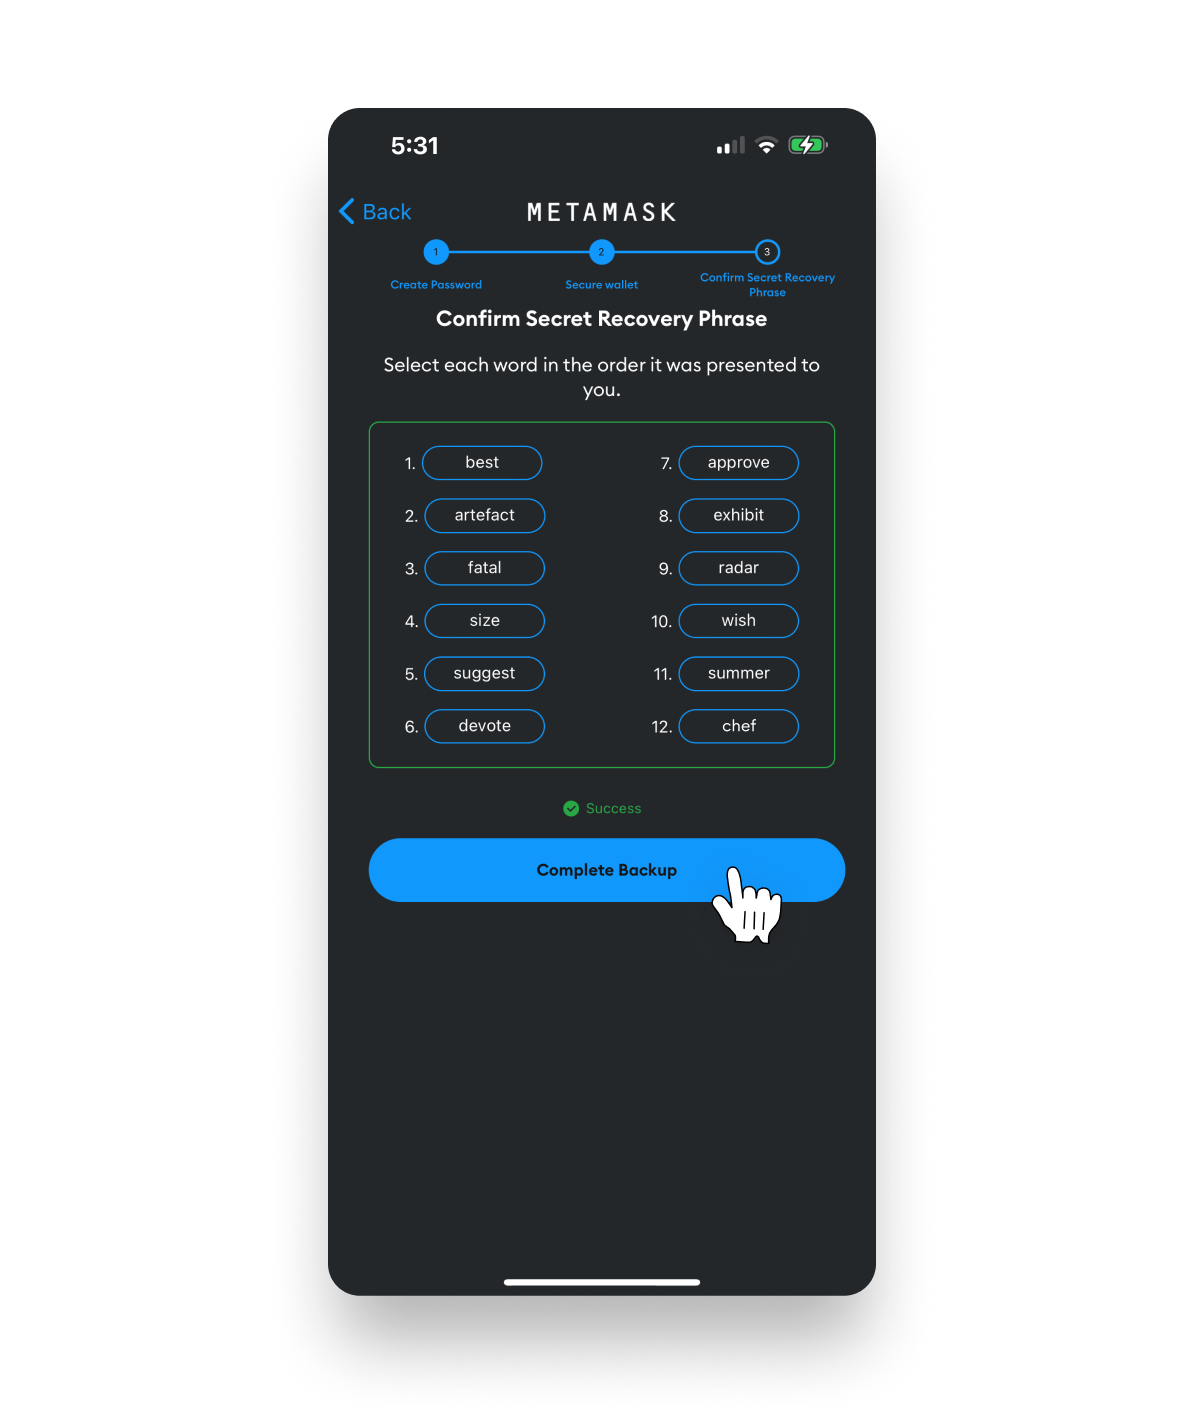
- 16. Confirm your Secret Recovery Phrase by tapping each word in the order it was originally displayed.
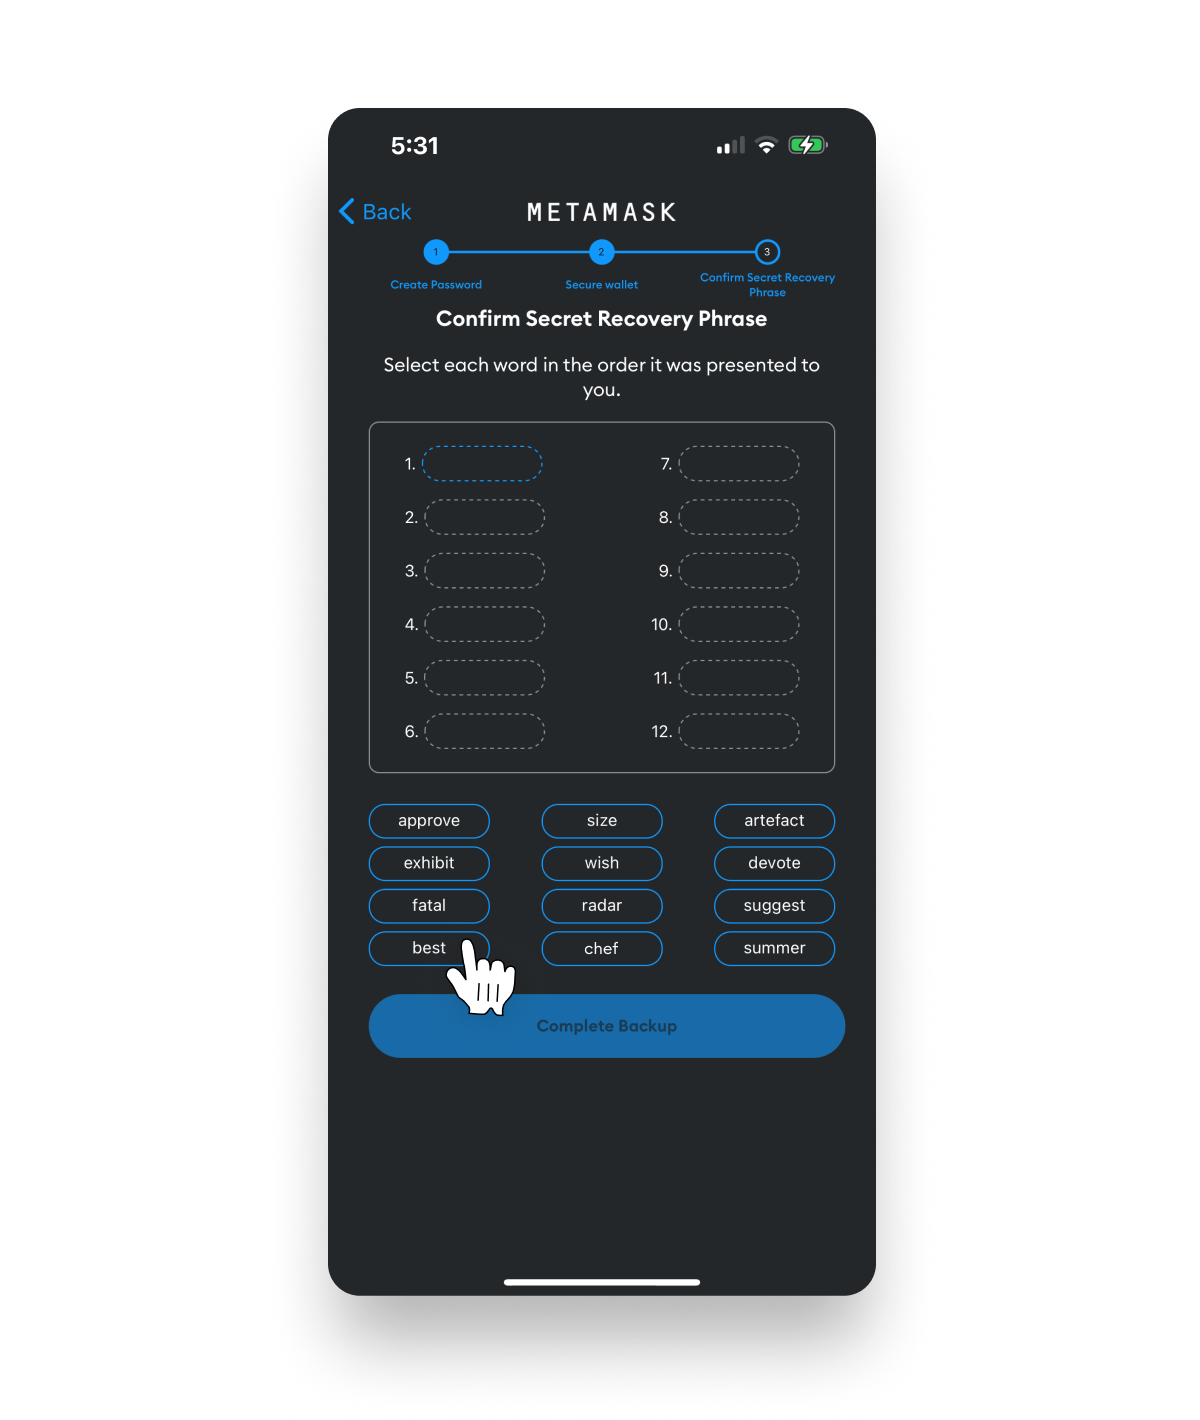
- 17. After successfully confirming your phrase, tap the Complete Backup button.
- 18. Click the Done button.

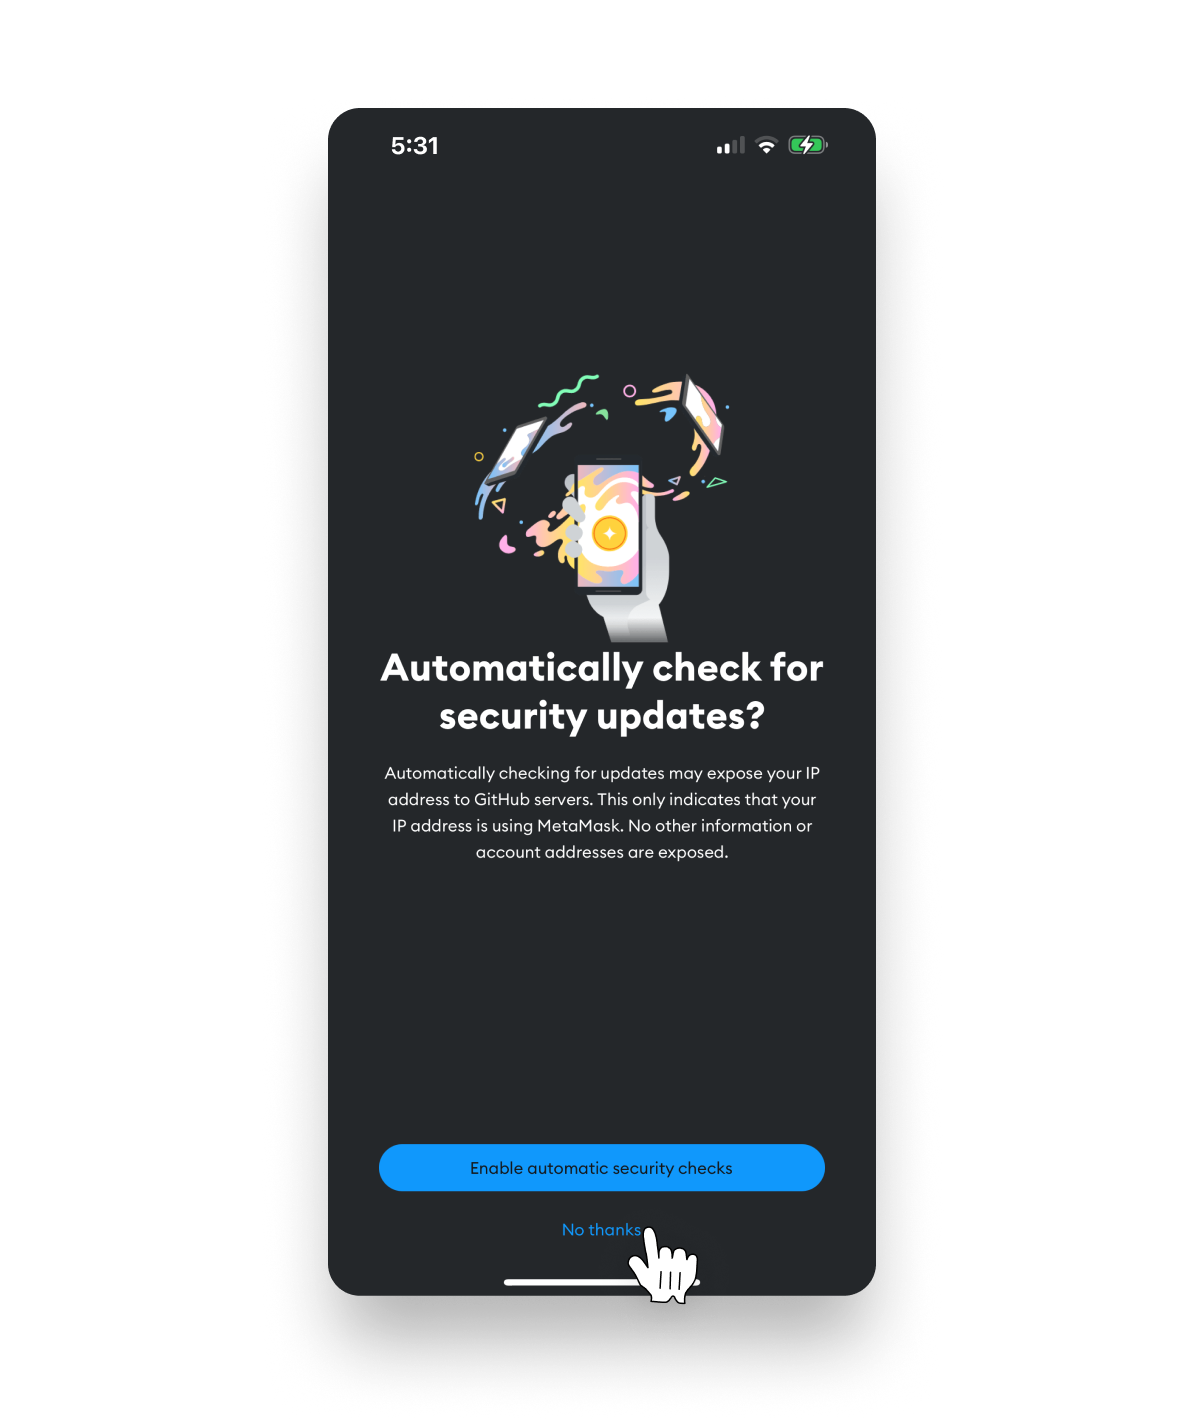
- 19. If you would like to automatically check for security updates tap the Enable automatic security checks button. Otherwise, tap No thanks.
Step 3. Add BNB Chain network
To connect with PancakeSwap, your MetaMask wallet will need to have BNB Chain network active.
- 1. Tap the network selector dropdown.

- 2. Tap the Add Network button.

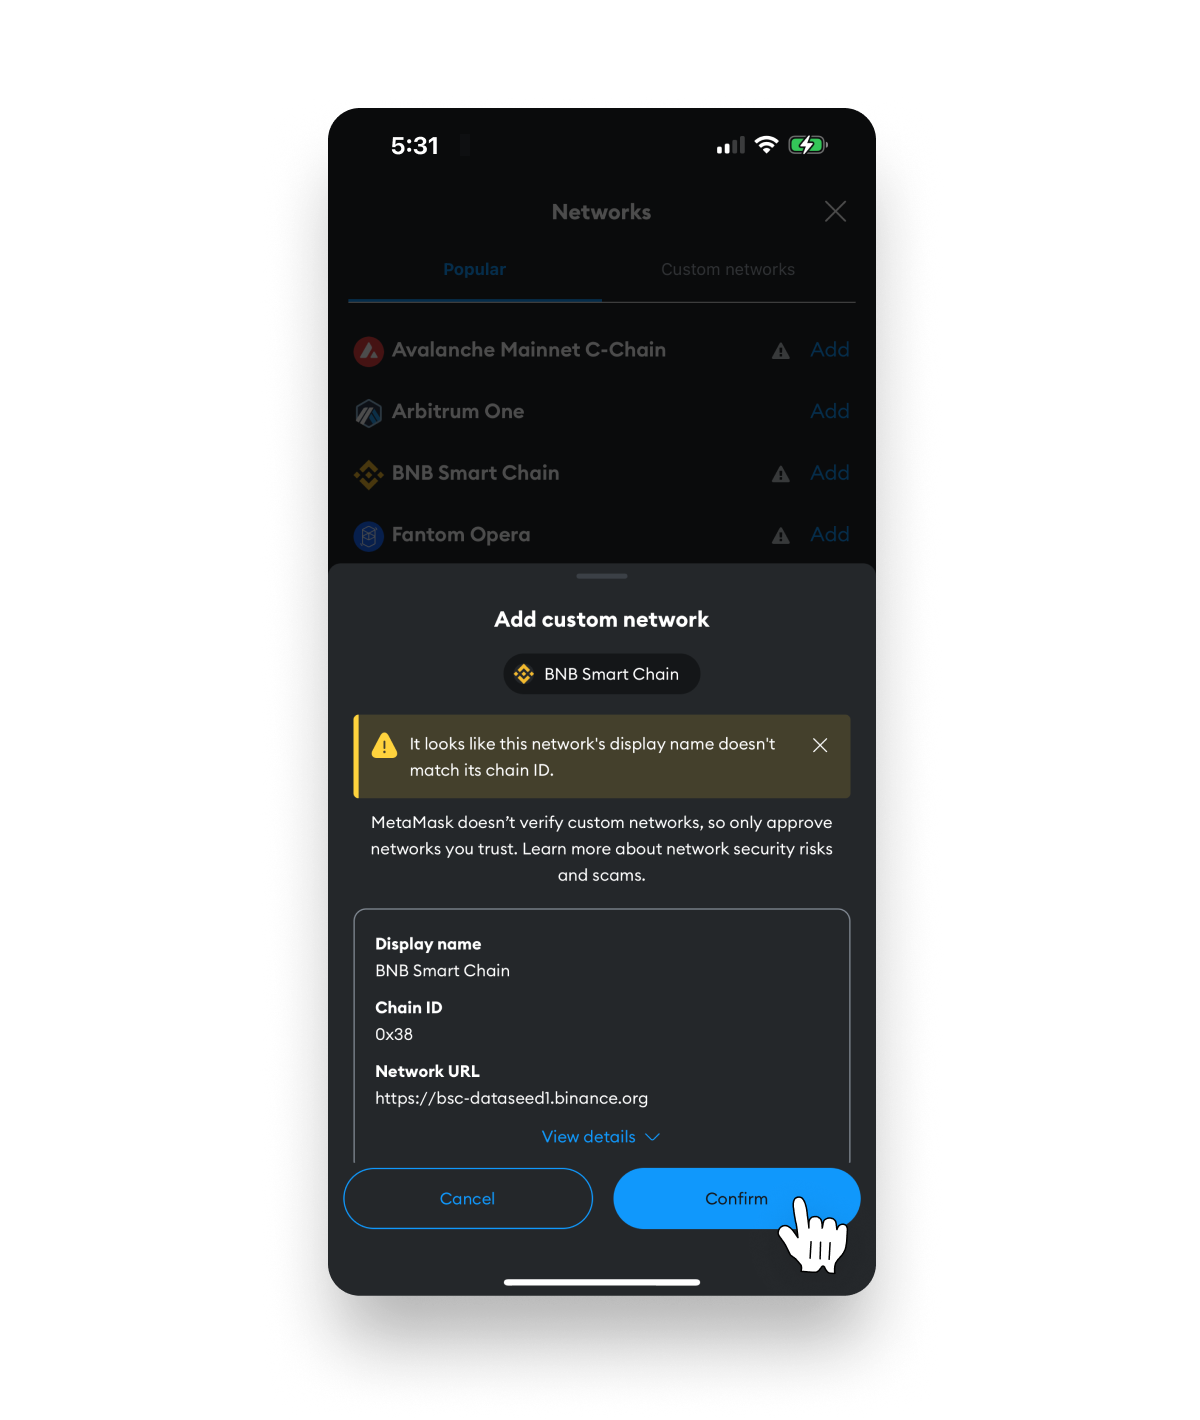
- 3. Locate BNB Smart Chain within the list and click Add.
TIP: BNB Smart Chain is also known as BNB Chain and was rebranded from Binance Smart Chain (BSC) in 2022.

- 4. Click the Confirm button.
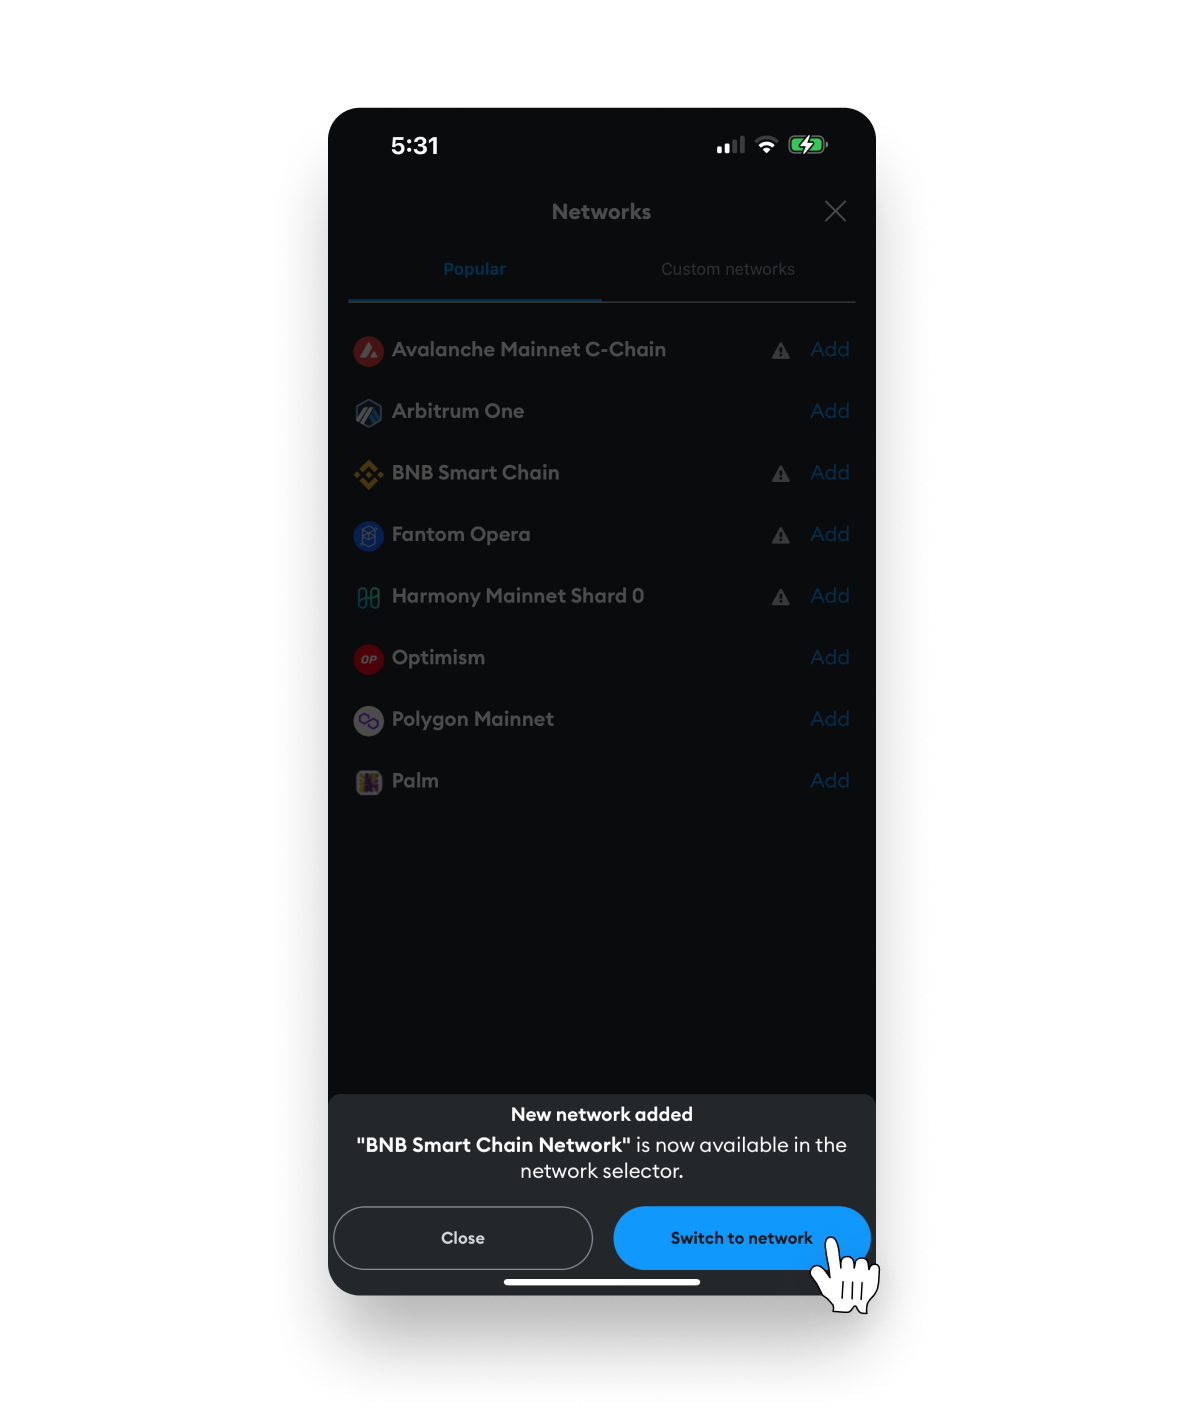
- 5. Click the Switch to network button to switch the wallet’s active network from Ethereum to BNB Smart Chain.
- 6. Read the tips on screen and then click the Got it button.

Step 4. Purchase $BNB and swap asset
Your MetaMask wallet will need a small amount of $BNB token to pay for the trading and transaction fees (similar to needing $VTHO when transacting on vechain network).
Also, you will need to purchase the asset you want to swap for $SHA. You may choose to use $BNB, $BUSD or $USDT.
TIP: Using $BNB as your asset for swapping will result in fewer purchases and transfers as $BNB can pay the fees and be swapped for $SHA.
Option 1. Purchase via MetaMask
⚠️ Important – purchasing tokens via the MetaMask extension offers convenience to eligible users, but the rates and fees are not as favorable compared to purchasing via a centralized exchange (CEX).
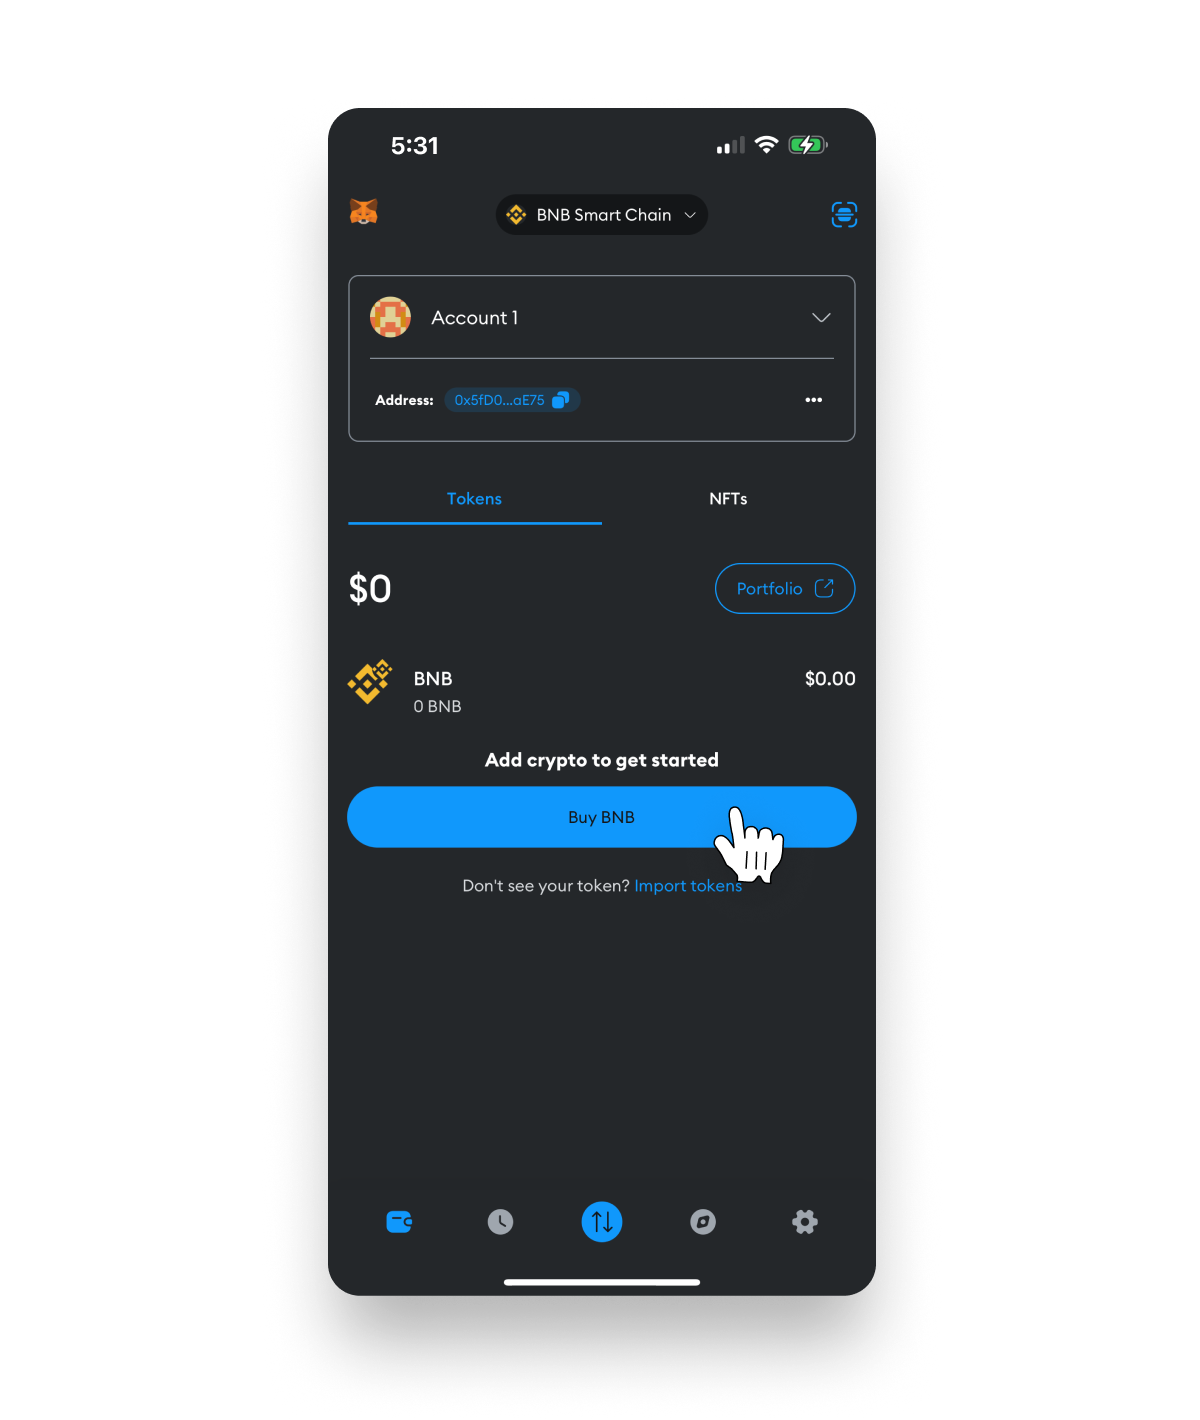
- 1. Tap the Buy BNB button.
- 2. After reading the available information, tap the Get started button.

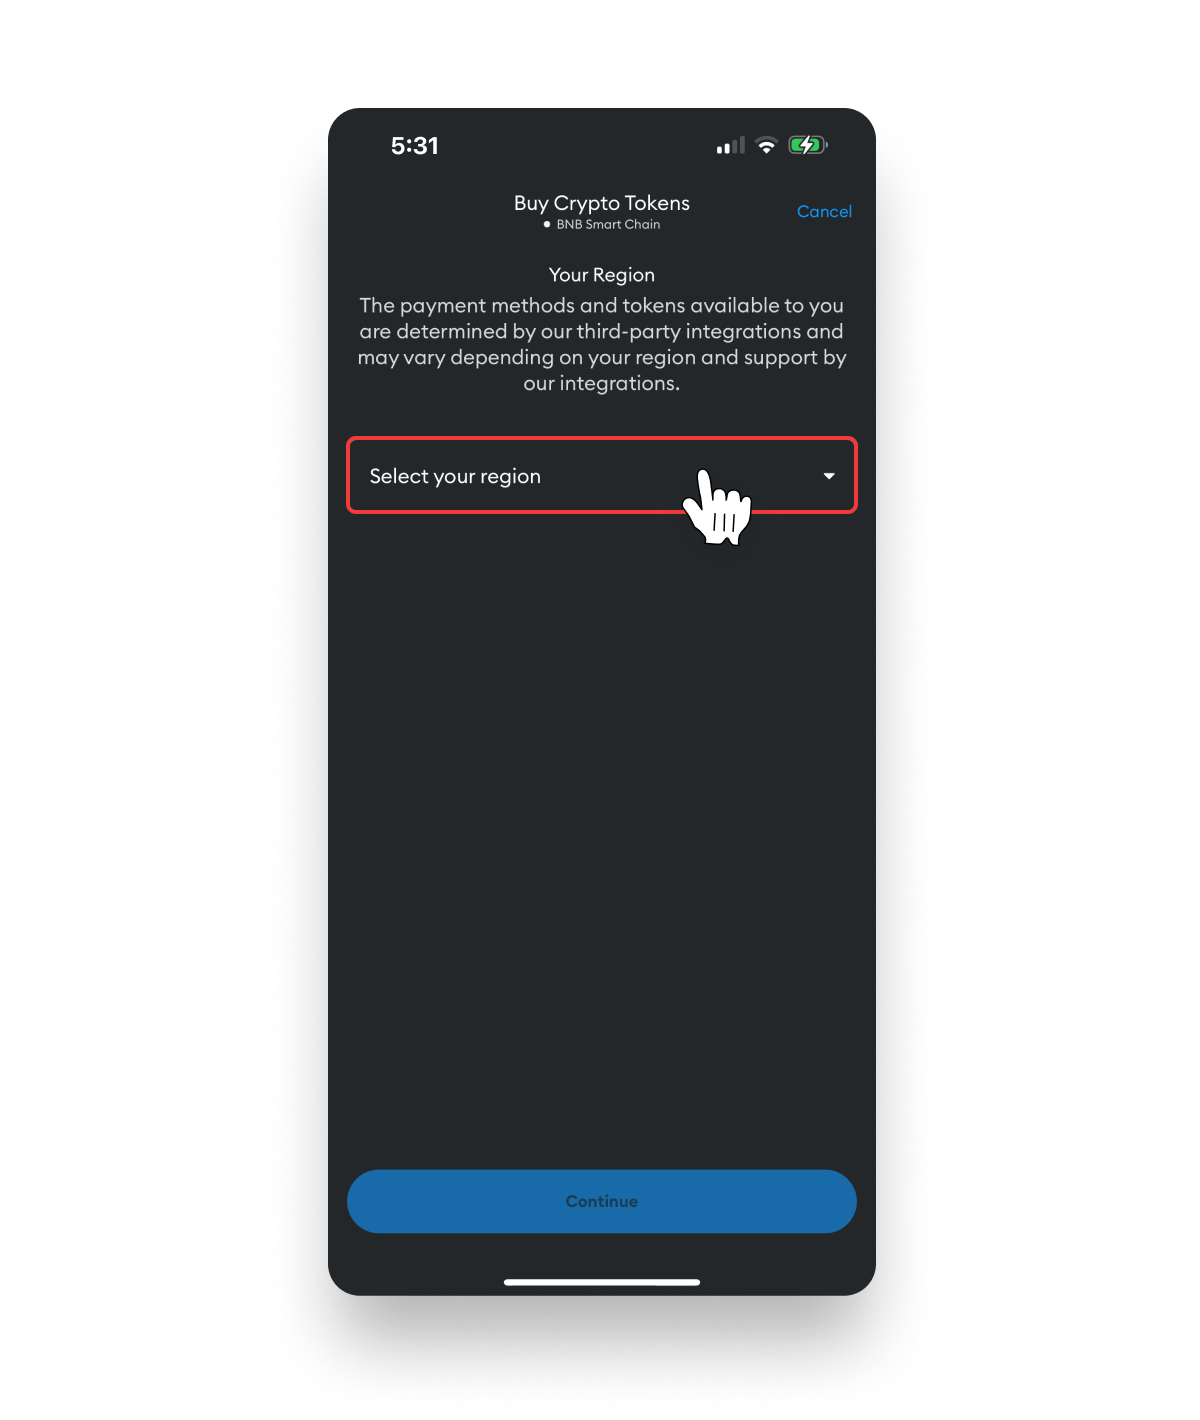
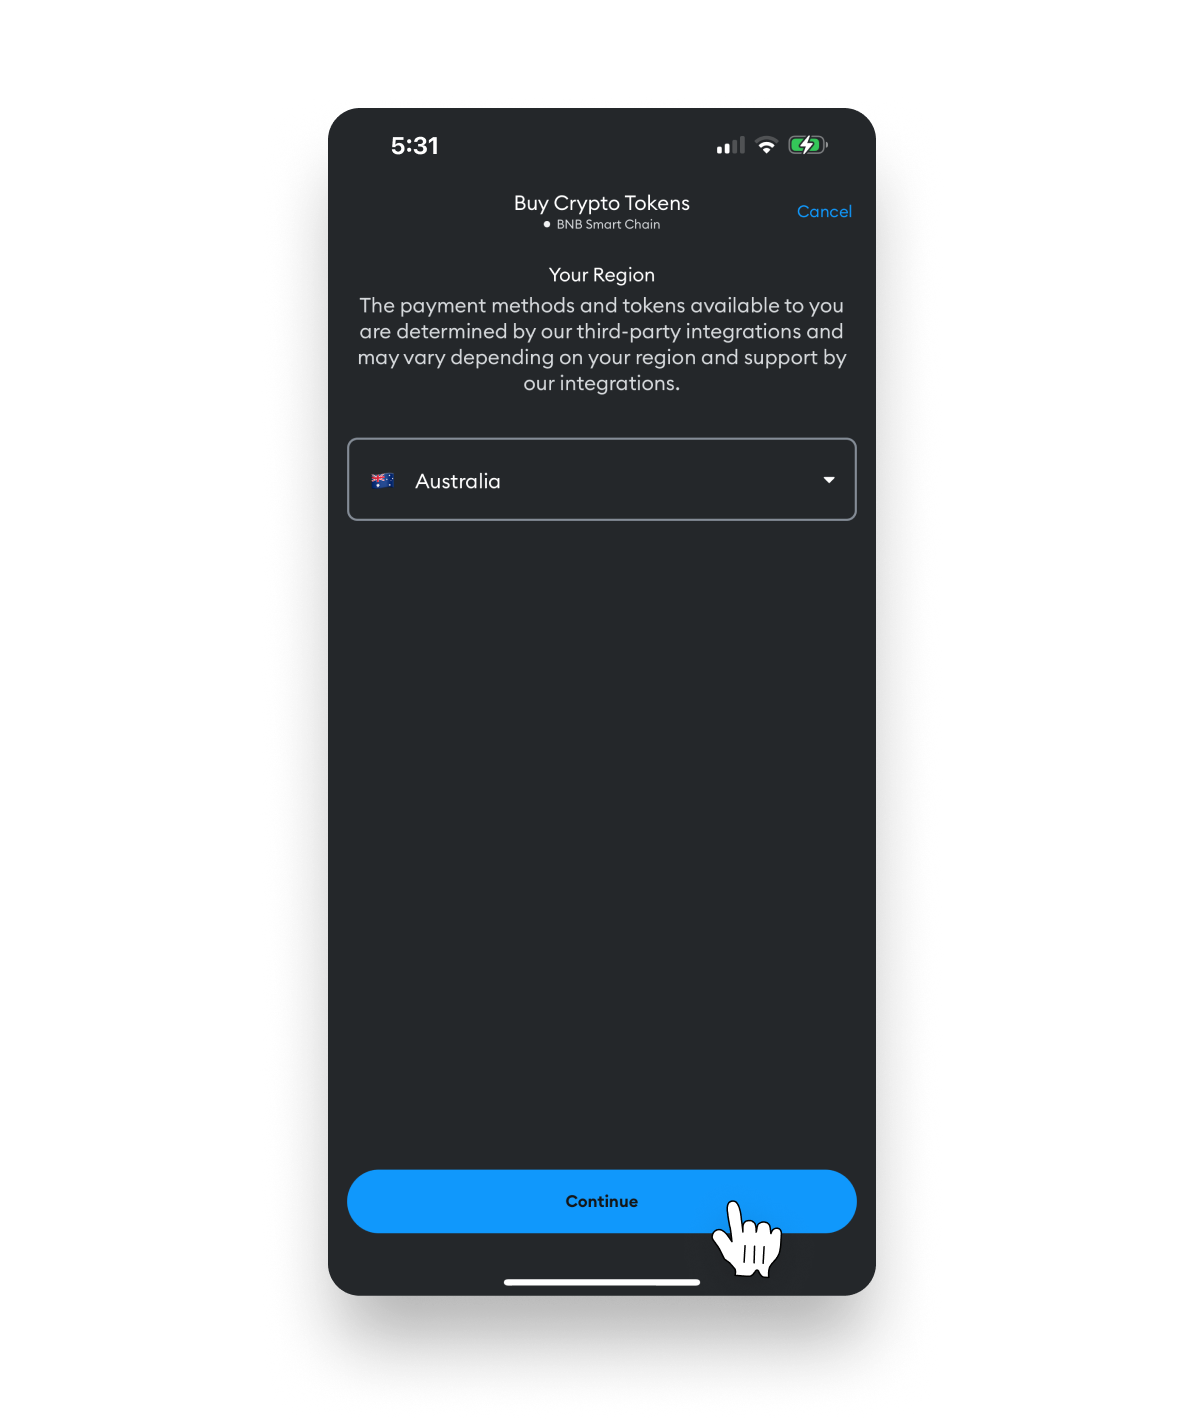
- 3. Select your region to check if you’re eligible to use the service.
- 4. Tap the Continue button.
- 5. Choose your preferred payment method from the available options.
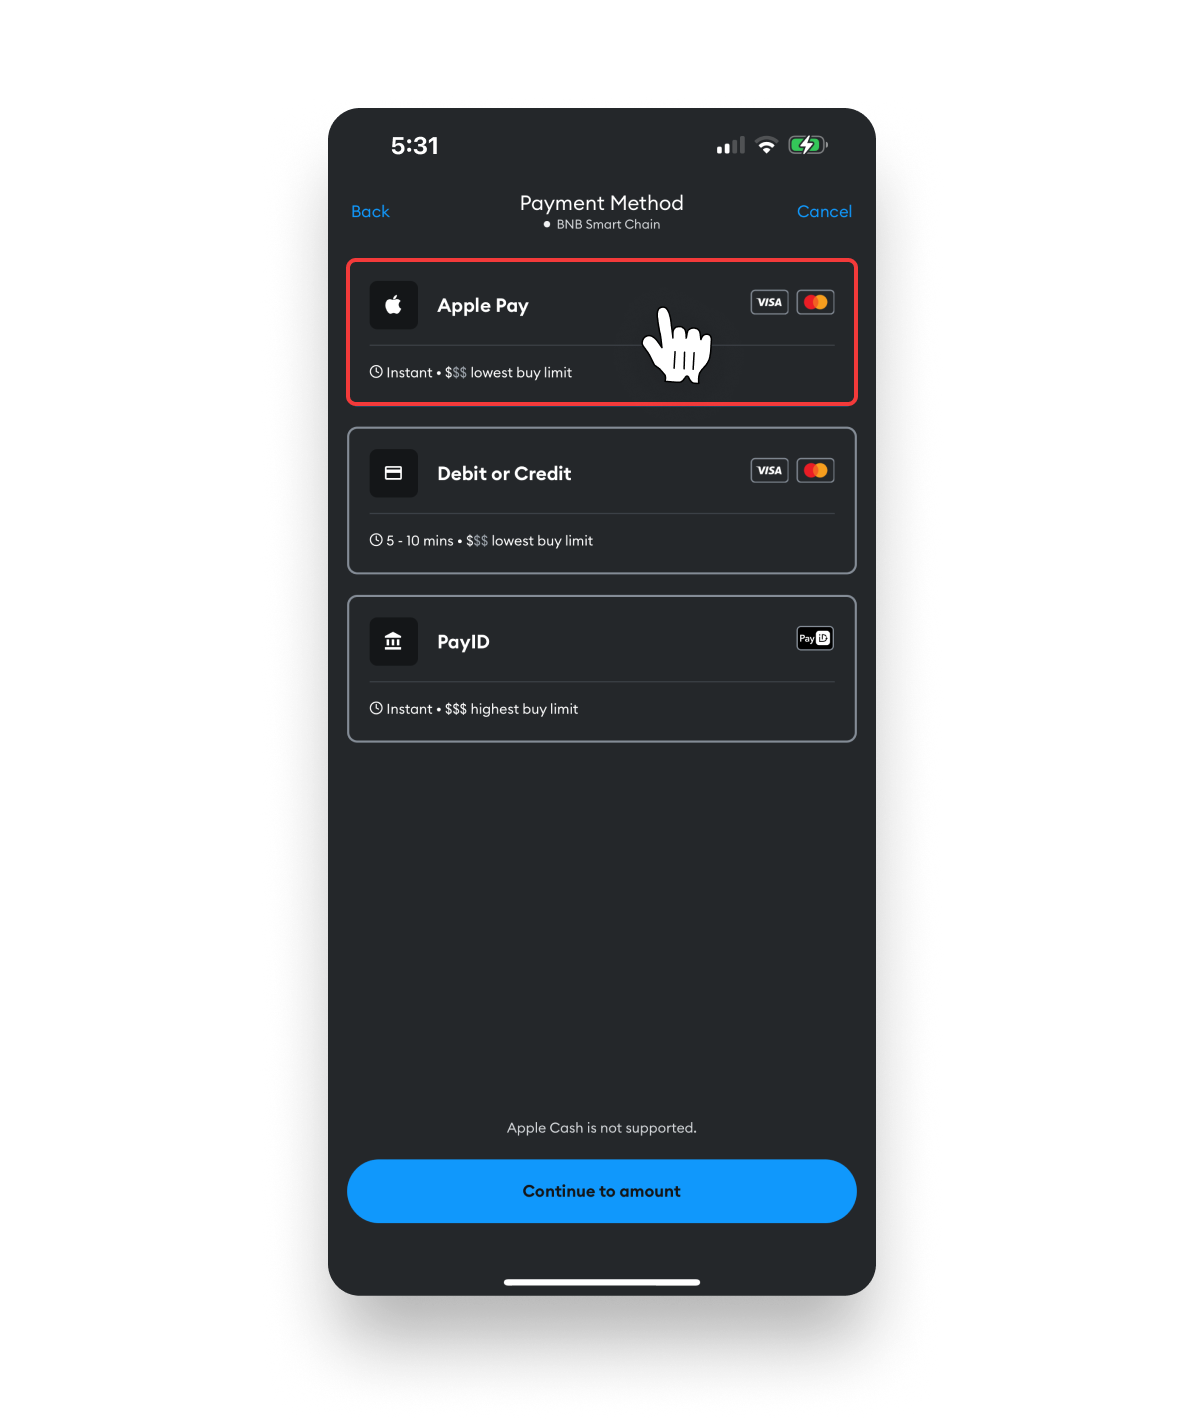
- 6. Tap the Continue to amount button.

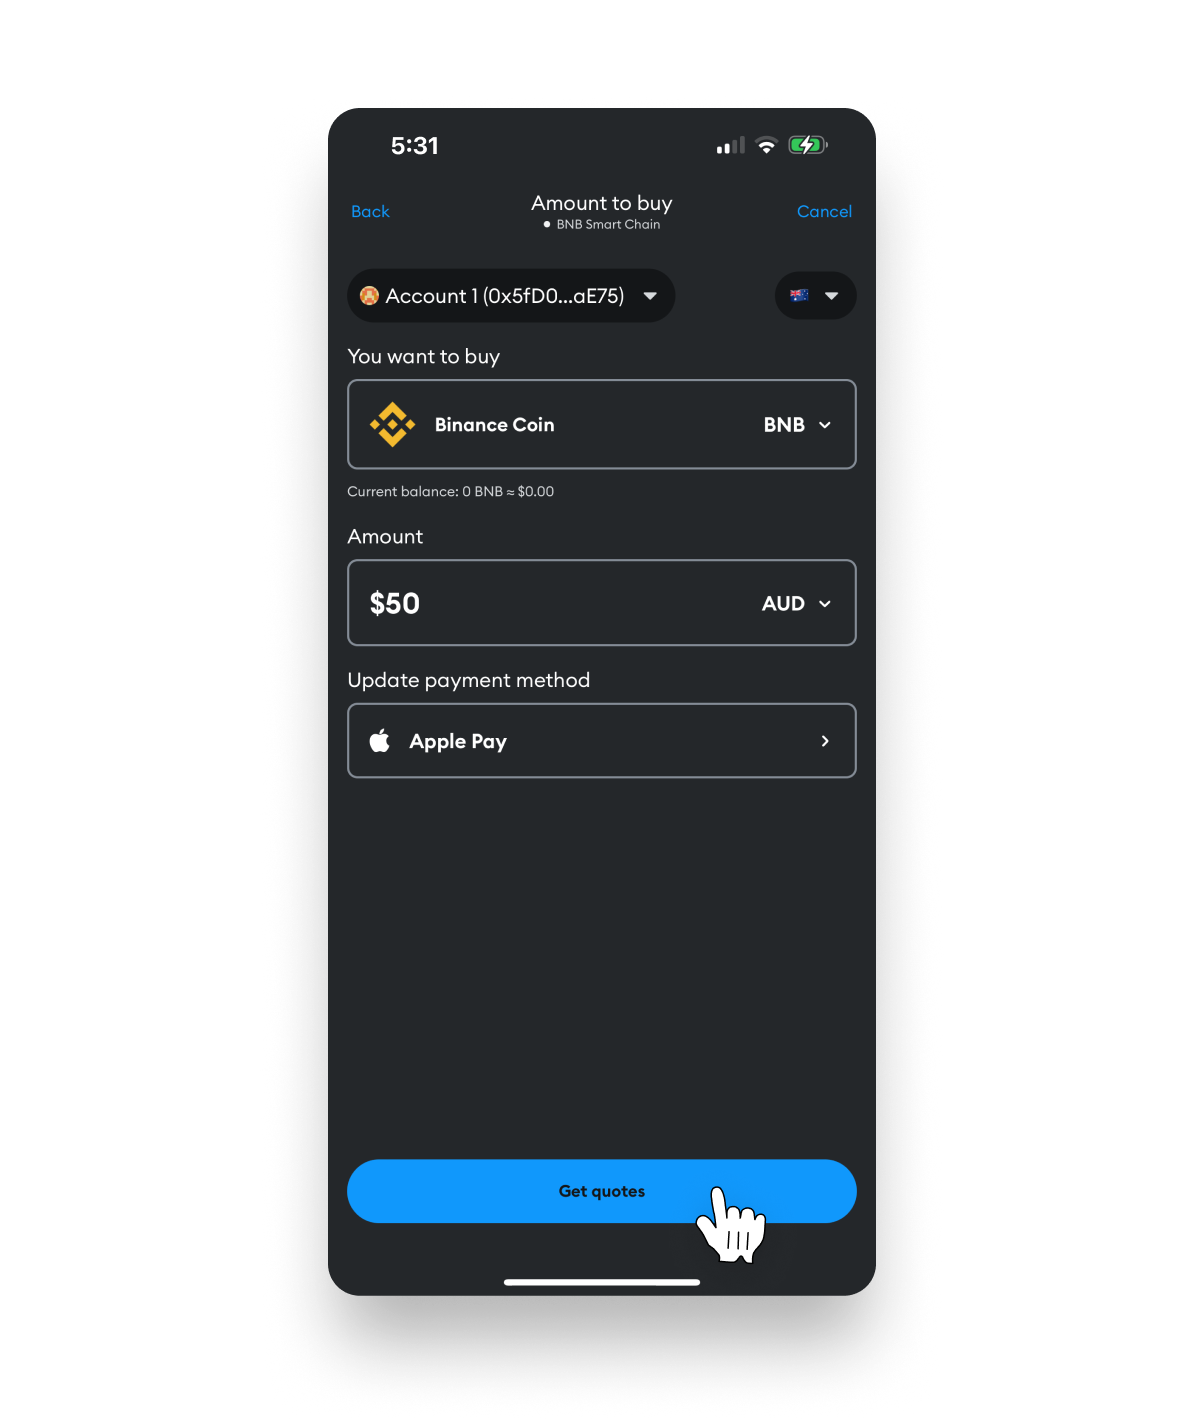
- 7. Tap the dollar value and type how much you want to purchase.
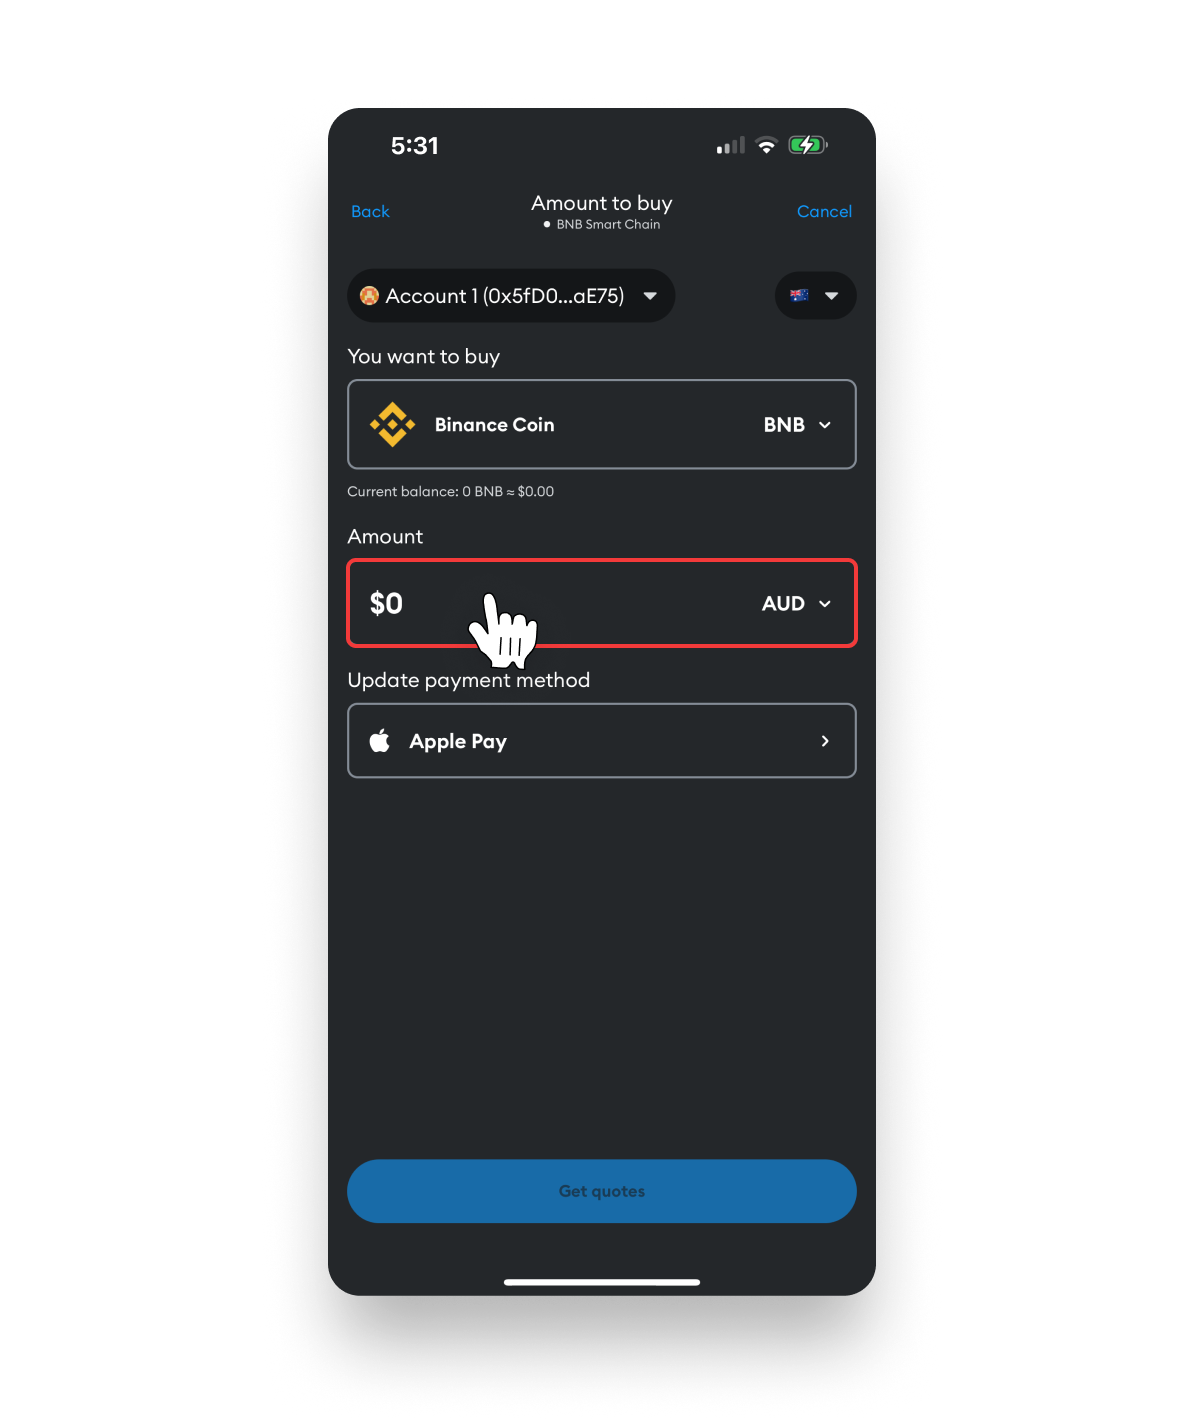
- 8. Tap the Get quotes button.
- 9. Choose your preferred provider and then tap the Continue with button.

- 10. Follow the on-screen prompts for your chosen provider to complete your purchase and your $BNB will be deposited to your wallet.

- 11. (Optional) Repeat these steps if you prefer to swap a different asset ($BUSD or $USDT) for $SHA.
Option 2. Purchase via a Centralized Exchange (CEX)
- 1. Login to your preferred CEX that supports the purchase of $BNB (and the other asset you want to use for swapping).

- Navigate to the trading section and purchase your desired amount of $BNB.
(Optional) Repeat this step if you prefer to swap a different asset ($BUSD or $USDT) for $SHA.
TIP: The PancakeSwap trading fee is set to 0.25% and the network transaction fee varies, but an approximate range is 0.00006 – 0.001 BNB. Learn more here.

Step 5. Send assets to your wallet
Please note that all CEX interfaces will vary. This step is meant to provide a general overview of the withdrawal process and ensure your assets are withdrawn on the BNB Chain network.
⚠️ This step is only required if you chose to purchase $BNB via a CEX.
- 1. Navigate to the wallet section of your CEX and tap the Withdraw button.

- 2. Select $BNB as the asset for withdrawal.

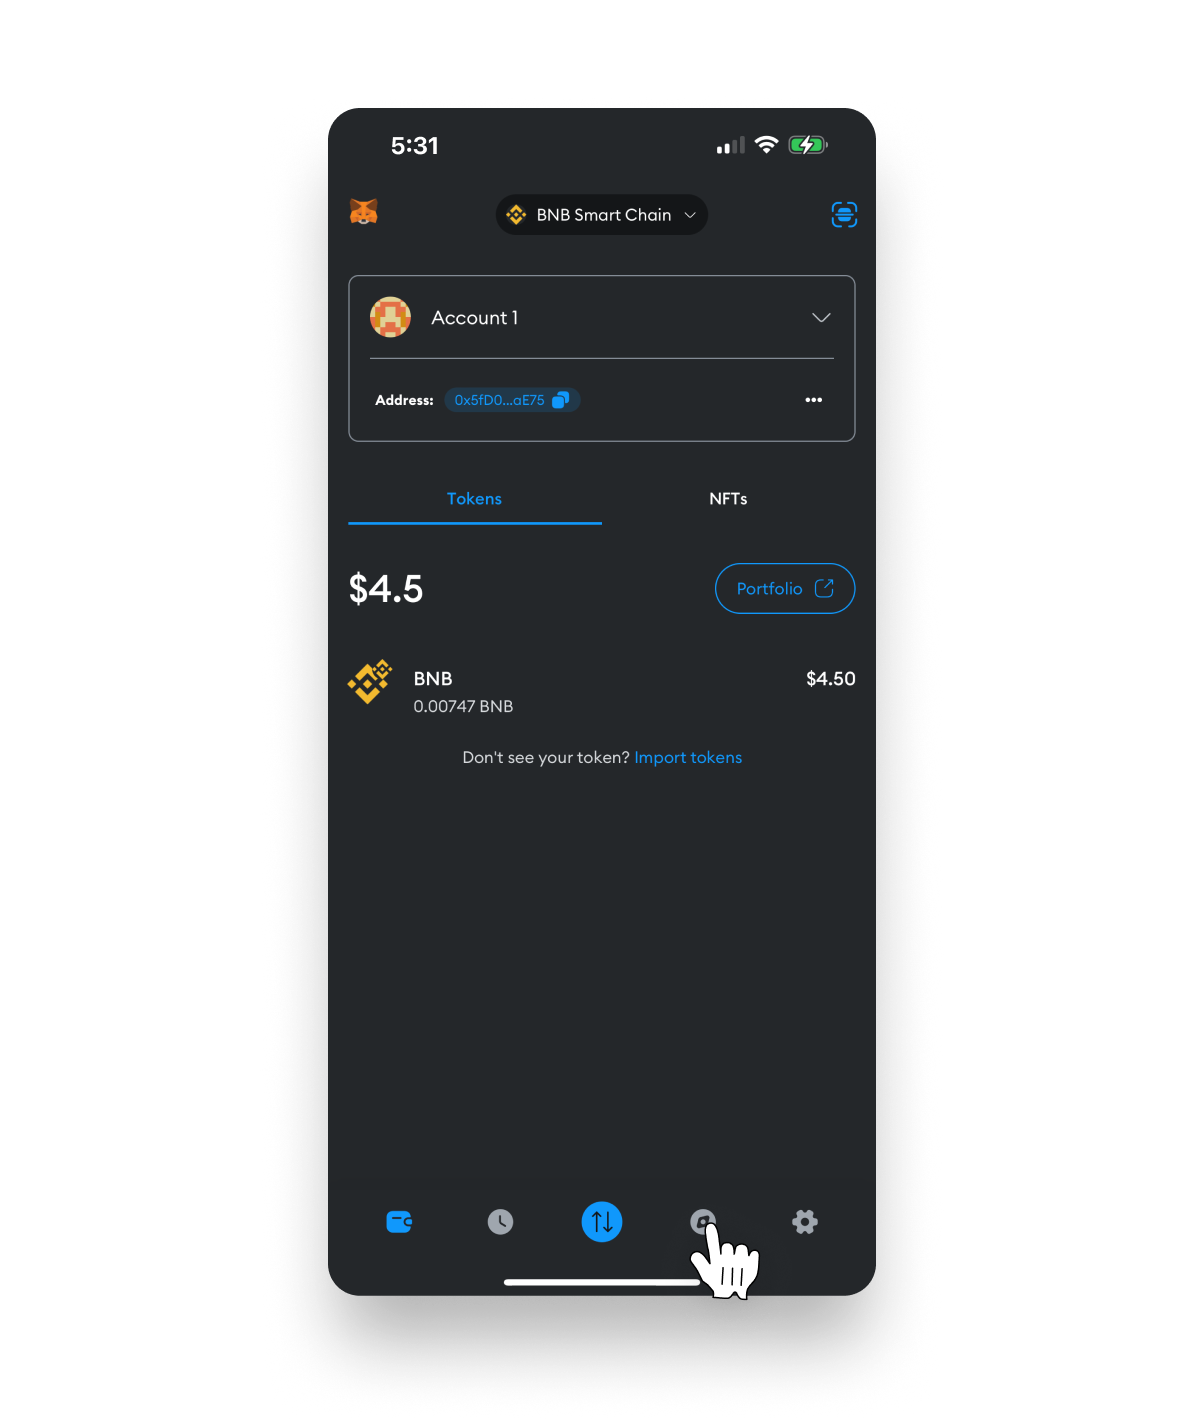
- 3. Open your MetaMask app.
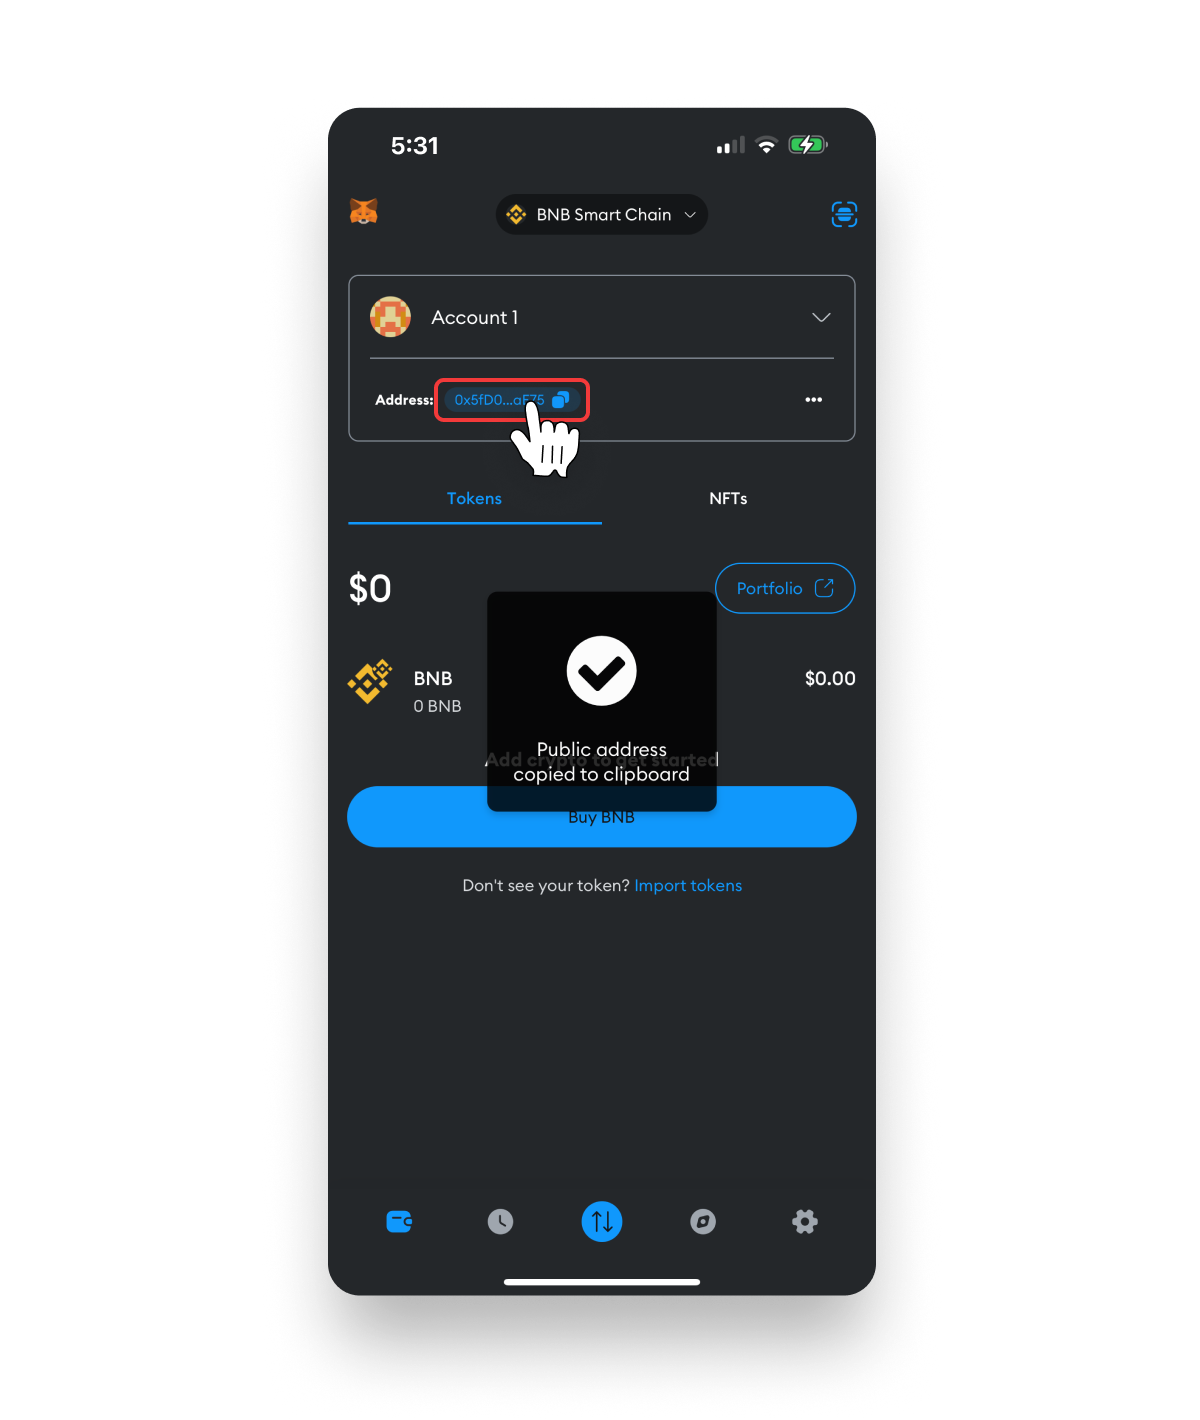
- 4. Copy your public receiving address by tapping on the address.
- 5. Return to your CEX and paste your wallet address in the withdrawal address input field.
⚠️ Important: Sending funds to the wrong address will result in a loss of funds.
- 6. Ensure the withdrawal network is BNB Smart Chain (BEP20).
TIP: You may observe old network branding (BSC) mixed with the current branding (BNB Chain / BNB Smart Chain).
⚠️ Important: Sending funds via the wrong network may result in a loss of funds.

- 7. Input the amount to withdraw.
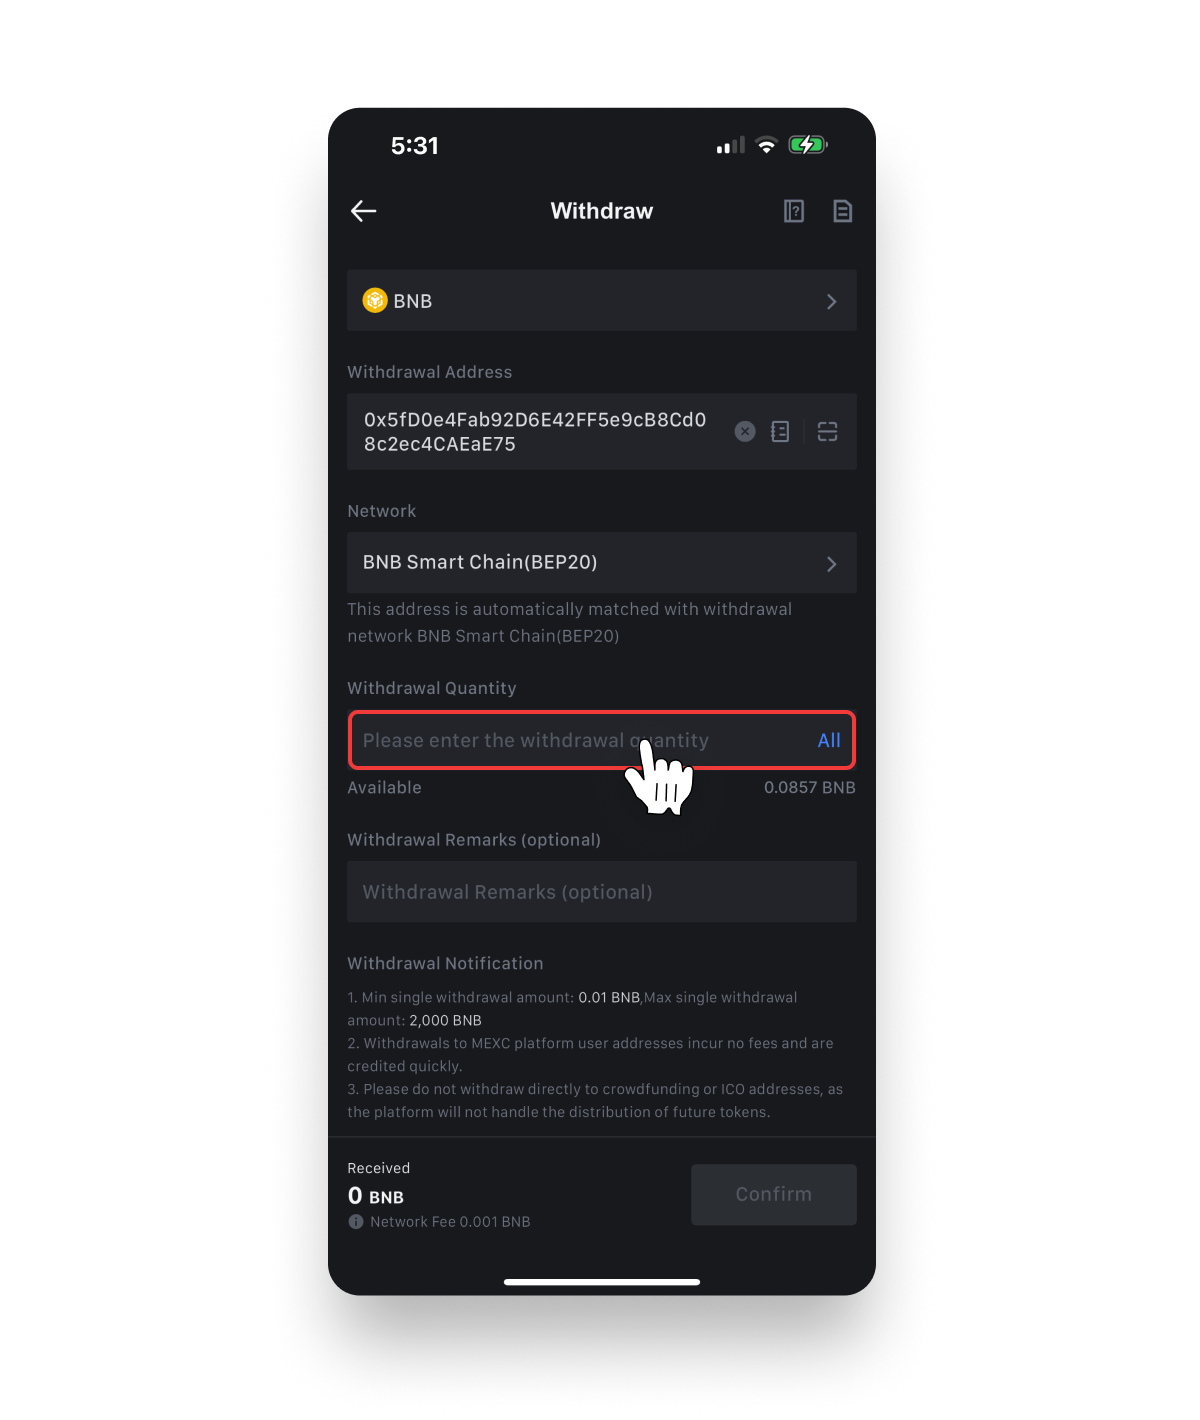
- 8. Click the Confirm button (or similar confirmation button) to initiate the withdraw process.

- 9. Follow your exchange’s withdrawal prompts which may include verifying the withdraw address and network, providing 2fa security codes or whitelisting the new withdraw address.
TIP: Withdrawal times vary by CEX and asset, but you can track the progress via your account’s withdrawal transaction details.
- 10. (Optional) Repeat these steps if you chose to purchase another asset such as $BUSD or $USDT.
Step 6. Connect to PancakeSwap
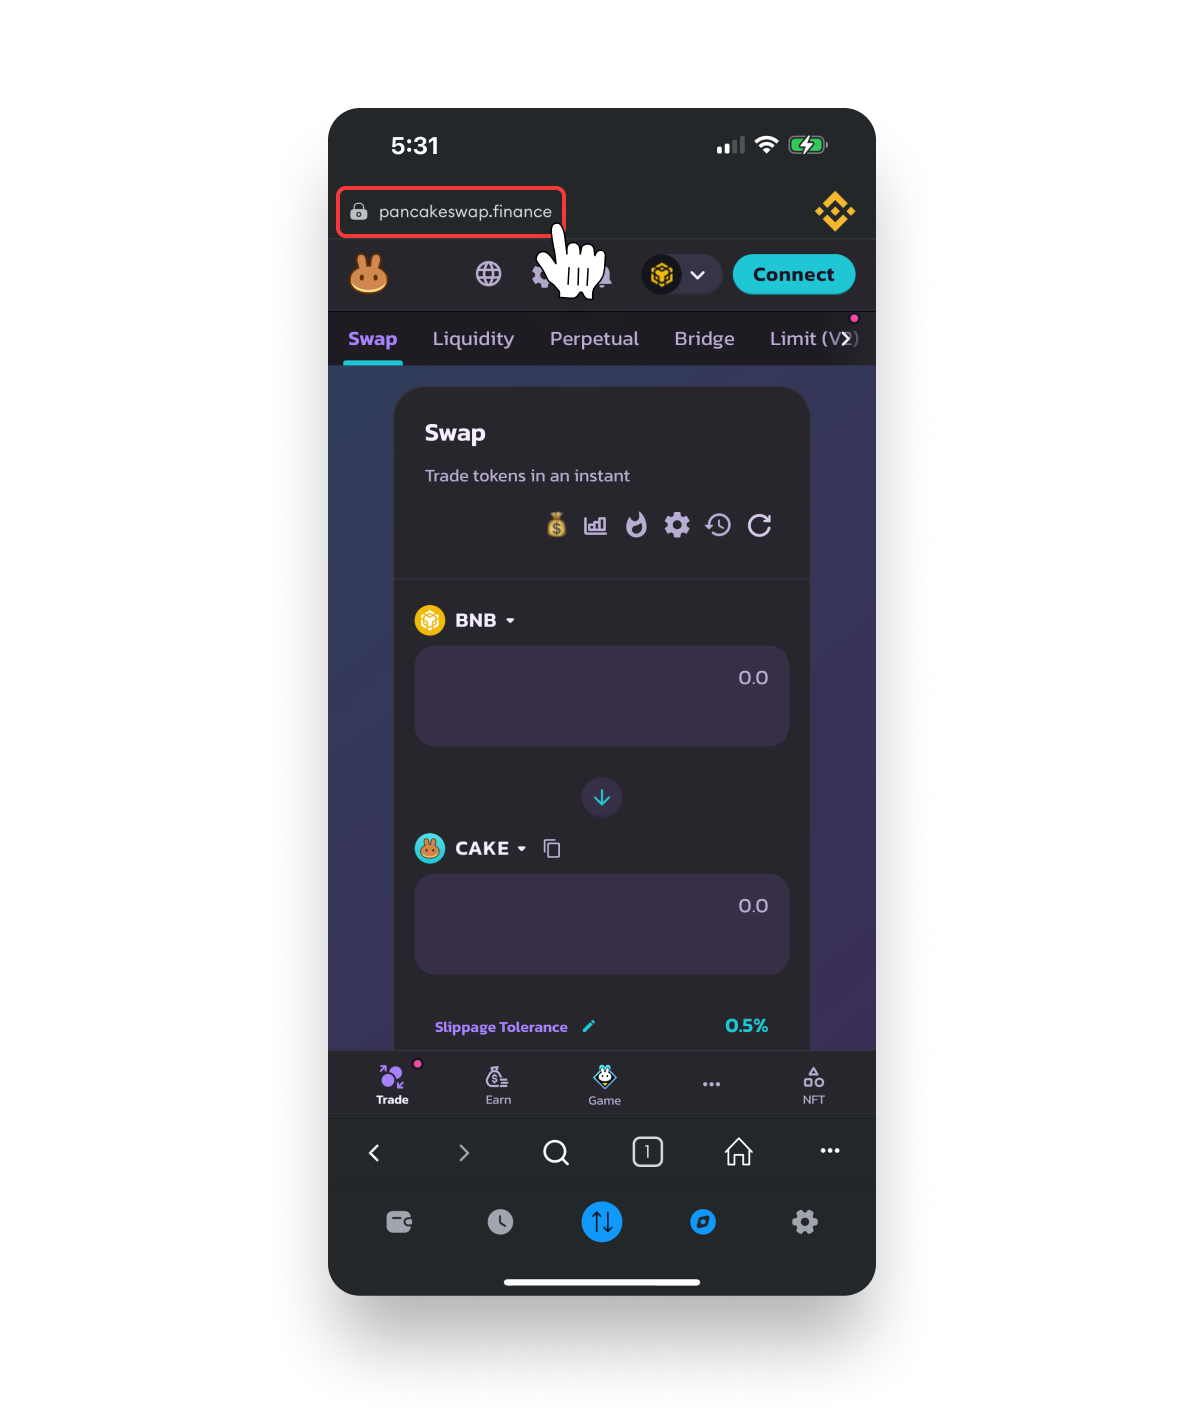
- 1. Open your MetaMask app.

- 2. Navigate to the in-app browser.
- 3. Visit https://pancakeswap.finance/swap.
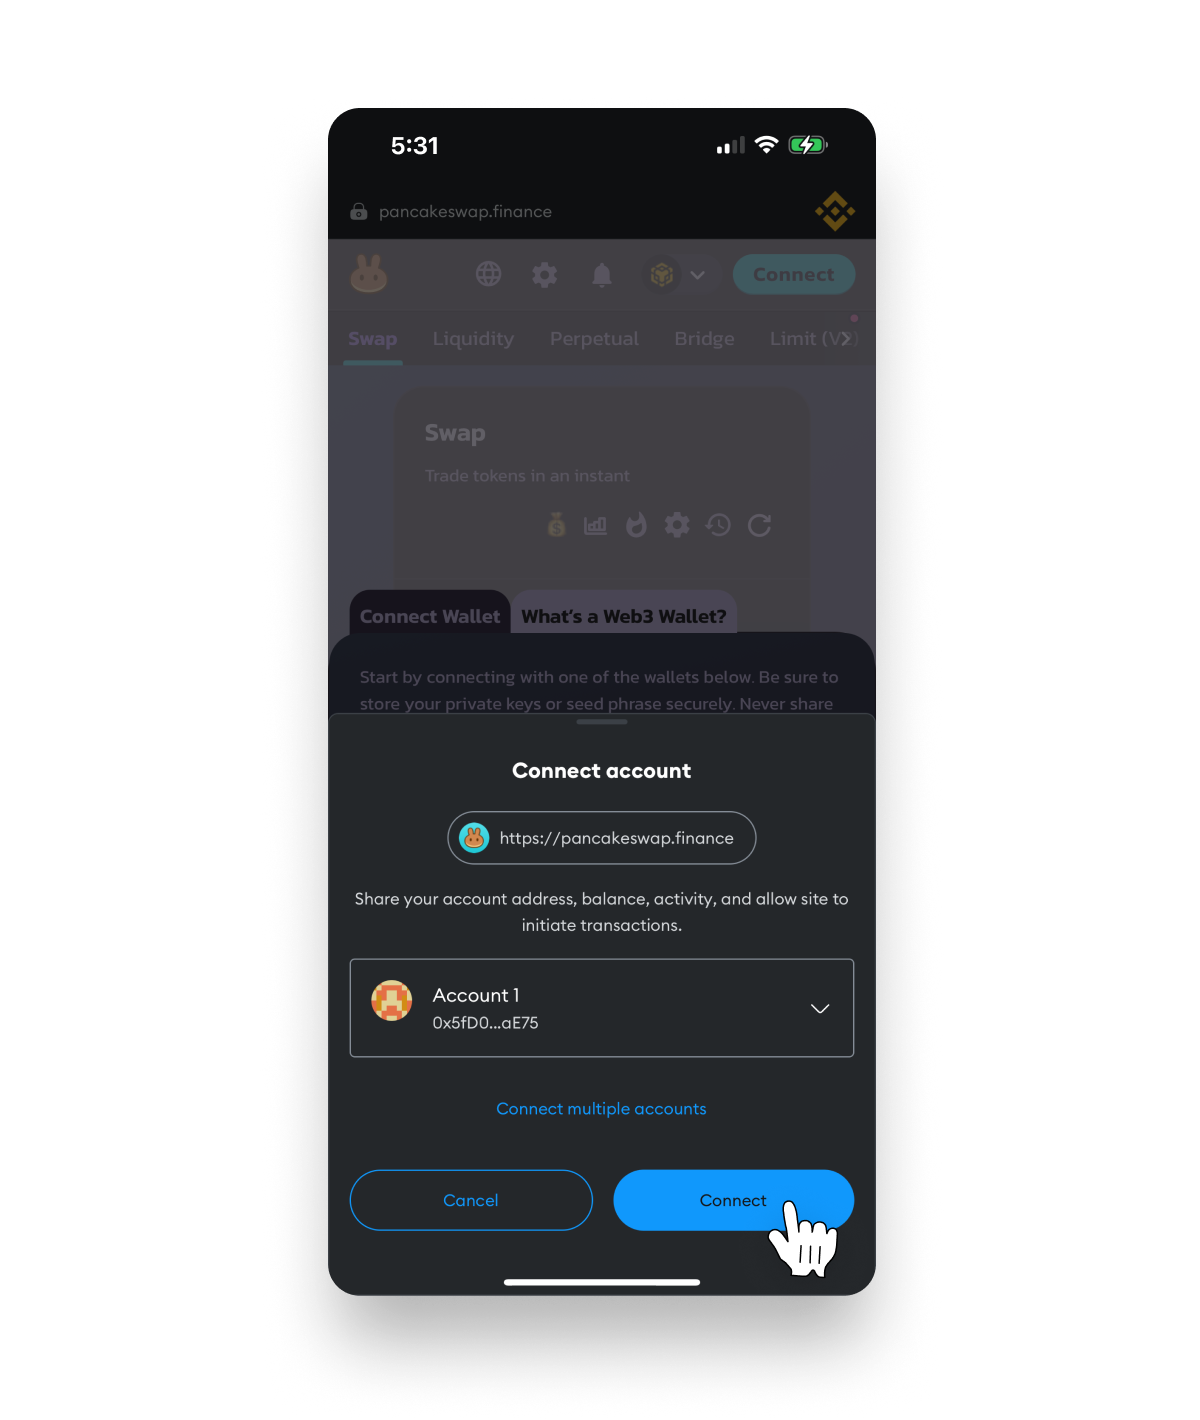
- 4. Tap the Connect button.
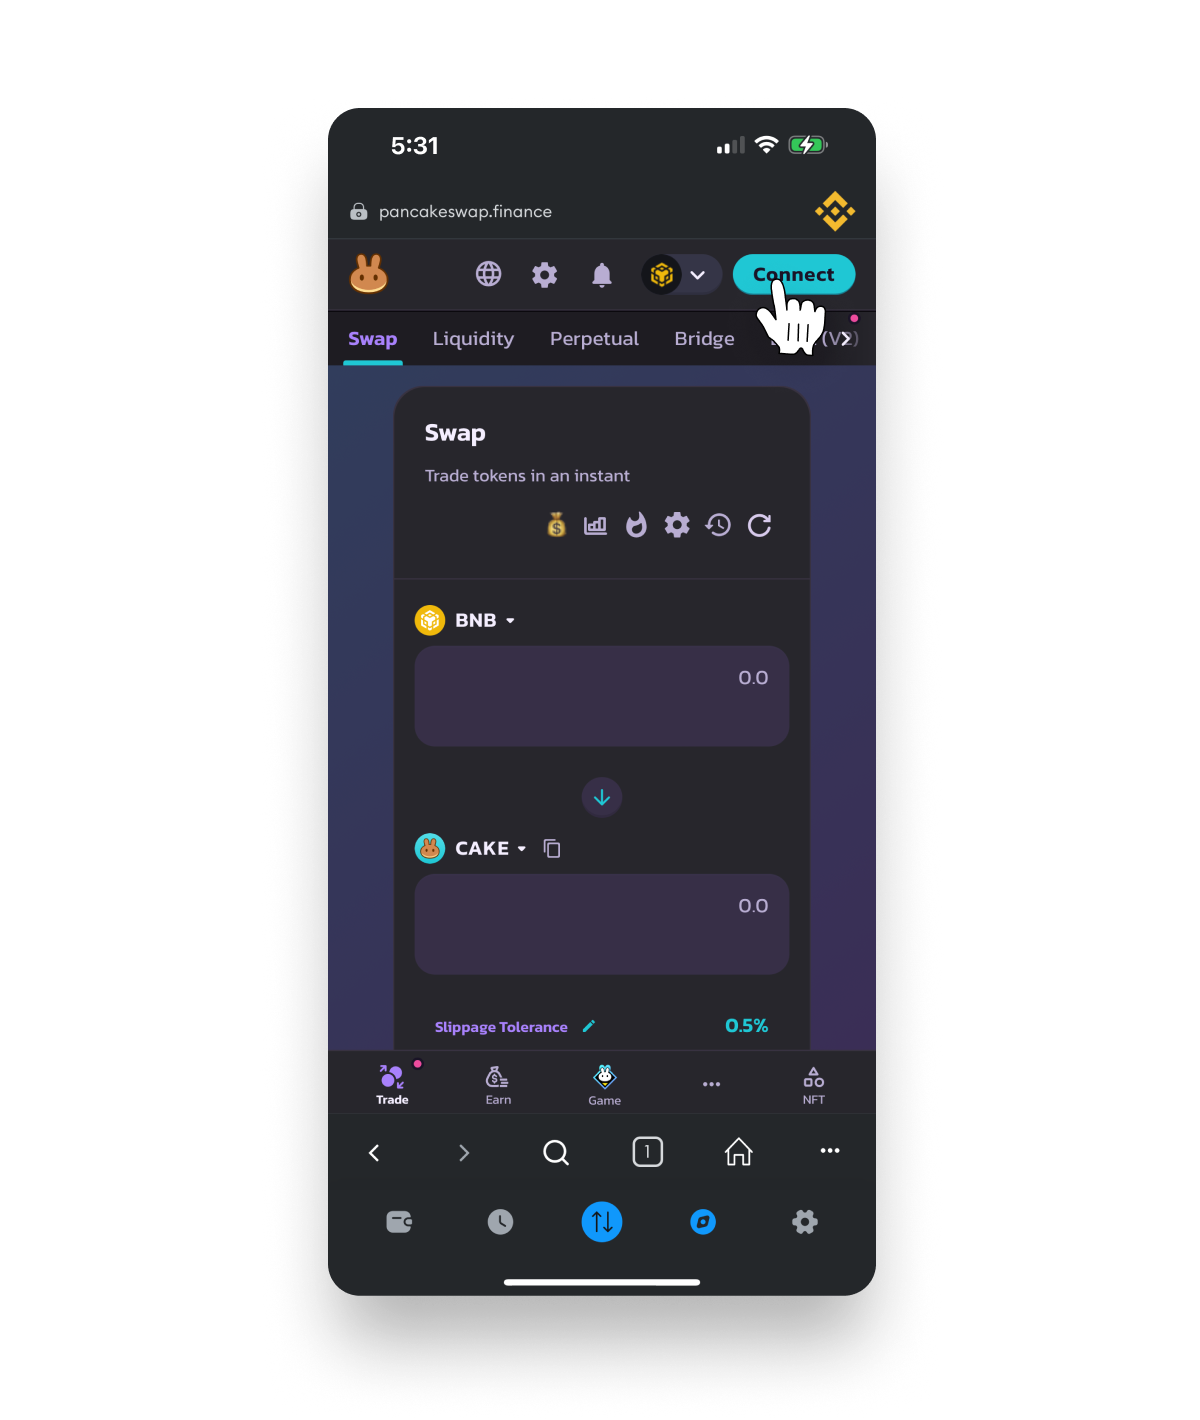
- 5. Tap the MetaMask logo.
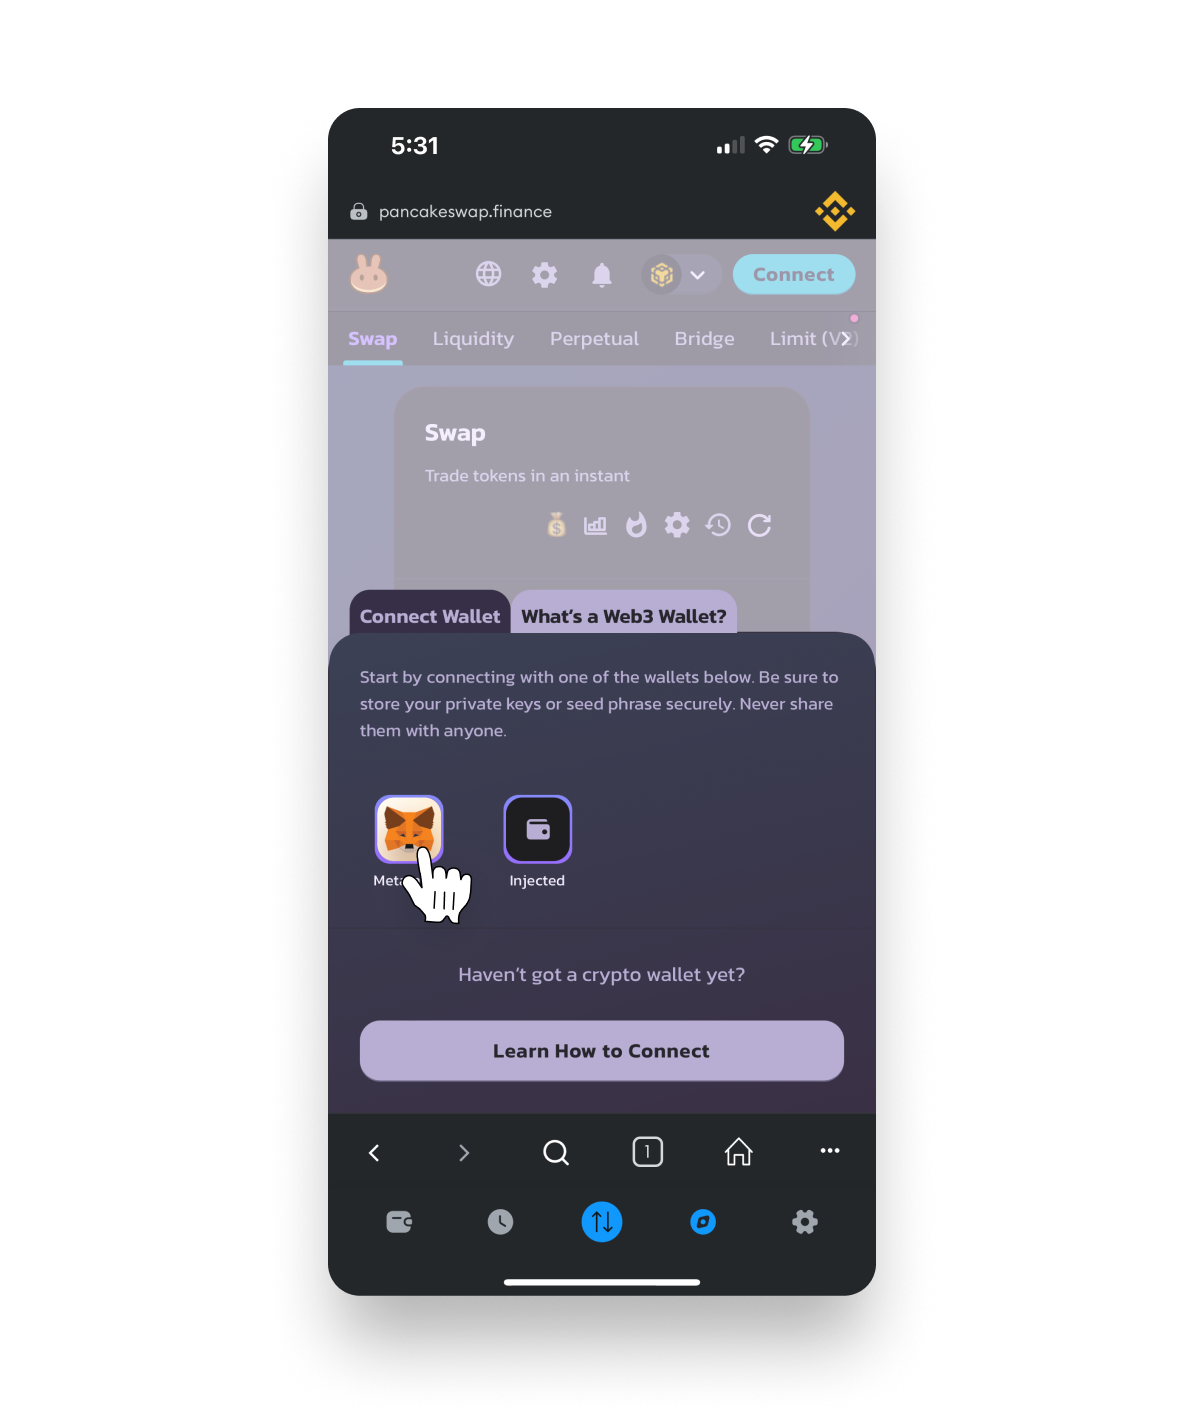
- 6. Tap the Connect button to connect MetaMask to PancakeSwap.
Step 7. Setup your swap
If you are using $BNB as your swap token, you can skip steps 1 & 2.
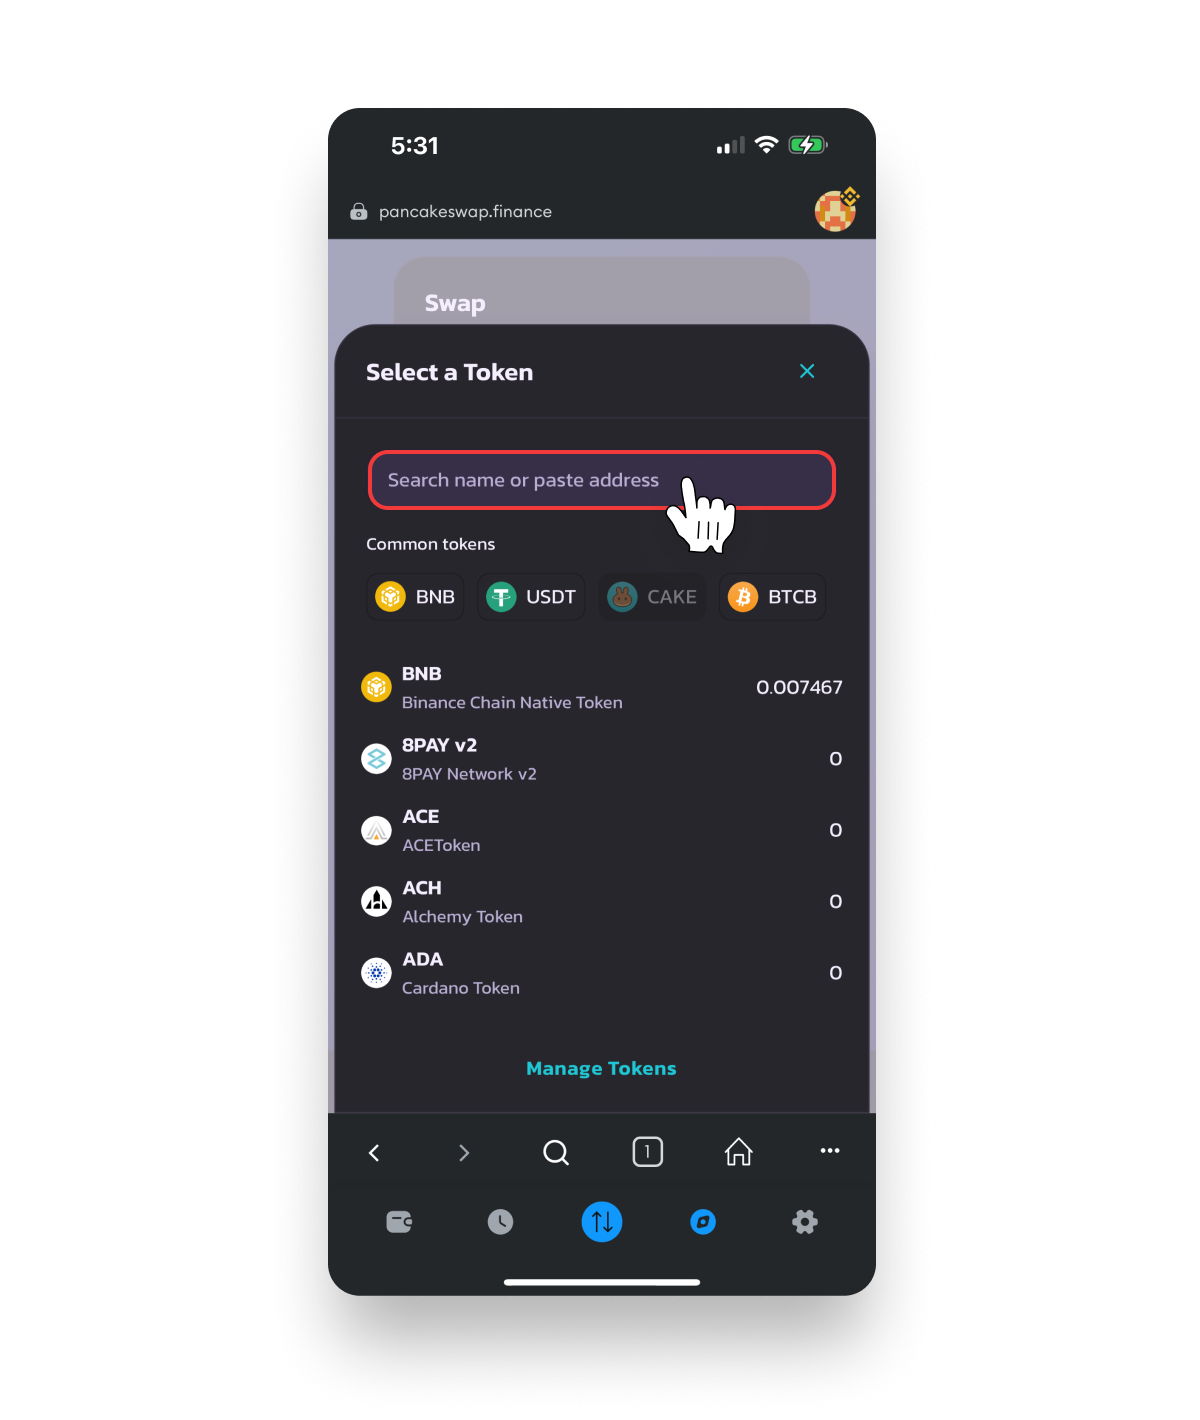
- 1. Tap the asset selector.

- 2. Choose the token you wish to swap for $SHA.
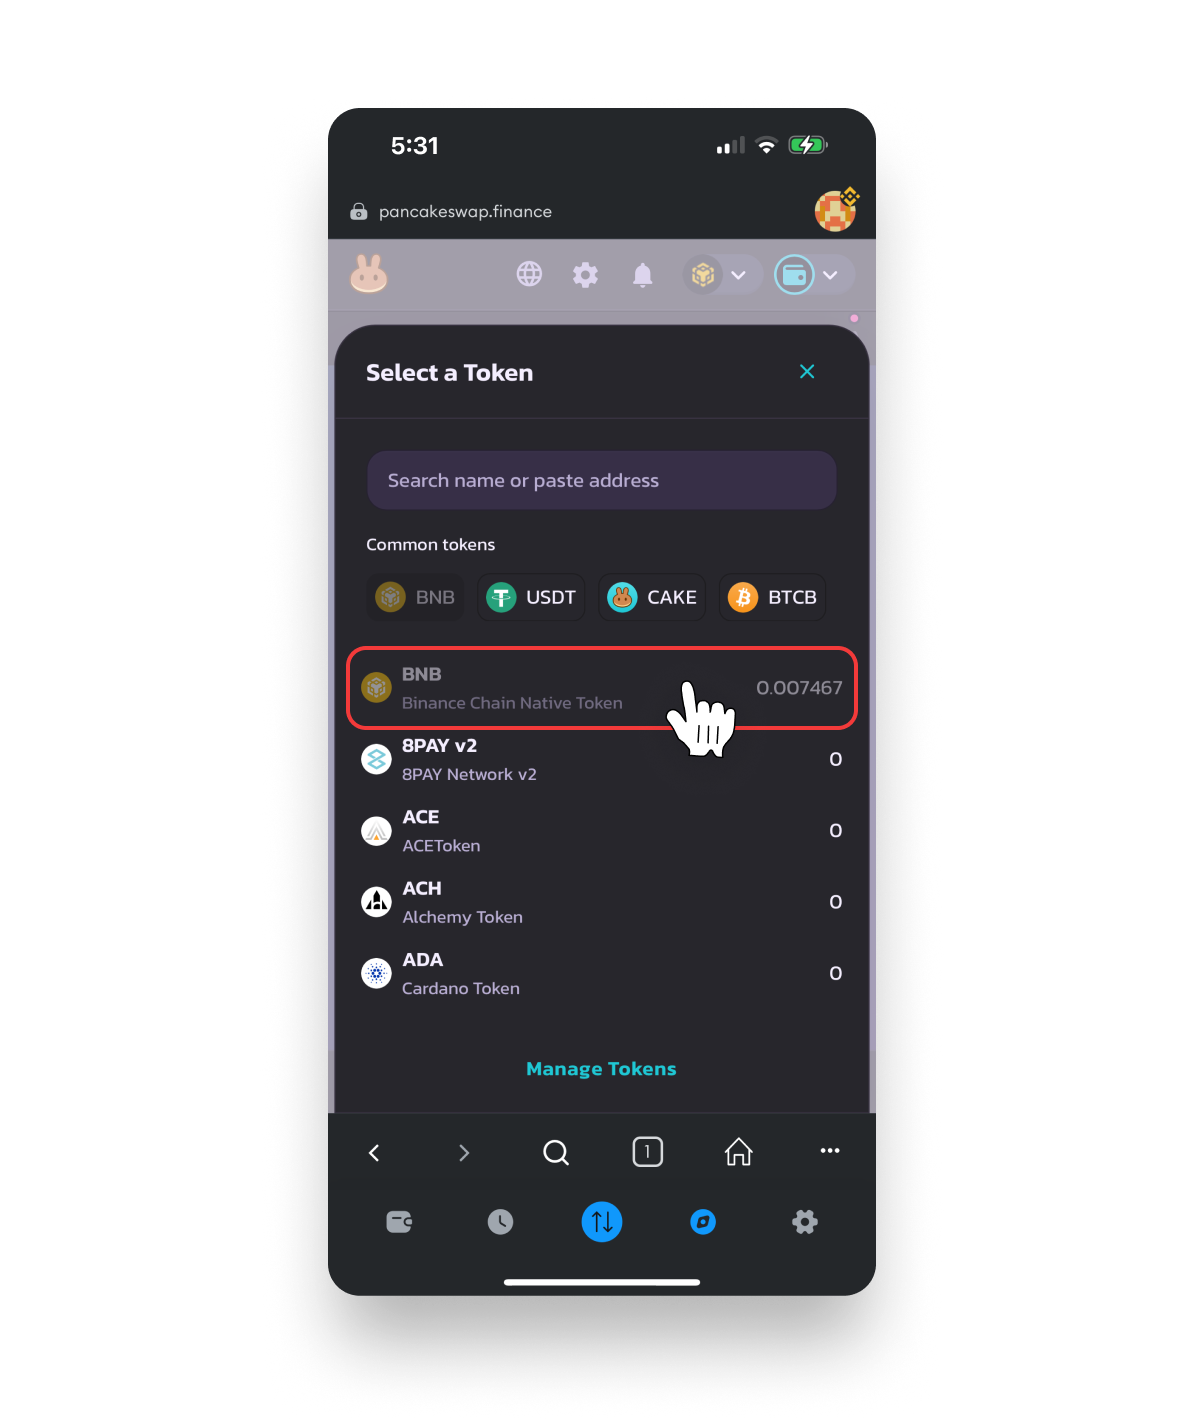
- 3. Input the amount you want swap.

- 4. Tap the asset selector.
- 5. Search for Safe Haven.
- 6. Tap the Import button.
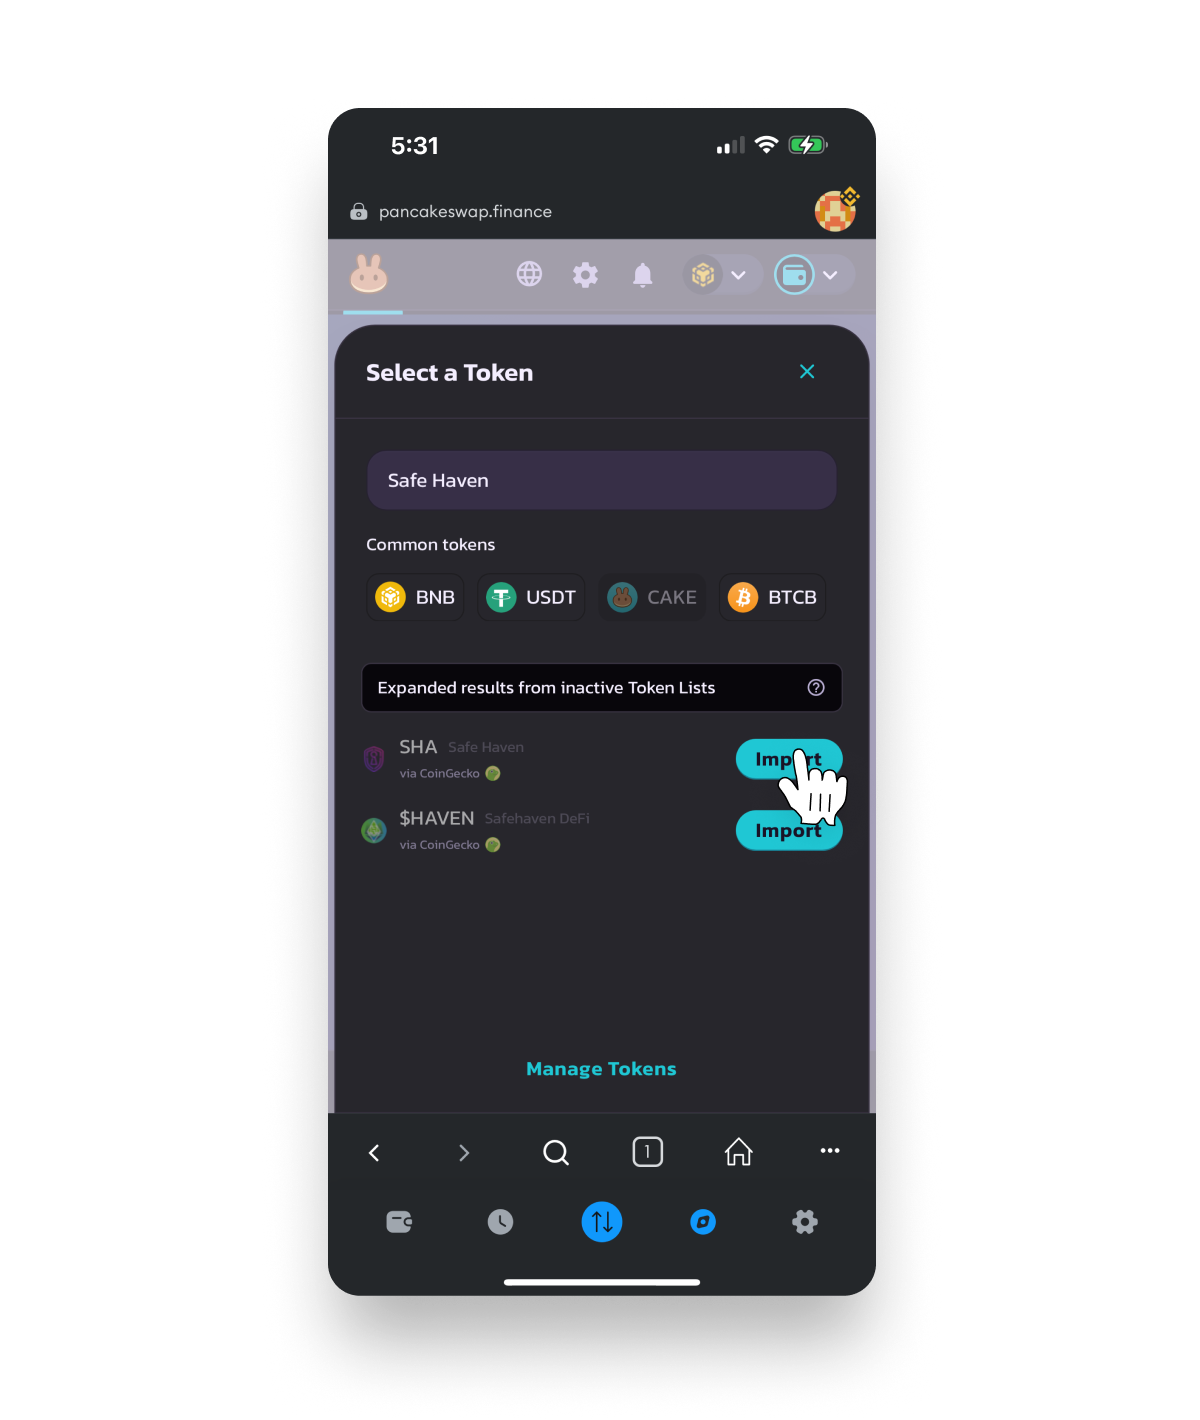
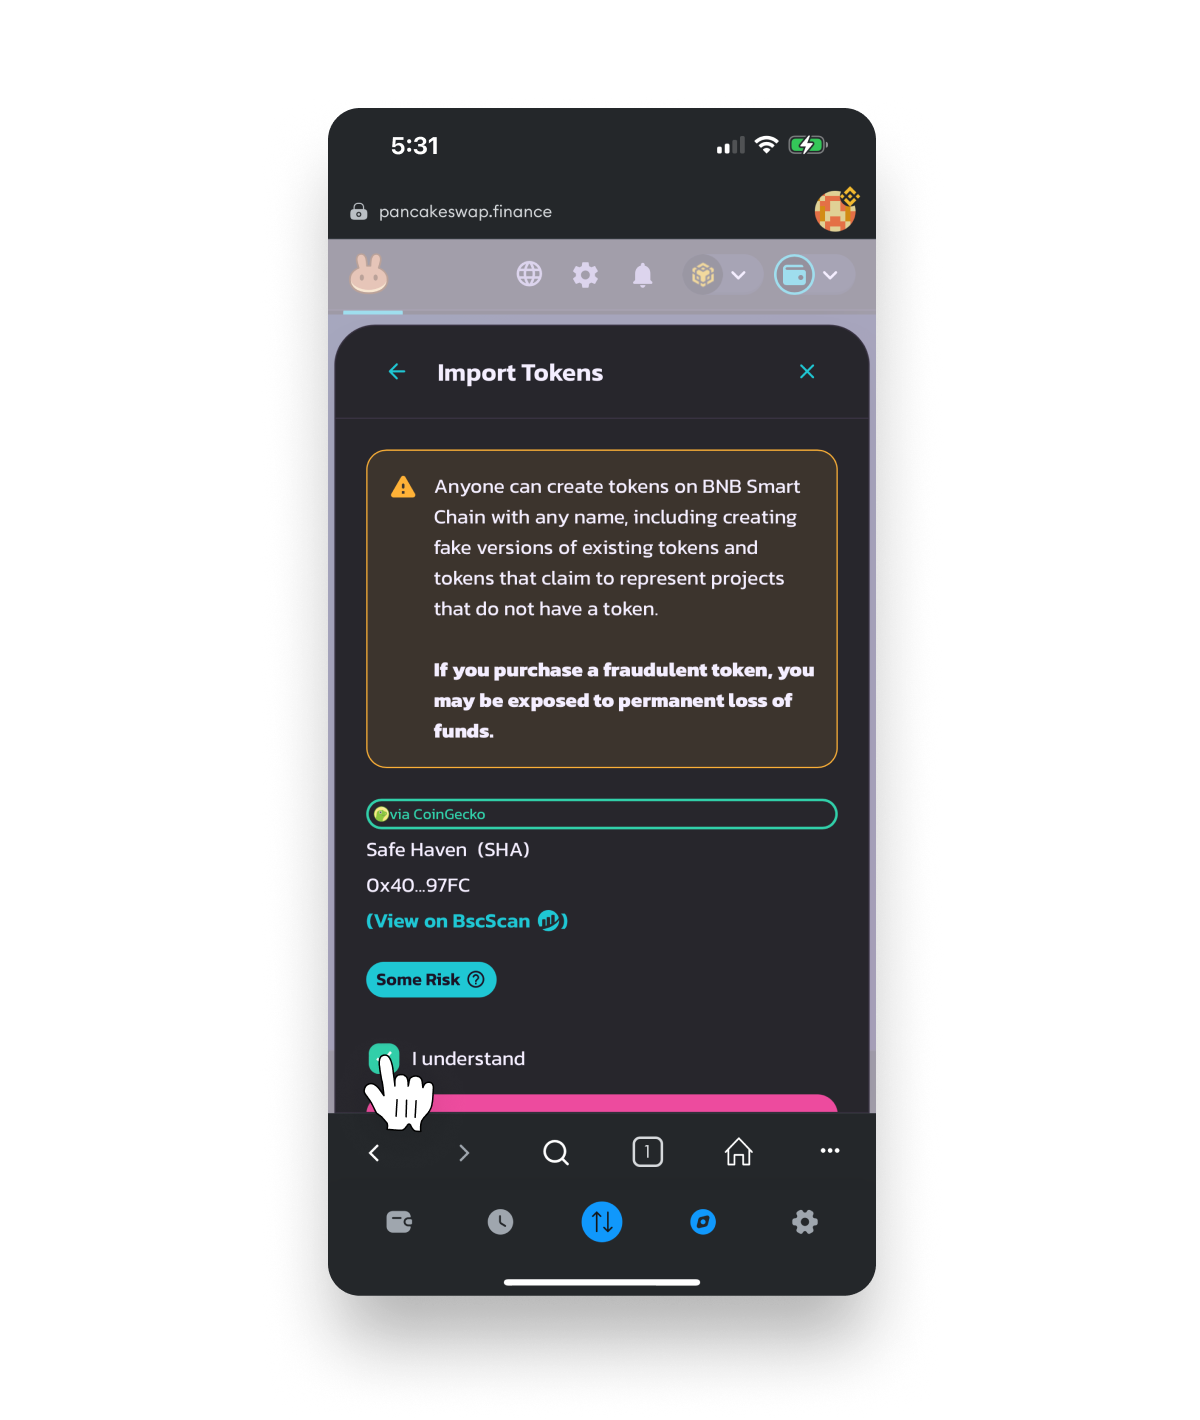
- 7. After reading the information on screen, tap the checkbox to acknowledge the information above.
TIP: You can confirm the correct $SHA token is being imported by ensuring the contract address matches.
Click here to view the correct SHA contract.
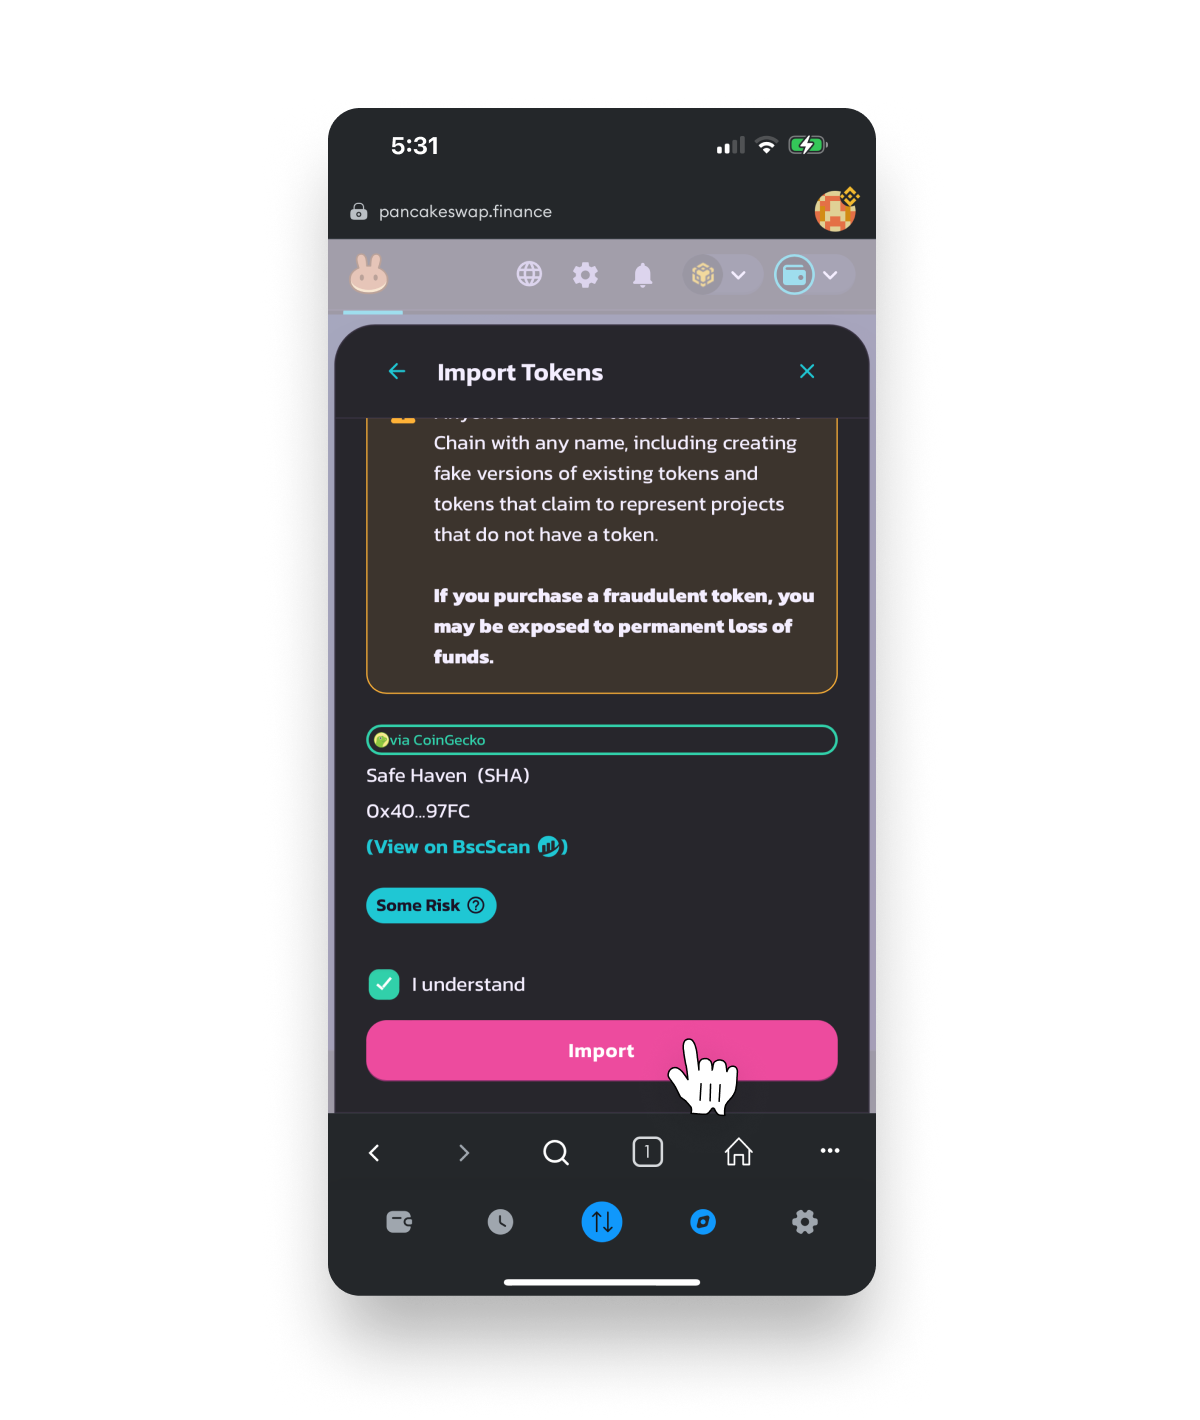
- 8. Tap the Import button.
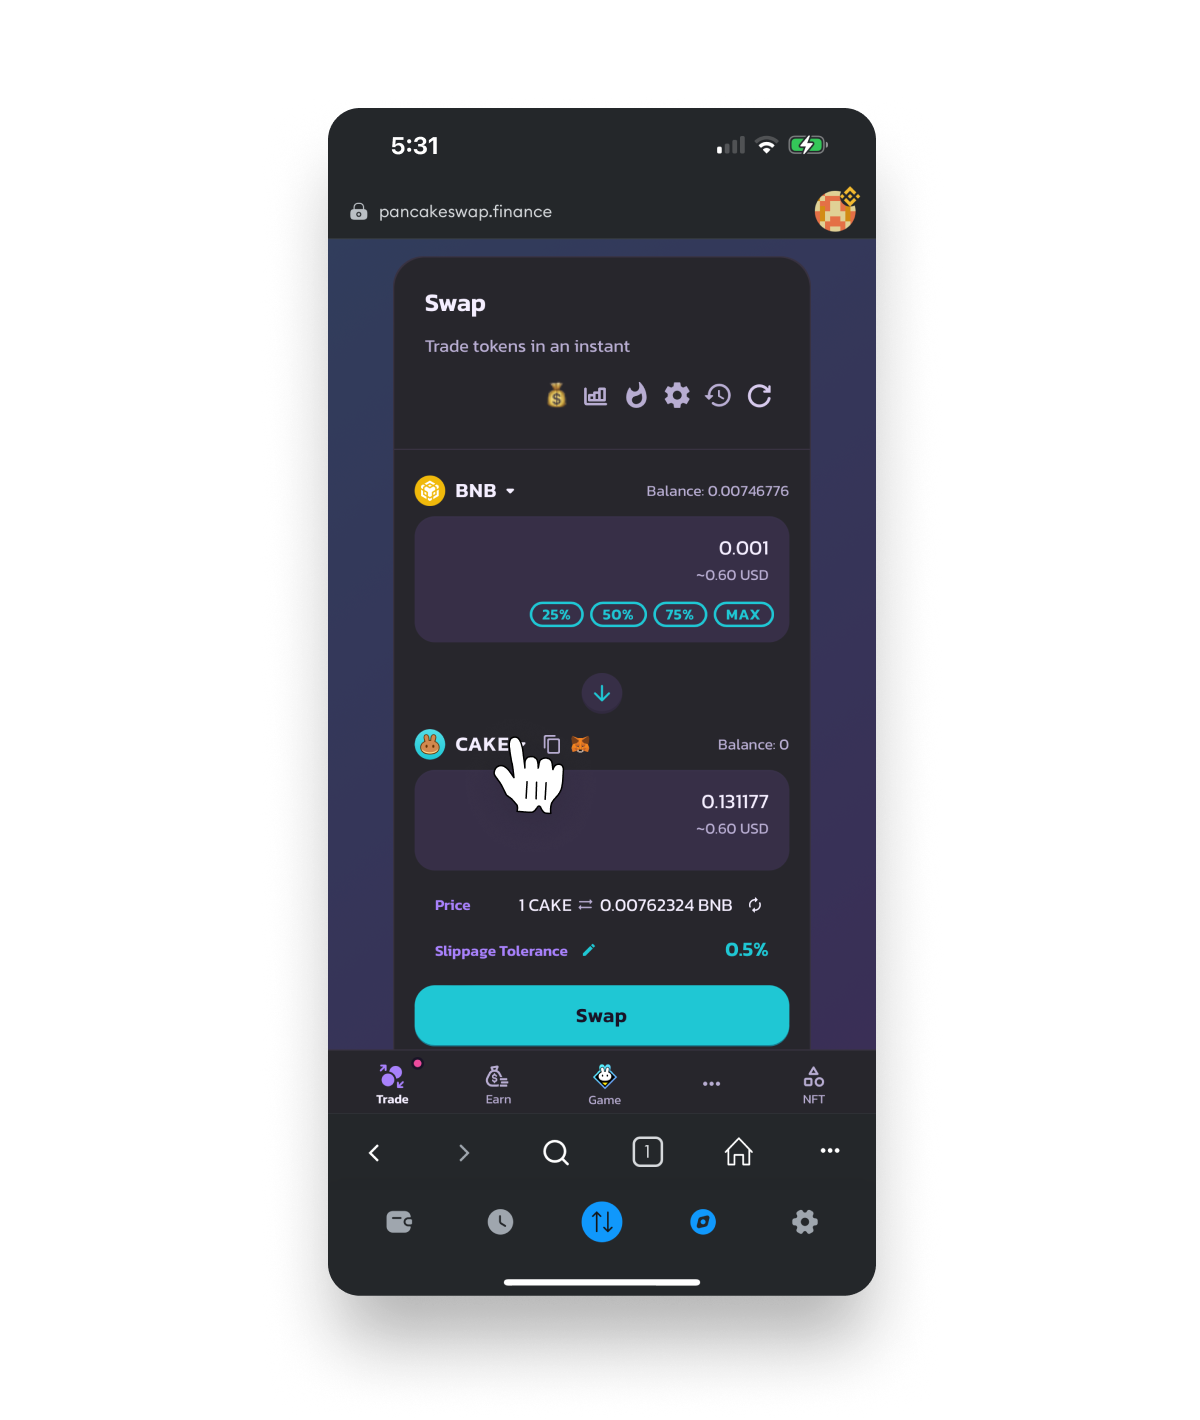
Step 8. Perform the swap
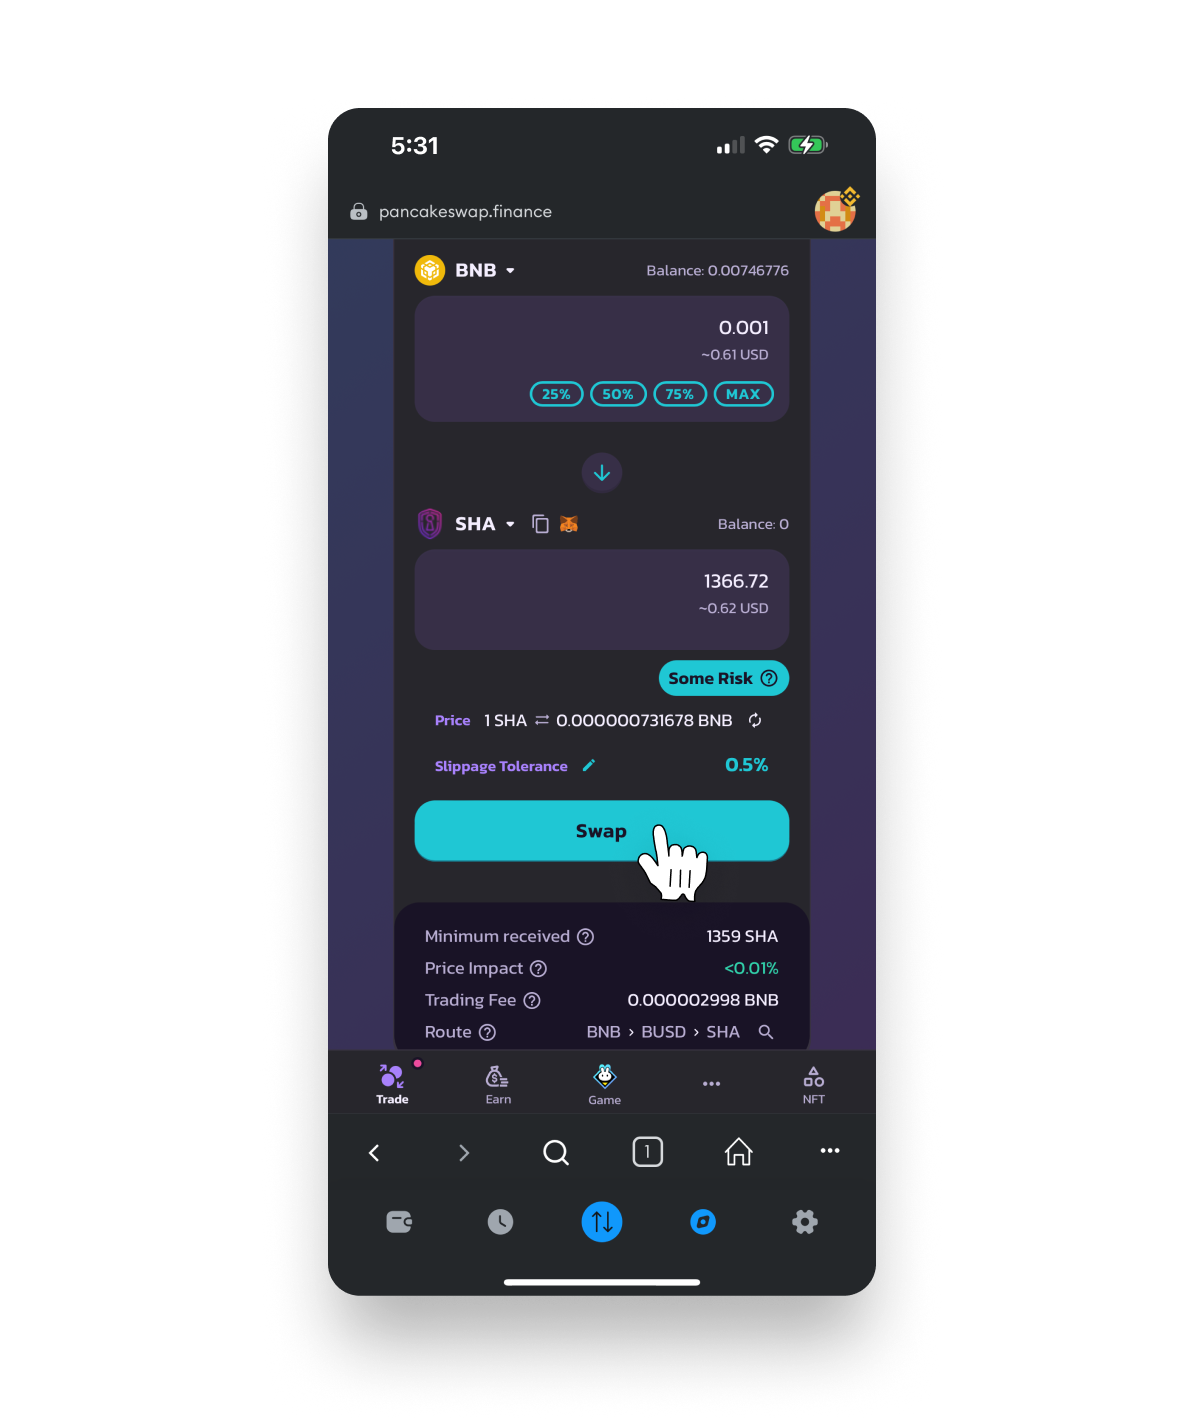
- 1. Review both the estimated & minimum amount of $SHA you will receive. Notice the slight variance due to slippage which is automatically set to 0.5%.
TIP: Advanced features such as slippage and trade route adjustments are available and you can learn more here.

- 2. Tap the Swap button.
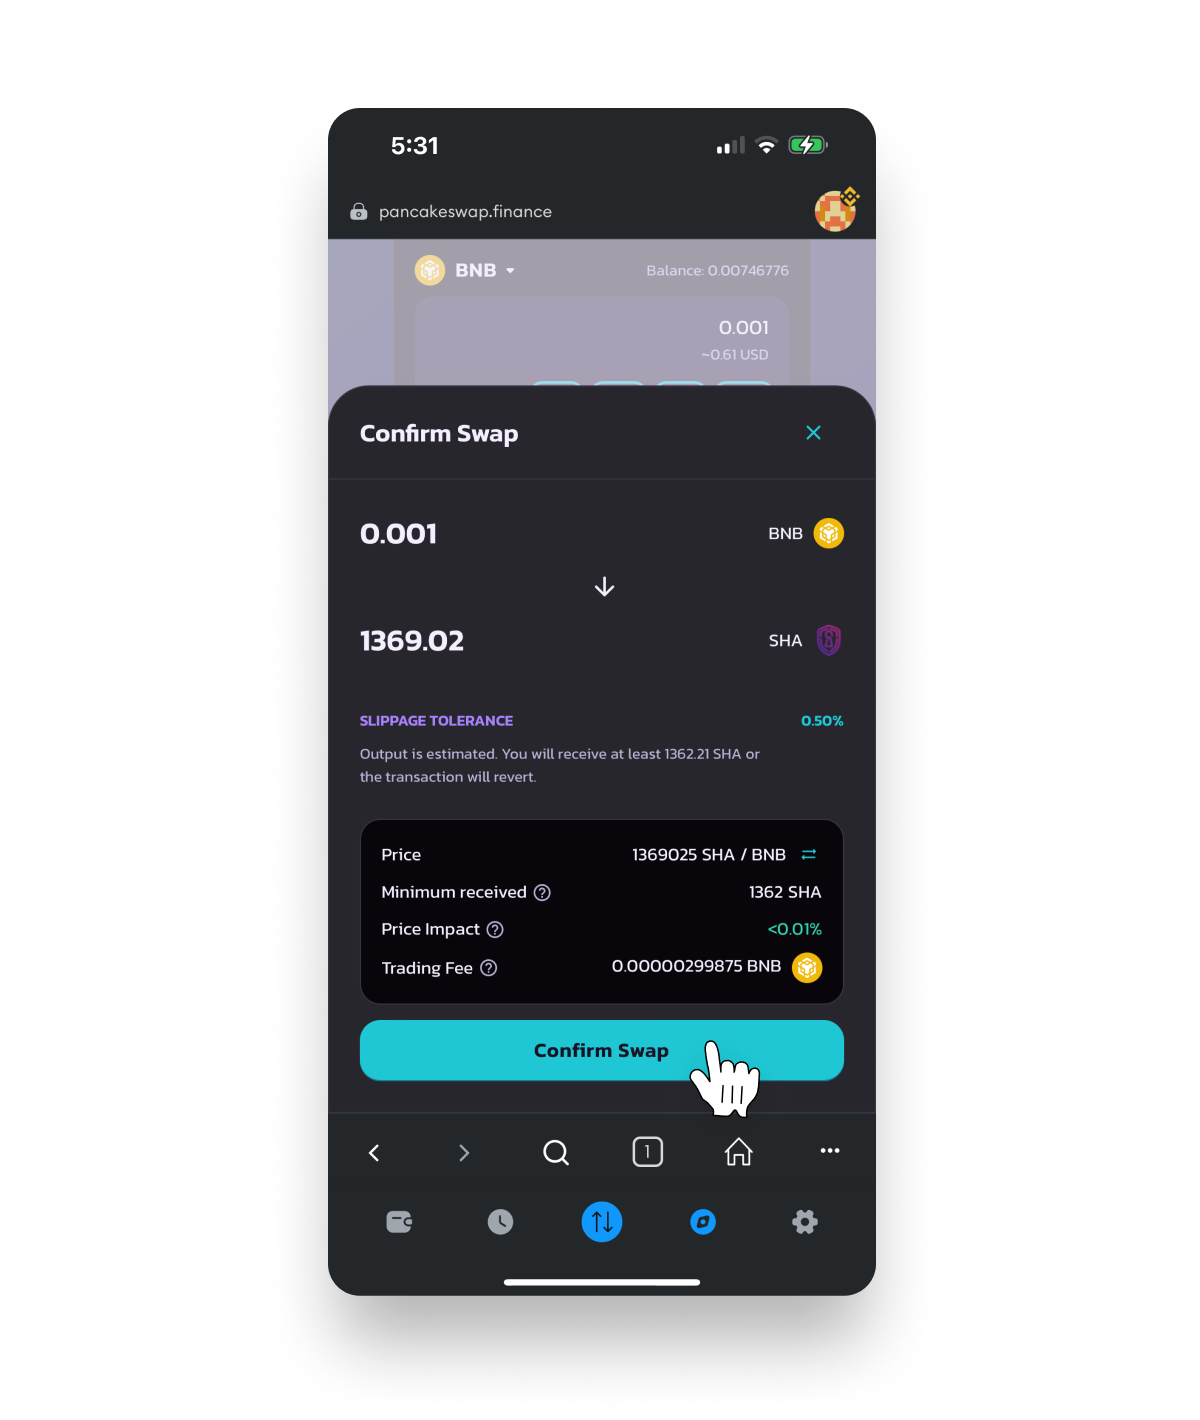
- 3. After reviewing the information on screen, tap Confirm Swap.
TIP: If too much time elapses a price variance may occur and you will need to accept the updated swap amounts.
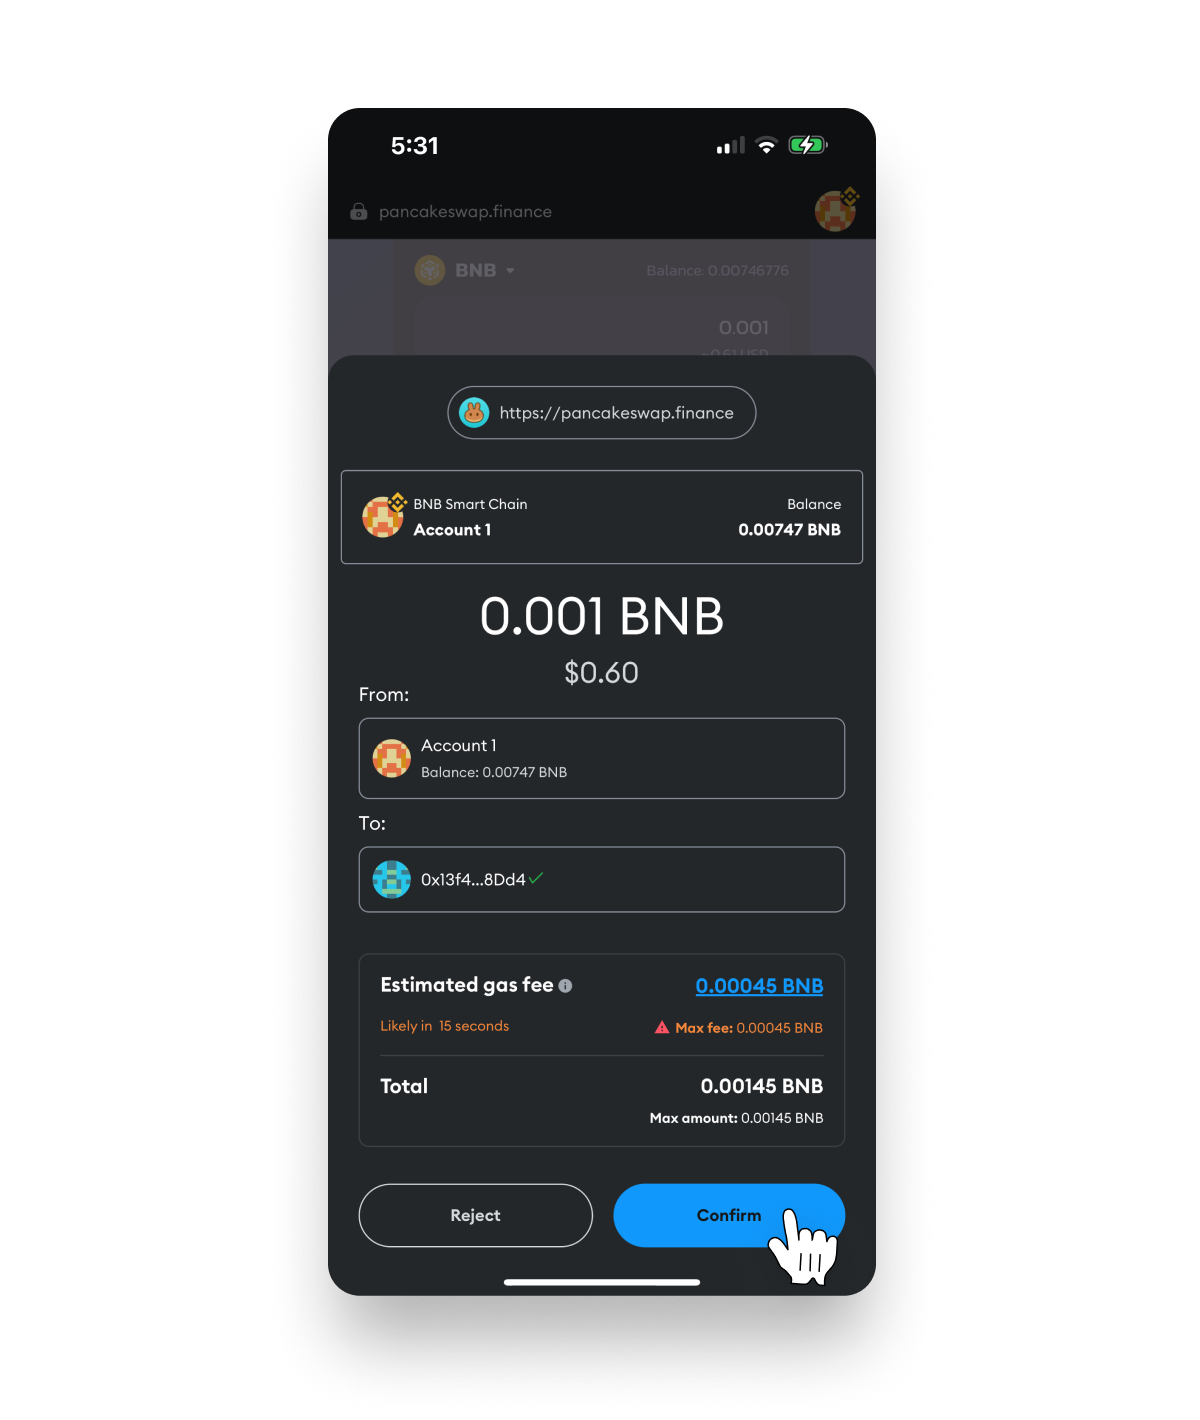
- 4. After reviewing the transaction fee and total amount, tap the Confirm button to execute the swap.
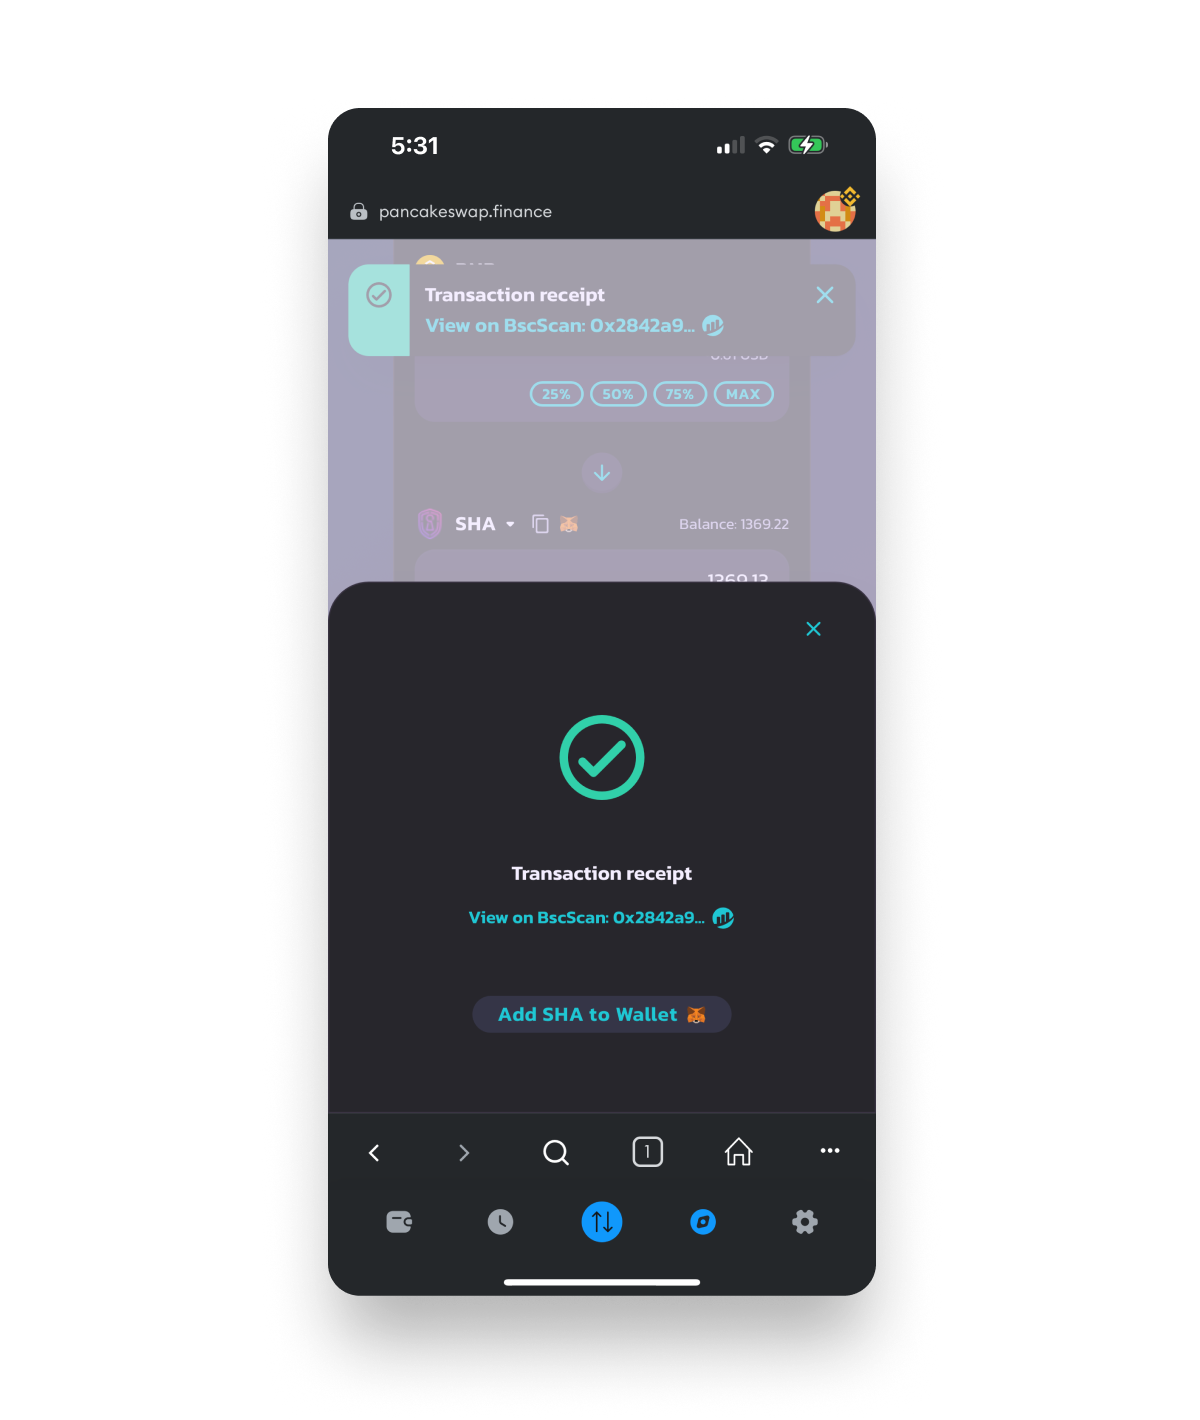
- 5. A confirmation popup will appear when the swap is successfully completed.
Step 9. Display $SHA in your wallet
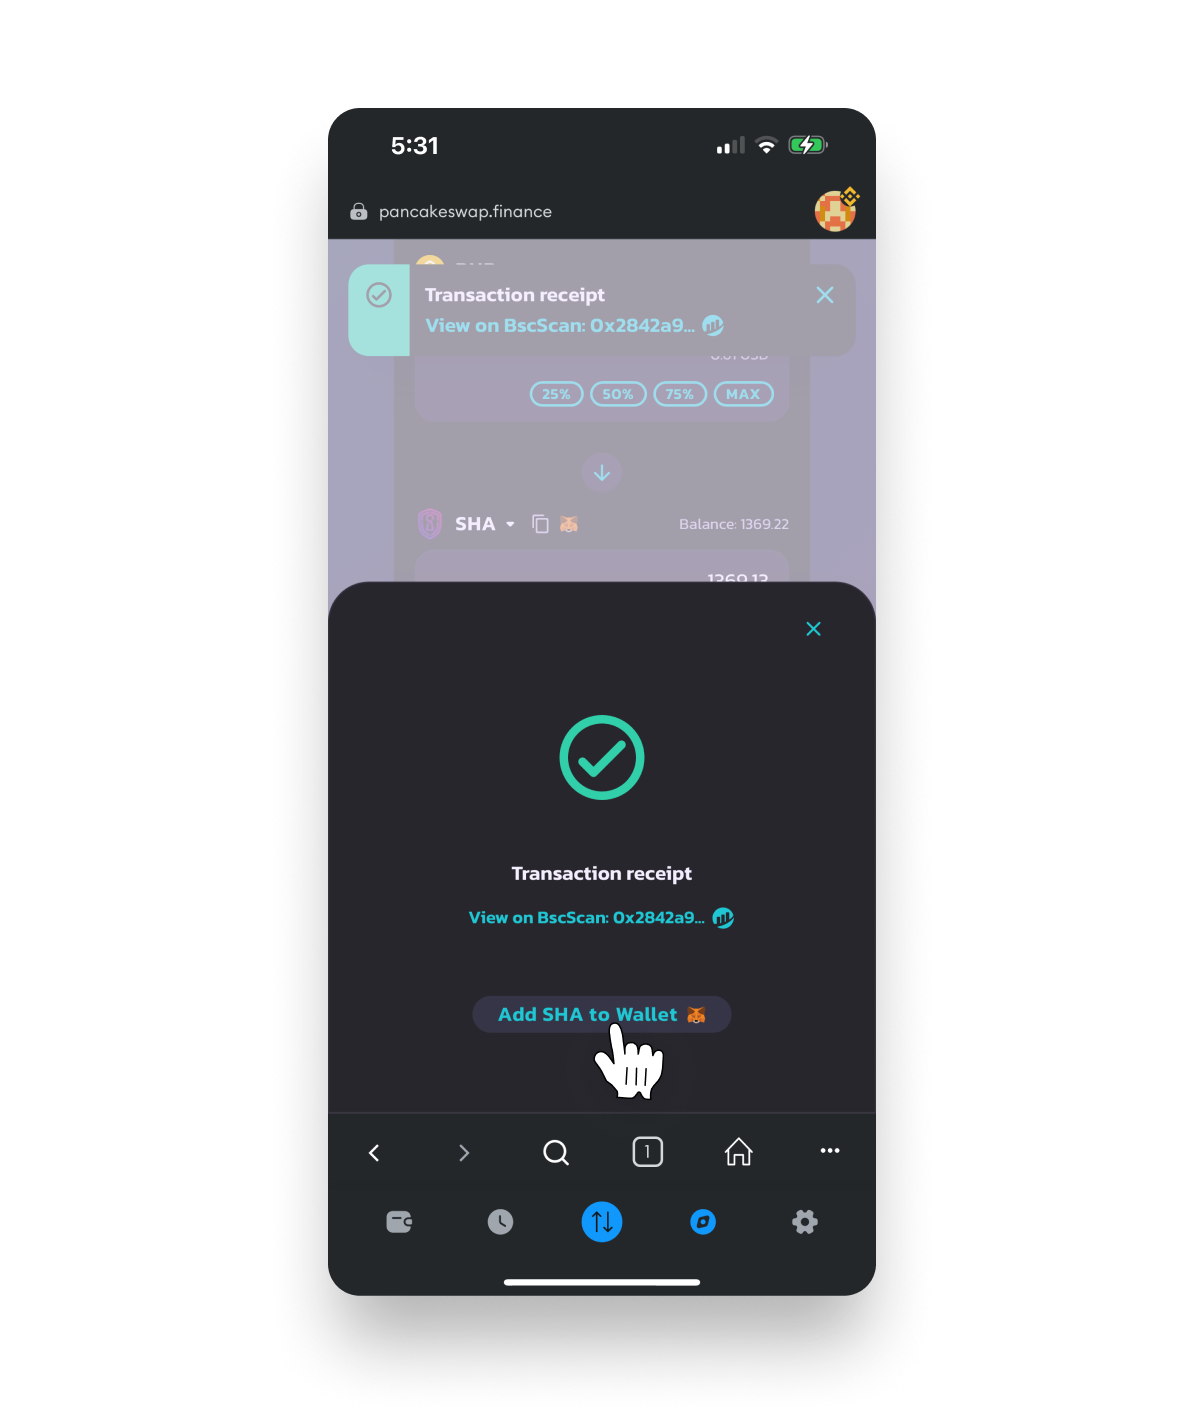
On occasion, tokens do not appear immediately in your wallet. Follow these simple steps to display your recently acquired token.
- 1. Tap the Add SHA to Wallet button.
- 2. Tap the Add Token button.
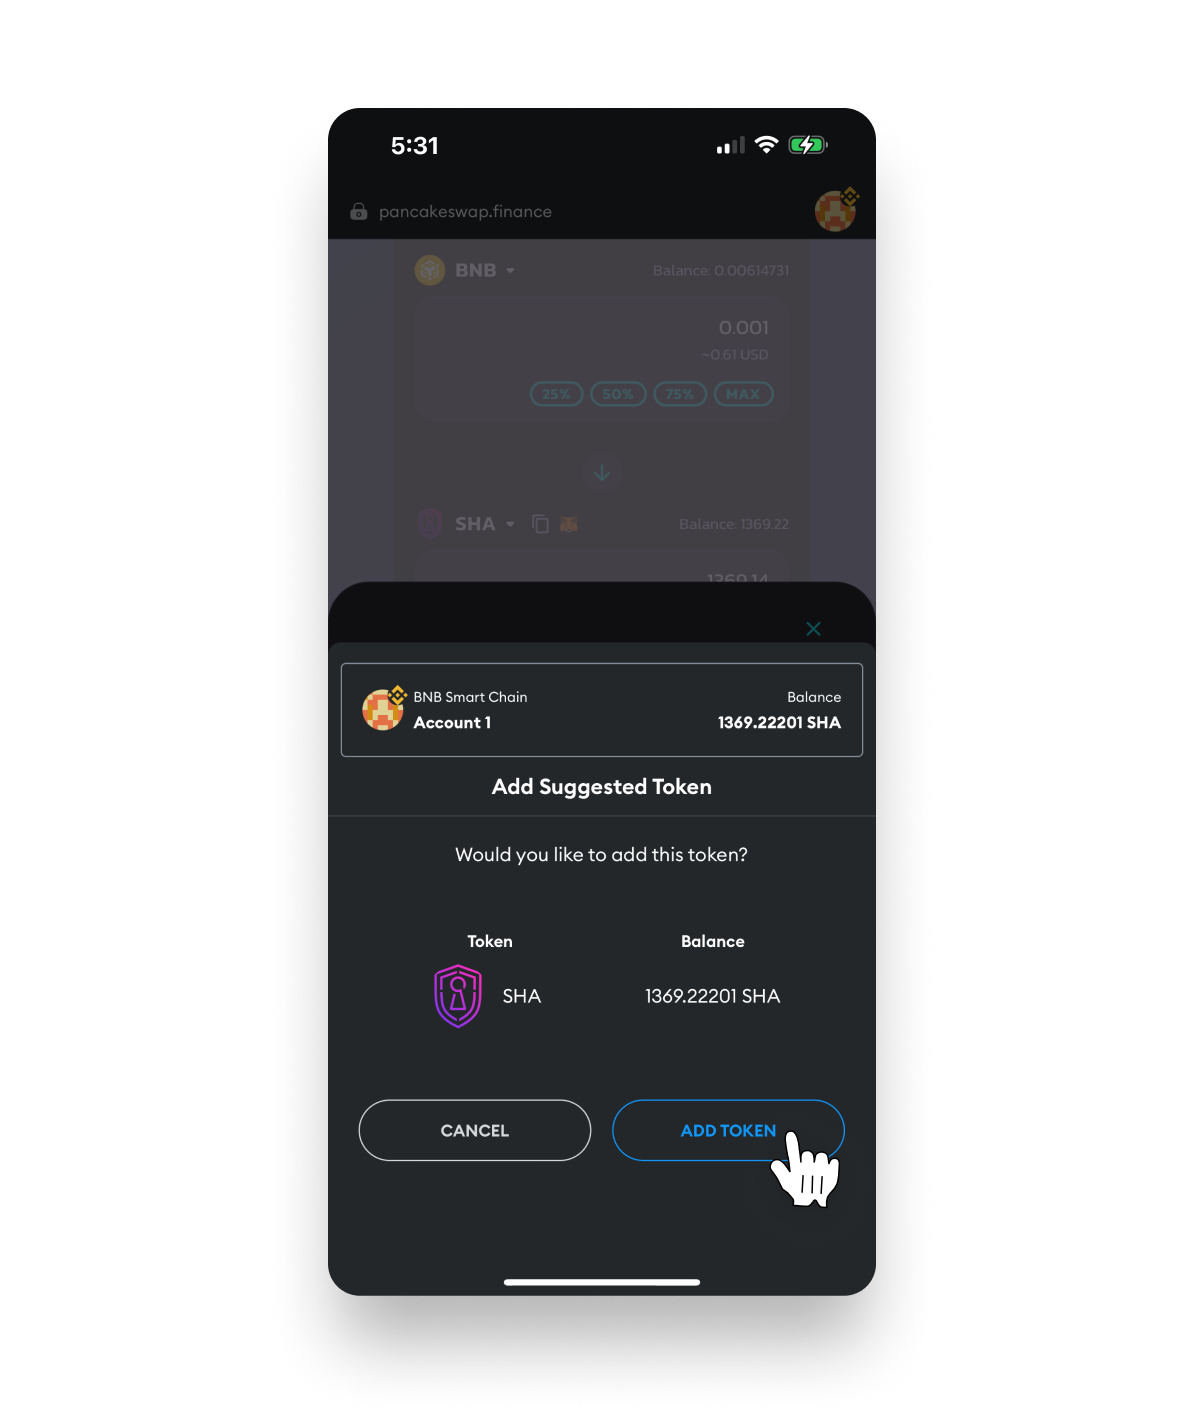
- 3. Your $SHA are now visible in your wallet.

✅ Congratulations! You have successfully purchased $SHA via PancakeSwap.
✳️ Go cross-chain: Use SafeSwap to bridge your SHA (BEP20) to SHA (vechain).
Back to news